AdSense Mobile Ad

Tuesday, November 16, 2010

Atlassian JIRA Configuration Tutorial: JIRA Schemes (Part 2)


In the first part of this tutorial we learnt the importance of JIRA schemes and how to configure some of them:
  • Issue type scheme.
  • Issue type screen scheme.
  • Field configuration scheme.
  • Screen scheme.

In the second part of this tutorial we'll discover other types of schemes that JIRA provides to fine tune our projects:
  • Permission scheme.
  • Issue security scheme.

These schemes are used to tune the security policies you may want to establish over your JIRA instance, your projects and the issues they manage.

Before You Start

If you haven't done it yet, please read: Atlassian JIRA Configuration Tutorial: Overview of JIRA Security.

Permission Scheme

An introductory discussion about JIRA security and JIRA permissions is the subject of another blog post.

A permission scheme defines a the set of permissions to apply to a project.


A Use Case

The default JIRA permission scheme distinguishes between the following project roles:
  • Administrators
  • Users
  • Developers

Users are granted the right of submitting issues into project (Create issues, Create comments, etc.) while developers are granted the right of working on issues and take them into completion (Edit issues, Close issues, etc.).

This is a starting point for refining your security policies adding actors (a project role) in your process and assigning them permissions. A first refinement might be requiring a project manager to check the developers' work on an issue before transitioning into the Closed state and letting developers transition an issue only up to the Resolved state.

How To Setup a Permission Scheme for Your Project

To setup a permission scheme for your project:
  • Define the project roles your project needs: this is an optional step, since you can assign permissions to users and groups, but it's desirable to clearly organize JIRA users in sets (project roles) according to their status in each project.
  • Assign users and groups to your project roles.
  • Create a permission scheme for your project (possibly copying an existing permission scheme).
  • Assign permissions to users, groups and project roles in the permission scheme.
  • Assign the permission scheme to your project.

Issue Security Scheme

As we've seen in another post of this series, issue security scheme let administrators establish security policies to protect issues in a project. An issue security scheme defines a set of security levels and grants permissions to a set of identities to access issues in a given security level.


A Use Case

Issues in your projects could be organized in security level so that the visibility of certain issues is reduced to a subset of the users that can access a project.

In another scenario you could be sharing a project with some of your clients and would not like a client of yours having visibility of all of the issues managed in that project for confidentiality reasons.

An issue may be changing security level according to the workflow transitions it performed: just after creation, an issue could be transitioned to another security level so that a subset of users (such as a group of developers) might asses the issue and decide what to do with it. In a later time, the issue can be transitioned to another security level to be available to a wider audience.

How to Setup an Issue Security Level for Your Project

To setup an issue security scheme for a project of yours you have to:
  • Create a new issue security scheme.
  • Define the number of security level your project needs and create them in the issue security scheme.
  • Grant permissions to a set of users for every security level in your scheme
  • Assign the issue security scheme to your project.

Next Steps

In the following part of this series we'll explore the last two kinds of schemes that JIRA provides: the workflow scheme and the notification scheme.



Monday, November 15, 2010

Upgrading OpenSolaris to Oracle Solaris 11 Express

Today Oracle released Solaris 11 Express and, as described in the Getting Started Guide, there's plenty of installation options:
  • An interactive GUI installer in a LiveCD.
  • A text installer.
  • An automated installer.
  • An upgrade path from OpenSolaris.

Yes. If you're running some OpenSolaris machines while waiting for the release that never came, here's the option for you. The upgrade instructions are detailed in the Solaris 11 Express Release Notes:
  • If your preferred publisher is not opensolaris.org (release), set it:

# pkg set-publisher -P -O http://pkg.opensolaris.org/release/ opensolaris.org

  • Perform an image-update:

# pkg image-update

  • Reboot into the new boot environment.
  • Set the new publishers:

# pkg set-publisher --non-sticky opensolaris.org
# pkg set-publisher --non-sticky extra
# pkg set-publisher -P -g http://pkg.oracle.com/solaris/release/ solaris

  • Read the license:

# pkg image-update 2>&1 | less

  • If you accept the license, perform the last image-update:

# pkg image-update --accept

  • Reboot into your brand new Oracle Solaris 11 Express boot environment

Oracle Releases Oracle Solaris 11 Express (2010.11)

More than one year after the latest and last OpenSolaris build (2009.06) was released Oracle has finally released a new snapshot of the next generation Solaris 11 Operating System: Solaris 11 Express (snv_151a).

Solaris Express is now available as:
  • A text installer: this installer does not install any window manager but it can be easily installed using the Solaris package manager (pkg).
  • A LiveCD with a GUI installer (does install the GNOME Desktop Environment).
  • An automated installer for network deployments.
  • USB install images.

If you want to discover what's new in this release, have a look at this presentation. The most important features I was waiting for are:
  • Boot Environments.
  • Fast Reboot.
  • IPS packaging system.
  • Boot Environments for Zones.
  • ZFS as the default file system.
  • ZFS deduplication.
  • ZFS diff.
  • ZFS dataset encryption.
  • Network virtualization (Project Crossbow).

Sunday, November 14, 2010

Atlassian JIRA Configuration Tutorial: Overview of JIRA Security


JIRA flexibility is notorious and its security features are no exception. This blog post is an overview of JIRA security features and how to configure permissions to secure JIRA, your projects and all of your issues.

Users, Groups and Project Roles

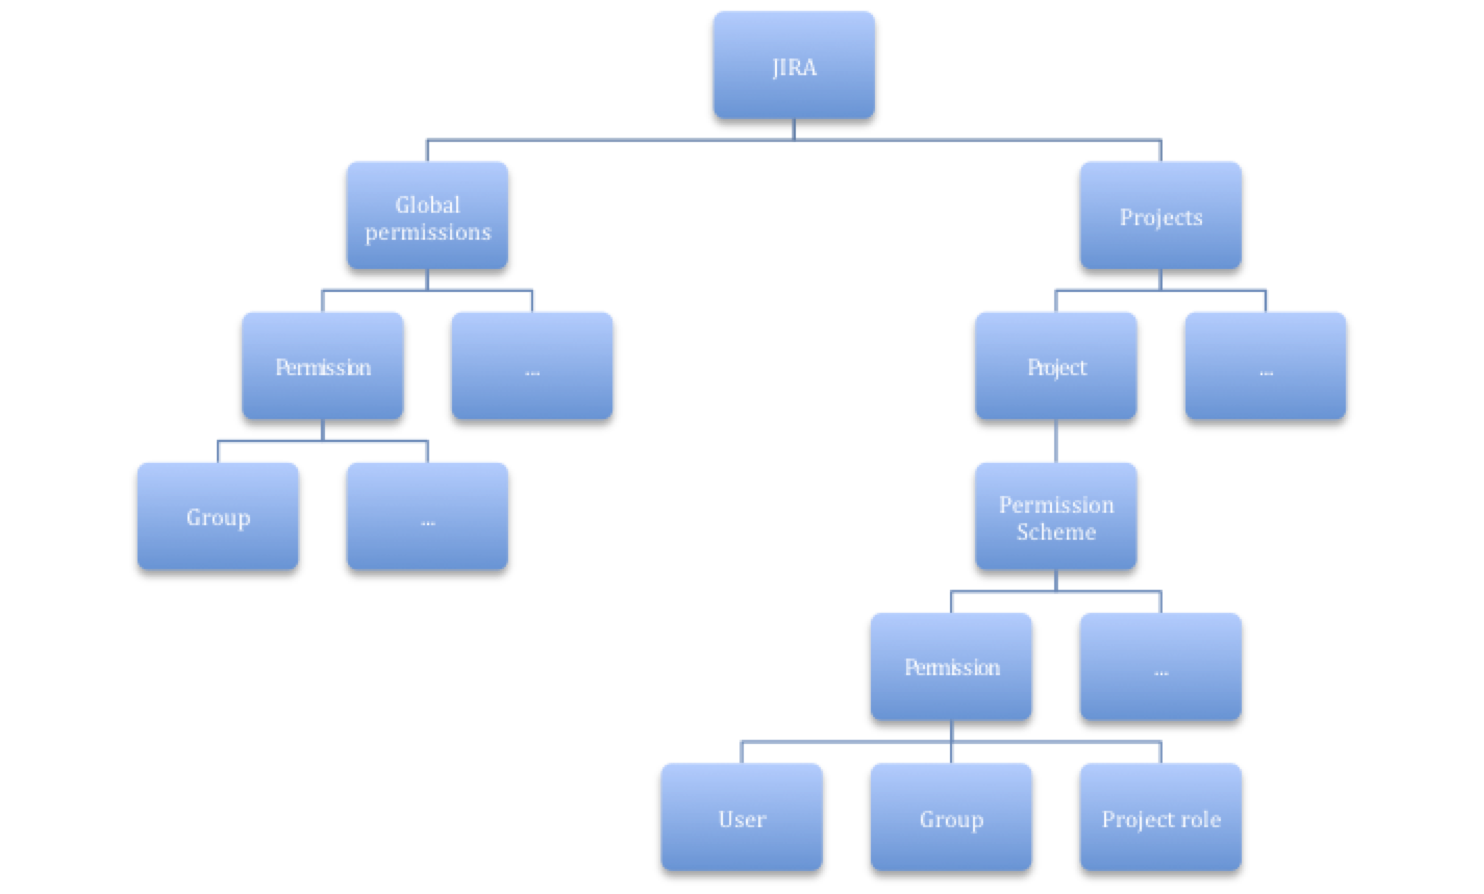
At the global level, JIRA organizes users into groups and project roles. Groups are named sets of users and project roles are named sets of users and groups:


The administrator can create, edit an delete any number of users, groups and project roles.

Although, at first, the existence of both groups and project roles might seem redundant, project roles are important since they provide an additional level of indirection to decouple permissions from user accounts in a project. JIRA permissions at the global level (Global Permissions) can only be granted to groups. JIRA permissions at the project level can be granted at any combination of users, groups and project roles. An effective organization of your users (and groups) into project roles will help you create and maintain clean security policies in your project by:
  • Defining the project roles you need.
  • Assigning permissions to your project roles in a permission scheme.
  • Assign a permission scheme to a project.

At the global level, to ease administration of a great number of projects, JIRA lets you define a project role's default members.

Global JIRA Permissions

Global JIRA permissions are (as of JIRA 4.2):
  • JIRA System Administrators.
  • JIRA Administrators.
  • JIRA Users.
  • Browse Users.
  • Create Shared Objects.
  • Manage Group Filter Subscriptions.
  • Bulk Change.

Most of them are self-explanatory and further information about each of them can be found in the official JIRA documentation.

JIRA Users

This permission is required for users to be able to log in into JIRA. By default, groups that are granted this permissions will be assigned to any newly created user.

Disabling a User

Revoking this permission to a user, that is removing the users from every group that is granted the JIRA Users permission, will effectively disable the user and it won't count against your JIRA license limit.

Project Permissions

Project permissions are defined by JIRA and can be granted to an identity in a permission scheme. Assigning a permission scheme to a project will make those permissions effective in that project context.

Examples of most commonly used permissions are:
  • Administer project
  • Browse project
  • Create issue
  • Edit issue
  • Resolve issue
  • Close issue
  • Add comment
  • Delete comment
  • Work on issues

For the complete list of permissions for a given JIRA version please check JIRA documentation or navigate to the Edit Permissions window of your JIRA installation accessible at the following URL:

http://your.jira/secure/admin/EditPermissions!default.jspa?schemeId=0

Further information about assigning project permissions to users, please check out this blog post.

Securing Workflow Transitions

The permissions seen so far make no mention of workflows and workflow transitions. Obviously, workflows are a fundamental part of JIRA functionality and it's essential for an administrator to be able to establish security policies at the workflow transition level.

Permission requirements can be associated to workflow transition using Conditions.

Conditions

Conditions essentially are validation rules that must be satisfied for a workflow transition to be executed. JIRA ships many built in conditions and many of them can be used to establish fine tuned security policies at a workflow transition level. The available security-related workflow transition conditions are (as of JIRA 4.2):
  • Only assignee.
  • Only reporter.
  • Permission.
  • User in group.
  • User in group custom field.
  • User in project role.

These conditions can be used to build security policies using any kind of identity seen so far: group and project role. Moreover, other identities related to a specific issue are available such as assignee and reporter.

Conditions are basic JIRA-provided parametrizable propositions that can be used to build more complex statements using the JIRA administration console.

Validators

Validators are similar to conditions with the difference that validators are executed against input parameters. As far as it concerns security policies, conditions is the way to go. Anyway, a Permission validator is available to check if the current user has a specific permission.

Securing Issues in a Project

We've seen many ways an administrator can secure its JIRA installation so far: at the global level, at the project level and at the workflow transaction level. There's case we haven't considered yet, though: applying distinct security policies to issues inside a project.

To achieve this goal in a flexible way, JIRA provides the ability to categorize a project's issues in the so-called security levels. A security level is an attribute of an issue that can be set in the usual ways:
  • By using a screen that configured to edit such a field.
  • By a workflow transaction.

An issue in a security level can be accessed only by identities (users, groups or project roles) that are granted permissions. The link between a security level and the identities that are granted access is established by means of an issue security scheme.


As usual, as soon as a project is associated to a security scheme, the scheme security policies are enforced. You can now create as many security level as your project needs and grant permissions to the corresponding users for every security level.

The available identities to grant permissions to in a security level are:
  • Reporter.
  • Group.
  • Single User.
  • Project Lead.
  • Assignee.
  • User custom field value.
  • Project role.
  • Group custom field value.

Next Steps

In this blog post we've introduced the facilities that JIRA provides to secure the operations it offers and the object it manages with flexible security policies.

In the next part of this series we'll examine what JIRA schemes are and how they can be used to decouple configurations from the context in which they are applied.


OpenSolaris (and OpenIndiana) Spends 50% of CPU Time in Kernel

A couple of days ago my client decided to prepare some new Java EE development environments and, when asked about which OS to choose, I suggested that he gave Solaris a try: since my client production servers run Solaris 10, he would benefit from a more homogeneous set of environments.

We installed a couple of test machines, one with Solaris 10 and another with OpenSolaris 2009.06, and we began installing the development environments and the required runtime components. The installation packages were SVR4: installation went straightforward on Solaris 10 while on OpenSolaris we had to resolve a couple of glitches. After a couple of day, test users were inclined towards OpenSolaris mostly because of its newer desktop environment: we started installing the remaining machines and started upgrading OpenSolaris to the latest dev release (b134).

Reduced Performance: CPU Time in Kernel When Idle 

The latest OpenSolaris dev release (b134) has got some known issues I wasn't concerned with since I already fought with in the past and can easily be resolved.

The surprise was discovering that all of the upgraded machines were affected by another problem: as soon as users rebooted into their b134 boot environment, the performance of the machine seemed to be pretty worse than when using the oldest (b111) boot environment.

prstat was showing no misbehaving process while vmstat indicated that the system was spending a constant 50% of the time in the kernel. With a quick search I easily pointed out this bug:


Repeating the steps outlined in the bug discussion confirmed me that we were hitting the same bug. We thus disabled cpupm in /etc/power.conf and the problem disappeared.

Upgrading to OpenIndiana

Although the bug is still listed as ACCEPTED, we decided to give OpenIndiana a try and upgrade a machine following the upgrade path from OpenSolaris b134. The upgrade went smooth and in no time we were rebooting into OpenIndiana b147.

The cpupm bug is still there, though. Nevertheless, it's a great opportunity for my client to test drive OpenIndiana and decide if it fits its needs. Nowadays, users will appreciate almost no differences between OpenSolaris and OpenIndiana (except for the branding.) As time goes by, we'll discover if and when Oracle will put back sources into OpenSolaris or if OpenIndiana is destined to diverge from its step-brother.