When I started having the need of decoding JSON Web Tokens quite often, I felt the urge of writing a program that allowed me to do it quickly. There are excellent options, such as jwt.io, but as soon as you need to do this operation often it becomes clumsy. And if you need to process multiple tokens, or further process the output, it becomes a necessity.
That's why I wrote a little shell script that allows you to do just that. jwt-decode will accept a list of tokens as arguments and will decode them on standard output. The syntax is the following:
$ jwt-decode token ...
{
"alg": "RS256",
"typ": "JWT",
"kid": "sbS_BWBm0GzfIQRnYWolcWDRnjqwDTY_Aq6Fn_boqKM"
}
{
"jti": "271151a3-db11-4f37-a724-4cf9957774f4",
"exp": 1530979706,
"nbf": 0,
"iat": 1523117306,
"iss": "https://domain.com/auth/realms/realm",
"aud": "app-name",
"sub": "5132c417-d772-420e-b5db-401ea633dca1",
"typ": "Bearer",
"azp": "app",
"auth_time": 0,
"session_state": "84e6a759-e54d-4fd7-9fcf-bb51131aab89",
"acr": "1",
"allowed-origins": [
""
],
"realm_access": {
"roles": [
"role0",
"role1",
"role2"
]
},
"resource_access": {
"account": {
"roles": [
"manage-account",
"manage-account-links",
"view-profile"
]
}
},
"custom-property": "1797"
}
...
You can find jwt-cli on GitHub.
Saturday, April 14, 2018
Monday, January 1, 2018
tm-cleanup.sh: A Shell Script to Delete Old Time Machine Backups Now Features an Interactive Interface
More than two years ago I wrote tm-cleanup.sh, a shell script to delete Time Machine backups. During this time it has proven very useful to me, and it's been serving its purpose as it is, with barely any modification at all.
However, I've been asked for help and clarifications quite a number of times by non-tech-savvy users who had some issues using the CLI. For this reason I thought that adding an interactive, dialog-based interface to this script may help people "visualise" what's going on when running tm-cleanup.sh.
The new interface has been added in v. 2.0.0, and can be opened by simply issuing the following command with no options:
$ sudo tm-cleanup.sh
The interactive interface opens a menu where the backup deletion operation can be triggered. The user is then presented the list of existing Time Machine backups and they can be individually selected and then deleted. Here's a screenshot of the interface showing the existing backups:
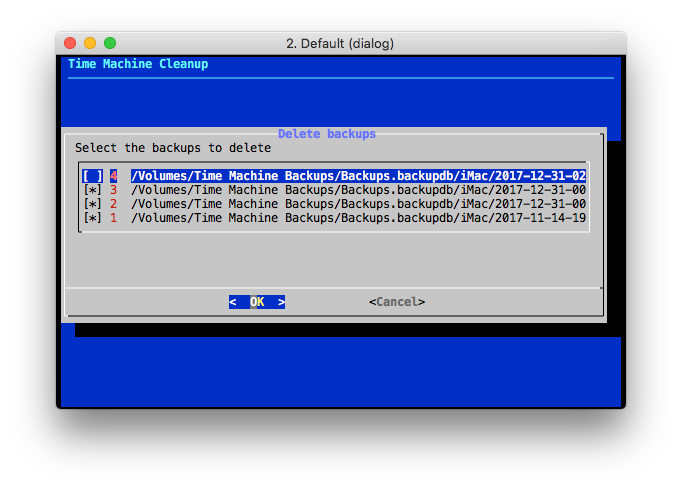
The documentation of the repository describes in detail both interfaces. I hope people will find it useful.
However, I've been asked for help and clarifications quite a number of times by non-tech-savvy users who had some issues using the CLI. For this reason I thought that adding an interactive, dialog-based interface to this script may help people "visualise" what's going on when running tm-cleanup.sh.
The new interface has been added in v. 2.0.0, and can be opened by simply issuing the following command with no options:
$ sudo tm-cleanup.sh
The interactive interface opens a menu where the backup deletion operation can be triggered. The user is then presented the list of existing Time Machine backups and they can be individually selected and then deleted. Here's a screenshot of the interface showing the existing backups:
The documentation of the repository describes in detail both interfaces. I hope people will find it useful.
Thursday, December 21, 2017
Starting an Emacs Daemon Automatically and Transparently using ZSH
If GNU Emacs is one of your editors of choice, then you may want to consider running Emacs as a server. Using an Emacs server is very convenient, especially if you open many Emacs processes (as it happens when the EDITOR variable is set to emacs in your shell). The reasons why you would use an Emacs server are manifold, and the most important are:
- Using an Emacs server results in a great increase in speed and responsiveness of Emacs.
- The fact that sharing the same Emacs process implies sharing buffers, command history, and many other information.
Starting an Emacs Server
An Emacs server can be started in two ways:- Running Emacs as a daemon, using the --daemon option:
$ emacs --daemon
- By launching it from inside an Emacs process using the server-start function:
M-x server-start
Once an Emacs server is running, you can use the emacsclient program to tell a running Emacs server to visit a file. The server and the client are quite sophisticated, and you can use them for example to connect a client to a server running on a remote machine. Most of the time, however, you'll be running the daemon and the client on the same host.
A question I get often is: how to start the server if it's not running and then connect to it? I've seen a lot of solutions to this problem, and probably one of the commonest is starting an Emacs server at login, and then using emacsclient to connect to it.
There's a fundamental thing I don't like about it: it's not transparent. However, since it's a very common approach, I'll quickly document how it's accomplished on macOS.
Starting an Emacs Daemon on macOS at Login
The canonical way to start a process when a user logs in on macOS is using launchd. launchd is the "system wide and per-user daemon/agent manager" and it "manages processes, both for the system as a whole and for individual users" (launchd(8) man page). The processes to be started at user login are called launch agents and are defined in plist files in the ~/Library/LaunchAgents directory.
The easiest way to start an Emacs server, then, is to launch emacs with the --daemon option. The corresponding launch agent file is the following:
Note: the emacs path and the UserName element must contain correct values for your system.
Once the launch agent descriptor has been created, it can be loaded using the following command:
# launchctl load -w /Library/LaunchAgents/gnu.emacs.daemon.plist
This solution is fine, but it has two major disadvantages: it requires a configuration, and the configuration is non-portable.
Fortunately, this is very easy to accomplish with emacsclient and ZSH:
Once the launch agent descriptor has been created, it can be loaded using the following command:
# launchctl load -w /Library/LaunchAgents/gnu.emacs.daemon.plist
This solution is fine, but it has two major disadvantages: it requires a configuration, and the configuration is non-portable.
Starting an Emacs Daemon On-Demand and Transparently
A simpler and portable solution (provided you're using ZSH) is leveraging emacsclient's ability to start a daemon if none is found in a ZSH function. Instead of having to explicitly use emacsclient after a server has been started, wouldn't it be nice to always use the same command, start a server if none is running, and connect to it transparently? Assuming we can do that, why not just calling this command emacs?Fortunately, this is very easy to accomplish with emacsclient and ZSH:
- emacsclient is able to start an Emacs daemon if none is running using the -a option with an empty argument.
- emacsclient can be invoked without a file name when the -c option is used, in which case a new frame showing the *scratch* buffer is created, mimicking emacs behaviour.
- ZSH lets us easily create "aliases on steroids" using a function such as the following:
Now, every time you invoke emacs in ZSH, the shell will run the emacs() function instead, which will run emacsclient -c -a= and will forward all its arguments to it.
When using an Emacs daemon there are some things to take into account. And that's what the official documentation is for. I will only say that since you are now sharing a single Emacs process, its frames and its buffers, you may now want to use C-x # when done with a buffer (or C-x C-k). This way you will kill the buffer and it won't be left hanging around.
When using an Emacs daemon there are some things to take into account. And that's what the official documentation is for. I will only say that since you are now sharing a single Emacs process, its frames and its buffers, you may now want to use C-x # when done with a buffer (or C-x C-k). This way you will kill the buffer and it won't be left hanging around.
Monday, November 27, 2017
Installing macOS High Sierra from Scratch: Not So Good a User Experience
One week ago a MacBook Pro of a relative of mine stopped booting. The symptoms indicated a hard disk failure, and the diagnosis confirmed it. I ordered a replacement drive on Amazon and I decided to allocate 30 minutes of a bright Saturday morning to fix it. The procedure should have been very simple:
- Create a bootable image of the latest macOS (High Sierra).
- In the meantime, swap the hard disk in the MacBook Pro (a procedure that hardly takes more than 10 minutes on a MacBook with a serviceable hard disk drive such as this one).
- Boot from an external device.
- Launch the installation.
- Go out and run.
Unfortunately, it took at least twice the estimated time and three macOS installation attempts.
Attempt 1: Launching the macOS Installer
The MacBook Pro booted the base system correctly from the external device, but when I launched the installer, it failed with the following message:
This copy of the Install macOS High Sierra.app application is damaged and can't be used to install macOS.
A quick search confirmed that this error frequently appears since macOS Sierra and the workarounds I found are quite imaginative. Apparently, many people thinks the installer is actually broken and are trying to download it again. Fortunately, it didn't take that much time to fix the problem. A post on the Apple website described the same problem (although on Sierra) and its solution (after several calls to Apple customer support, according to the author): deleting the ./Contents/SharedSupport/InstallInfo.plist from the bootable image should do the trick. And it did.
Attempt 2: Launching the macOS Installer
The second attempt looked promising: the installer now launched correctly. Unfortunately, it failed on the second screen with the following message:
The recovery server could not be contacted.
The first thing I do in these cases is open a terminal and perform basic checks. The second check I made caught the problem: the system was reporting January, 1st 2001 as the current date. Therefore, most probably, the HTTPS connection to the recovery server was failing because the certificate check was failing (chances are the validity period of that certificate appeared to be in the future).
I fixed the date using the date command and restarted the macOS installer.
Attempt 3: Finding the Hard Disk Drive
The installer was now working, but it couldn't find any disk to install the system. I quitted the installer (for the third time) and opened Disk Utility. To my surprise, Disk Utility couldn't find any internal disk either. Again, a quick search confirmed the obvious: High Sierra's Disk Utility doesn't recognise unformatted internal drives. I opened the terminal again in order to quickly format the drive:
- First of all, confirm the disk is available and its device name:
$ diskutil list
/dev/disk0 (internal, physical):
[...snip...]
- Then, format it to make it available to Disk Utility:
$ diskutil eraseDisk JHFS+ NewDisk GPT disk0
Disk Utility could now see the device. I reformatted it using APFS, restarted the installer again and this time the I successfully made it to the end of the installation.
Final Thoughts
I never needed to reinstall OS X or macOS on any of the three computers I owned in the last 10 years: this was the first macOS installation from scratch I performed in a very long time. However, the three errors I experienced have three characteristics in common which make this experience unsettling:
- They are obscure and difficult to troubleshoot. I bet most non-tech-savvy user would have to ask for help.
- They have been known for years.
- They are, or seem to be, easily solvable. The date problem, for instance: why wouldn't an installer which requires a working Internet connection not synchronise the current time using NTP?
Come on Apple, you can do better than this.
Saturday, November 18, 2017
Making Native Language Support (NLS) and gettext Optional
I've decided to write this blog post after noticing how many people were asking me to make gettext optional when building fswatch. At the beginning I actually thought it was optional. And I never dug any deeper into the matter because, apparently, everybody experiencing this problem was building fswatch from the repository sources instead of building it from a release tar-ball. I would typically answer to build the release tar-ball instead and I would hear no more complaints.
Making gettext optional is easy, and should be a best practice when writing a piece of software. However, I've seen so many questions in the Internet about this topic that I've decided to write a blog post where I would outline the reasons why you should do it and how you should do it using the GNU Autotools.
The Autotools are not required by end users. The scripts generated by the Autotools are fully independent from them. These script are then bundled with the sources (in a distribution) which is often called a release tar-ball.
As you can see, the goal of the Autotools is making users' life simple, not maintainers'. In fact, maintainers need to have the Autotools components they use in order to generate a distribution. These are the sources you typically find in a package repository such as fswatch. That's why you don't find any configure script in the source repository: it's created when a release is created and a distribution is packaged.
Perhaps not surprisingly, GNU gettext is one of the components software authors may use conditionally. configure would then check the build environment to detect the availability of all the required gettext components and enable Native Language Support (NLS) if all checks succeed.
It goes without saying that the maintainers do need gettext installed in their machines in order to be able to use these macros, to create the configuration scripts and to create a package distribution.
All the other Makefile fragments required to use gettext, such as defining the LOCALEDIR to load catalog files and linking against libintl, do not need to be modified. Even if always adding @LTLIBINTL@ to LDADD may seem odd at first, the Autoconf output variable LTLIBINTL is documented to expand to an empty string when NLS is not being used.
# Prepare gettext-related symbols used by programs
AM_CPPFLAGS += -DLOCALEDIR=\"$(localedir)\"
# Link program against libintl if gettext is being used
prog_LDADD += @LTLIBINTL@
Making gettext optional is easy, and should be a best practice when writing a piece of software. However, I've seen so many questions in the Internet about this topic that I've decided to write a blog post where I would outline the reasons why you should do it and how you should do it using the GNU Autotools.
So, What's the Issue With Building From Repository Sources?
Actually there's no issue. But probably many people asking that question don't know how the Autotools work. Autoconf is a tool whose goal is producing scripts (the ubiquitous configure script) that configure the source code before building it to adapt it to the characteristics of the current system. In a typical flow the user does nothing but running configure. The script will run and will test for the presence of all the features requested by the author. The presence of a feature, or its lack thereof, can then be used to parametrise Makefiles, or more generally, be used to conditionally drive the execution of other tests or scripts.The Autotools are not required by end users. The scripts generated by the Autotools are fully independent from them. These script are then bundled with the sources (in a distribution) which is often called a release tar-ball.
As you can see, the goal of the Autotools is making users' life simple, not maintainers'. In fact, maintainers need to have the Autotools components they use in order to generate a distribution. These are the sources you typically find in a package repository such as fswatch. That's why you don't find any configure script in the source repository: it's created when a release is created and a distribution is packaged.
Perhaps not surprisingly, GNU gettext is one of the components software authors may use conditionally. configure would then check the build environment to detect the availability of all the required gettext components and enable Native Language Support (NLS) if all checks succeed.
What's Special About Gettext?
This Autotools overview doesn't explain, though, what's the issue about gettext. If it's just one of the many configuration checks performed by configure, what's the relationship with the Autotools and the repository sources? The answer is that gettext provides a tight integration with the Autotools, in the form of ready to use Autoconf and Automake macros to support the gettext operations during a normal workflow, such as:- Extracting strings from sources.
- Creating template files (POT files).
- Creating translation files (PO files).
- Updating template files.
- Merging changes into translation files.
- Compiling translation files into message catalogs.
- Shipping required files in a distribution.
- Installing message catalogs.
It goes without saying that the maintainers do need gettext installed in their machines in order to be able to use these macros, to create the configuration scripts and to create a package distribution.
Making gettext Optional
To make gettext optional, we have to perform at least these operations in the Autoconf configuration file (configure.ac):- Use the AM_GNU_GETTEXT macro to check whether NLS should be used. If it should be used, the USE_NLS variable would be set to yes.
- Create an Automake conditional to propagate this information to the Makefiles, perhaps using something in the lines of:
AM_GNU_GETTEXT([external])
AM_GNU_GETTEXT_VERSION([0.19.4])
AM_CONDITIONAL([USE_NLS], [test "x${USE_NLS}" = "xyes"])
AM_GNU_GETTEXT_VERSION([0.19.4])
AM_CONDITIONAL([USE_NLS], [test "x${USE_NLS}" = "xyes"])
In the Makefiles, we have to leverage these information to:
- Conditionally distribute NLS-related files such as ABOUT-NLS:
if USE_NLS
dist_doc_DATA += ABOUT-NLS
endif
dist_doc_DATA += ABOUT-NLS
endif
- Conditionally execute NLS-related targets. What I typically do is segregating all NLS-related stuff in a directory (po) which is conditionally processed by the Makefile:
if USE_NLS
PO_SUBDIR = po
endif
SUBDIRS = other_paths $(PO_SUBDIR)
# Prepare gettext-related symbols used by programs
AM_CPPFLAGS += -DLOCALEDIR=\"$(localedir)\"
# Link program against libintl if gettext is being used
prog_LDADD += @LTLIBINTL@
Conclusion
This is all that's required to make gettext optional in your Autotools package. With these few changes, users will now be able to let configure automatically determine whether to enable or disable NLS, and even disabling it using the --disable-nls option:
$ ./configure --disable-nls
Subscribe to:
Posts (Atom)