When I started having the need of decoding JSON Web Tokens quite often, I felt the urge of writing a program that allowed me to do it quickly. There are excellent options, such as jwt.io, but as soon as you need to do this operation often it becomes clumsy. And if you need to process multiple tokens, or further process the output, it becomes a necessity.
That's why I wrote a little shell script that allows you to do just that. jwt-decode will accept a list of tokens as arguments and will decode them on standard output. The syntax is the following:
$ jwt-decode token ...
{
"alg": "RS256",
"typ": "JWT",
"kid": "sbS_BWBm0GzfIQRnYWolcWDRnjqwDTY_Aq6Fn_boqKM"
}
{
"jti": "271151a3-db11-4f37-a724-4cf9957774f4",
"exp": 1530979706,
"nbf": 0,
"iat": 1523117306,
"iss": "https://domain.com/auth/realms/realm",
"aud": "app-name",
"sub": "5132c417-d772-420e-b5db-401ea633dca1",
"typ": "Bearer",
"azp": "app",
"auth_time": 0,
"session_state": "84e6a759-e54d-4fd7-9fcf-bb51131aab89",
"acr": "1",
"allowed-origins": [
""
],
"realm_access": {
"roles": [
"role0",
"role1",
"role2"
]
},
"resource_access": {
"account": {
"roles": [
"manage-account",
"manage-account-links",
"view-profile"
]
}
},
"custom-property": "1797"
}
...
You can find jwt-cli on GitHub.
Showing posts with label shell scripts. Show all posts
Showing posts with label shell scripts. Show all posts
Saturday, April 14, 2018


Monday, January 1, 2018
tm-cleanup.sh: A Shell Script to Delete Old Time Machine Backups Now Features an Interactive Interface
More than two years ago I wrote tm-cleanup.sh, a shell script to delete Time Machine backups. During this time it has proven very useful to me, and it's been serving its purpose as it is, with barely any modification at all.
However, I've been asked for help and clarifications quite a number of times by non-tech-savvy users who had some issues using the CLI. For this reason I thought that adding an interactive, dialog-based interface to this script may help people "visualise" what's going on when running tm-cleanup.sh.
The new interface has been added in v. 2.0.0, and can be opened by simply issuing the following command with no options:
$ sudo tm-cleanup.sh
The interactive interface opens a menu where the backup deletion operation can be triggered. The user is then presented the list of existing Time Machine backups and they can be individually selected and then deleted. Here's a screenshot of the interface showing the existing backups:
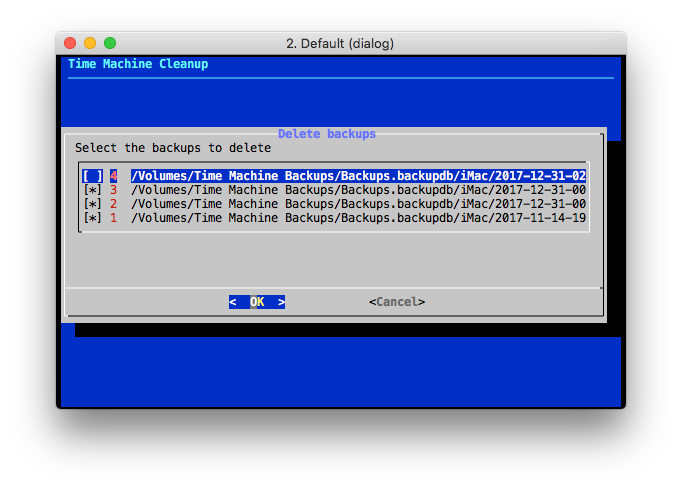
The documentation of the repository describes in detail both interfaces. I hope people will find it useful.
However, I've been asked for help and clarifications quite a number of times by non-tech-savvy users who had some issues using the CLI. For this reason I thought that adding an interactive, dialog-based interface to this script may help people "visualise" what's going on when running tm-cleanup.sh.
The new interface has been added in v. 2.0.0, and can be opened by simply issuing the following command with no options:
$ sudo tm-cleanup.sh
The interactive interface opens a menu where the backup deletion operation can be triggered. The user is then presented the list of existing Time Machine backups and they can be individually selected and then deleted. Here's a screenshot of the interface showing the existing backups:
The documentation of the repository describes in detail both interfaces. I hope people will find it useful.
Saturday, May 2, 2015
A Shell Script to Delete Old Time Machine Backups and Free Disk Space
In another post I described the procedure to manually delete Time Machine snapshots and optionally shrink the disk image (in case a sparse bundle is being used) in order to free up disk space.
I have written a shell script, tm-cleanup.sh, to automate the backup deletion. The script accepts an optional argument to specify the maximum backup age in days: older backups are deleted (by default, backups older than 30 days are deleted).
The latest version of the script can be obtained by cloning its GitHub repository and, optionally, run its installation script to create symbolic links to it into /usr/local/bin:
$ sudo make install
I have written a shell script, tm-cleanup.sh, to automate the backup deletion. The script accepts an optional argument to specify the maximum backup age in days: older backups are deleted (by default, backups older than 30 days are deleted).
The latest version of the script can be obtained by cloning its GitHub repository and, optionally, run its installation script to create symbolic links to it into /usr/local/bin:
$ sudo make install
Tuesday, September 28, 2010
Encoding an Unicode Character to UTF-8
Introduction
I'm living in an UTF-8 world. Everthing, from the operating systems I use (Solaris, Linux and Mac OS X) to my terminals. Even the file systems I use must be able to support the UTF-8 names I give to my files.UTF-8 is a flexible and well supported encoding for Unicode and it's supported, out of the box, on all the operating systems I use. UTF-8 allows me not to worry (ever) about the characters I use in file names or in the files I write. Being a native Italian living in Spain, it's essential for me to have an encoding that supports all of the languages I use in my daily file.
UTF-8 is the perfect solution: it's ASCII backwards compatible, so I need no conversion when writing ASCII files, and can encode every characters in the Unicode character set. No need to worry if one day I had to write some Japanese file name. The only "drawback" it may have it's a little space overhead compared to some other encodings (such as UTF-16) but in this particular case, UTF-8 beats them all.
In such an UTF-8 world, there's no need to worry: just use the tools you have and everything will be fine.
Well, almost. Sometimes, as described in that post, I need to know exactly how UTF-8 encodes a specific Unicode code point. Some other times, since I'm a sed and grep addict, it's really handy knowing what to look for. Some days ago, for example, I had look for file names that contained specific code points to correct an idiosyncrasy between Subversion and Mac OS X (I still cannot believe it...). In such a cases, an UNIX terminal and its utilities are really your best friends. Since the encoding process is very easy, I'm quickly describing it to you in the case you need it.
The UTF-8 Encoding
The UTF-8 encoding is a variable width encoding in which each Unicode code point can be encoded as a sequence of 1 to 4 octects. Each octect is composed by a heading byte and trailing bytes. Since the encoding is a variable width one, you need a way to tell where a sequence starts and where it ends. That information is stored in the head byte.Heading Byte
The head byte can take one of these forms:- 0xxxxxxx: Single byte.
- 110xxxxx: Head of a sequence of two bytes.
- 1110xxxx: Head of a sequence of three bytes.
- 11110xxx: Head of a sequence of four bytes.
You may have noticed that the number of 1s in a heading byte tells how long the sequence is. If the heading byte starts with 0, the sequence is single byte.
The 0xxxxxxx format guarantees that ASCII characters in the [0, 127] range are encoded by the identical function thus guaranteeing the backwards compatibility with ASCII.
Trailing Bytes
Trailing bytes in a multibyte UTF-8 sequence always have the following form:- 10xxxxxx
Encoding
The 0s and 1s in the heading and trailing bytes format described in the previous sections are called control bits. In the UTF-8 encoding, the concatenation of the non control bits is the scalar value of the encoded Unicode code point. Because of the structure of the aforementioned forms, the number of required bytes to encode a specific Unicode code point with UTF-8 depends on the Unicode range where it falls (the ranges are given both hexadecimal and binary forms:- [U+000, U+007F] [00000000, 01111111]: one byte.
- [U+0080, U+07FF] [10000000, 111 11111111]: two bytes.
- [U+0800, U+FFFF] [1000 00000000, 11111111 11111111]: three bytes.
- [U+10000, U+10FFFF] [1 00000000 00000000, 10000 00000000 00000000]: four bytes.
One Byte Range
In the one byte range, meaningful bits of the Unicode code points are in then [0, 6] range. Since the single byte form has a 1 bit overhead (the leading 0), a single byte is sufficient:[0xxxxxxx 0xxxxxxxx]
[00000000, 011111111]
Two Bytes Range
In the two bytes range, meaningful bits of the Unicode code points are in the [0, 10] range. Since the head of a sequence of two bytes has a 3 bits overhead and the form of a trailing byte has a 2 bits overhead, there's room for exactly 11 bits.[ fff ffssssss, fff ffssssss]
[00000000 10000000, 00000111 11111111]
(* f are bits from the first byte of the encoded sequence)
(** s are bits from the second byte of encoded the sequence)
The encoded sequence is:
[110fffff 10ssssss]
Three Bytes Range
In the three bytes range, meaningful bits of the Unicode code points are in the [0, 15] range. Since the head of a sequence of three bytes has a 4 bits overhead and the form of a trailing byte has a 2 bits overhead, there's room for exactly 16 bits.[ffffssss sstttttt, ffffssss sstttttt]
[00001000 00000000, 11111111 11111111]
(* f are bits from the first byte of the sequence)
(** s are bits from the second byte of the sequence)
(*** t are bits from the third byte of the sequence)
The encoded sequence is:
[1110ffff 10ssssss 10tttttt]
Four Bytes Range
In the four bytes range, meaningful bits of the Unicode code points are in the [0, 20] range. Since the head of a sequence of four bytes has a 5 bits overhead and the form of a trailing byte has a 2 bits overhead, there's room for exactly 21 bits.[ fffss sssstttt tthhhhhh, fffss sssstttt tthhhhhh]
[00000001 00000000 00000000, 00010000 11111111 11111111]
(* f are bits from the first byte of the sequence)
(** s are bits from the second byte of the sequence)
(*** t are bits from the third byte of the sequence)
(**** h are bits from the third byte of the sequence)
The encoded sequence is:
[11110fff 10ssssss 10tttttt 10hhhhhh]
Conclusion
You know see how easy is to convert an Unicode code point to its representation in the UTF-8 encoding. The UTF-8 encoding of the Byte Order Mark (BOM) character, for example, whose code point is U+FEFF, can be easily be computed as explained above.The U+FEFF code point falls in the three byte range and its binary representation is:
[F E F F ]
[1111 1110 1111 1111]
According the the aforementioned rule, the conversion gives:
[E F B B B F ]
[11101111 10111011 10111111]
that corresponds to the \xEF\xBB\xBF expression used with sed in our previous example.
A Shell Script to Find and Remove the BOM Marker
Edited:
As pointed out by Omri, the script is failing on OS X apparently because of an idiosyncrasy in Apple's sed implementation. I temporarily fixed the script switching from sed to perl on OS X: perl is also shipped by default on OS X so there shouldn't be any problem. However, on OS X this version of the script scans by default the entire file, and not only the first line as it does with other sed implementations.Introduction
Have you ever seen this characters while dumping the contents of some of your text files, haven't you?
If you have, you found a BOM marker! The BOM marker is a Unicode character with code point U+FEFF that specifies the endianness of an Unicode text stream.
Since Unicode characters can be encoded as a multibyte sequence with a specific endianness, and since different architectures may adopt distinct endianness types, it's fundamental to signal the receiver about the endianness of the data stream being sent. Dealing with the BOM, then, it's part of the game.
If you want to know more about when to use the BOM you can start by reading this official Unicode FAQ.
This post has been modified to solve some problems and improve the script according to your comments:
- Solved some mktemp inconsistencies across UNIX flavours (such as Solaris and Mac OS X).
- Files can now be filtered by extension using the -e option, as suggested by Goldan.
- BOM can be removed throughout the file using the -a option, as suggested by Goldan.
- An arbitrary number of files can be safely passed as a parameter.
- The script behaves correctly even with filenames with whitespaces in it.
Safe Harbour Statements: I try to test the script in the greatest number of systems but I'm not guaranteeing that it is working correctly on your. I'll be glad if you give me your feedback: any suggestion or bug report will be appreciated.
UTF-8
UTF-8 is one of the most widely used Unicode characters encoding on software and protocols that have to deal with textual data stream. UTF-8 represents each Unicode character with a sequence of 1 to 4 octects. Each octect contains control bits that are used to identify the beginning and the length of an octect sequence. The Unicode code point is simply the concatenation of the non control bits in the sequence. One of the advantages of UTF-8 is that it retains backwards compatibility with ASCII in the ASCII [0-127] range since such characters are represented with the same octect in both encodings.If you feel curious about how the UTF-8 encoding works, I've written an introductory post about it.
Common Problems
Because of its design, the UTF-8 encoding is not endianness-sensible and using the BOM with this encoding is discouraged by the Unicode standard. Unfortunately some common utilities, notably Microsoft Notepad, keep on adding a BOM in your UTF-8 files thus breaking those application that aren't prepared to deal with it.Some programs could, for example, display the following characters at the beginning of your file:

A more serious problem is that a BOM will break a UNIX shell script interfering with the shebang (#!).
A Shell Scripts to Check for BOMs and Remove Them
The Byte Order Mark (BOM) is a Unicode character with code point U+FEFF. Its UTF-8 representation is the following sequence of 3 octects:1110 1111 1011 1011 1011 1111
E F B B B F
The quickest way I know of to process a text file and perform this operation is sed. The following syntax will instruct sed to remove the BOM from the first line of its input file:
sed '1 s/\xEF\xBB\xBF//' < input > output
A Warning for Solaris Users
I haven't found a way (yet) to correctly use a sed implementation bundled with Solaris 10 to perform this operation, neither using /usr/bin/sed nor /usr/xpg4/bin/sed. If you're a Solaris user, please consider installing GNU sed to use the following script.The quickest way to install sed and a lot of fancy Solaris packages is using Blastwave or OpenCSW. I've also written a post about loopback-mounting Blastwave/OpenCSW installation directory in Solaris Zones to simplify Blastwave/OpenCSW software administration.
A Suggestion for Windows Users
If you want to execute this script in a Windows environment, you can install CygWin. The base install with bash and the core utilities will be sufficient for this script to work on your CygWin environment.Source
This is the source code of a skeleton implementation of a bash shell script that will remove the BOM from its input files. The script support recursive scanning of directories to "clean" an entire file system tree and a flag (-x) to avoid descending in a filesystem mounted elsewhere. The script uses temporary files while doing the conversion and the original file will be overwritten only if the -d option is not specified.#!/bin/bash
set -o nounset
set -o errexit
DELETE_ORIG=true
DELETE_FLAG=""
RECURSIVE=false
PROCESSALLFILE=false
PROCESSING_FILES=false
PROCESSALLFILE_FLAG=""
SED_EXEC=sed
USE_EXT=false
FILE_EXT=""
TMP_CMD="mktemp"
TMP_OPTS="--tmpdir="
XDEV=""
ISDARWIN=false
if [ $(uname) == "SunOS" ] ; then
if [ -x /usr/gnu/bin/sed ] ; then
echo "Using GNU sed..."
SED_EXEC=/usr/gnu/bin/sed
fi
TMP_OPTS="-p "
fi
if [ $(uname) == "Darwin" ] ; then
TMP_OPTS="-t tmp"
SED_EXEC="perl -pe"
echo "Using perl..."
ISDARWIN=true
fi
function usage() {
echo "bom-remove [-adrx] [-s sed-name] [-e ext] files..."
echo ""
echo " -a Remove the BOM throughout the entire file."
echo " -e Look only for files with the chosen extensions."
echo " -d Do not overwrite original files and do not remove temp files."
echo " -r Scan subdirectories."
echo " -s Specify an alternate sed implementation."
echo " -x Don't descend directories in other filesystems."
}
function checkExecutable() {
if ( ! which "$1" > /dev/null 2>&1 ); then
echo "Cannot find executable:" $1
exit 4
fi
}
function parseArgs() {
while getopts "adfrs:e:x" flag
do
case $flag in
a) PROCESSALLFILE=true ; PROCESSALLFILE_FLAG="-a" ;;
r) RECURSIVE=true ;;
f) PROCESSING_FILES=true ;;
s) SED_EXEC=$OPTARG ;;
e) USE_EXT=true ; FILE_EXT=$OPTARG ;;
d) DELETE_ORIG=false ; DELETE_FLAG="-d" ;;
x) XDEV="-xdev" ;;
*) echo "Unknown parameter." ; usage ; exit 2 ;;
esac
done
shift $(($OPTIND - 1))
if [ $# == 0 ] ; then
usage;
exit 2;
fi
# fixing darwin
if [[ $ISDARWIN == true && $PROCESSALLFILE == false ]] ; then
PROCESSALLFILE=true
echo "Process all file is implicitly set on Darwin."
fi
FILES=("$@")# fixing darwin
if [[ $ISDARWIN == true && $PROCESSALLFILE == false ]] ; then
PROCESSALLFILE=true
echo "Process all file is implicitly set on Darwin."
fi
if [ ! -n "$FILES" ]; then
echo "No files specified. Exiting."
fi
if [ $RECURSIVE == true ] && [ $PROCESSING_FILES == true ] ; then
echo "Cannot use -r and -f at the same time."
usage
exit 1
fi
checkExecutable $SED_EXEC
checkExecutable $TMP_CMD
}
function processFile() {
if [ $(uname) == "Darwin" ] ; then
TEMPFILENAME=$($TMP_CMD $TMP_OPTS)
else
TEMPFILENAME=$($TMP_CMD $TMP_OPTS"$(dirname "$1")")
fi
echo "Processing $1 using temp file $TEMPFILENAME"
if [ $PROCESSALLFILE == false ] ; then
cat "$1" | $SED_EXEC '1 s/\xEF\xBB\xBF//' > "$TEMPFILENAME"
else
cat "$1" | $SED_EXEC 's/\xEF\xBB\xBF//g' > "$TEMPFILENAME"
fi
if [ $DELETE_ORIG == true ] ; then
if [ ! -w "$1" ] ; then
echo "$1 is not writable. Leaving tempfile."
else
echo "Removing temp file..."
mv "$TEMPFILENAME" "$1"
fi
fi
}
function doJob() {
# Check if the script has been called from the outside.
if [ $PROCESSING_FILES == true ] ; then
for i in $(seq 1 ${#FILES[@]})
do
echo ${FILES[$i-1]}
processFile "${FILES[$i-1]}"
done
else
# processing every file
for i in $(seq 1 ${#FILES[@]})
do
CURRFILE=${FILES[$i-1]}
# checking if file or directory exist
if [ ! -e "$CURRFILE" ] ; then echo "File not found: $CURRFILE. Skipping..." ; continue ; fi
# if a paremeter is a directory, process it recursively if RECURSIVE is set
if [ -d "$CURRFILE" ] ; then
if [ $RECURSIVE == true ] ; then
if [ $USE_EXT == true ] ; then
find "$CURRFILE" $XDEV -type f -name "*.$FILE_EXT" -exec "$0" $DELETE_FLAG $PROCESSALLFILE_FLAG -f "{}" \;
else
find "$CURRFILE" $XDEV -type f -exec "$0" $DELETE_FLAG $PROCESSALLFILE_FLAG -f "{}" \;
fi
else
echo "$CURRFILE is a directory. Skipping..."
fi
else
processFile "$CURRFILE"
fi
done
fi
}
parseArgs "$@"
doJob
Examples
Assuming the script is in your $PATH and it's called bom-remove, you can "clean" a bunch of files invoking it this way:$ bom-remove file-to-clean ...
If you want to clean the files in an entire directory, you can use the following syntax:
$ bom-remove -r dir-to-clean ...
If your sed installation is not in your $PATH or you have to use an alternate version, you can invoke the script with the following syntax:
$ bom-remove -s path/to/sed file-to-clean ...
If you want to clean a directory in which other file systems might be mounted, you can use the -x option so that the script does not descend them:
$ bom-remove -xr dir-to-clean ...
Next Steps
The most effective way to fight the BOM is avoiding spreading it. Microsoft Notepad, if there's anybody out there using it, isn't the best tool to edit your UTF-8 files so, please, avoid it.However, should your file system be affected by the BOM-desease, I hope this script will be a good starting point to build a BOM-cleaning solution for your site.
Enjoy!
Monday, May 10, 2010
Command Line Clients to Manage Atlassian Software
Atlassian software such as JIRA and Confluence not only let user interact with them with a web interface: they both expose an API which can invoked remotely via JAX-RPC or SOAP protocols. Such an API is ideal if you need to batch execute some work on an instance or if you want to build a client of your own around it. Nowadays, with the help of modern IDEs and frameworks, it's pretty easy to build a JAX-RPC or SOAP client. The excellent Netbeans, for example, will build a Web Service client for you in just a couple of clicks: more than once I wrapped such a client inside some shell scripts just for their ease of use and for automation's sake.
Nevertheless, if what you need is just a wrapper around these remote APIs, you may consider using the Atlassian Command Line Interfaces instead of building your own client. Atlassian Command Line Interfaces are shell scripts about a Java client and the only requirement to run them is having Java in your $PATH which, probably, you already have. Their syntax respects the typical UNIX shell script conventions and you'll really feel at home with them.
There is an Atlassian Command Line Interface for almost every Atlassian product on the market:
- Bamboo Command Line Interface
- Confluence Command Line Interface
- Crowd Command Line Interface
- Crucible Command Line Interface
- FishEye Command Line Interface
- JIRA Command Line Interface
If you're using more than one product, consider downloading the Atlassian Command Line Interface bundle instead:
Happy scripting and enjoy a better experience with your Atlassian products.
Saturday, January 17, 2009
Sending batch mail on Solaris 10 (with attachments)
The typical problem. You have to do a repetitive task and you bless UNIX and its shells. But sometimes you wonder how to do it. This time, I had to write a bunch of emails to a set of email addresses. So far, so good. Solaris and many other UNIX flavors have utilities such as mail and mailx which you can easily do you job with. I usually use mailx to do send emails from scripts and I'm very happy with it.
But today I had to send emails with attachments and mailx has no built in support for them. If you know something about emails standards, you could easily figure out how to do it. Google searches about the topic are full of examples of sending properly formatted mails with mailx, where properly means uuencoding the attachments, concatenating them with the mail message and then send them all piped to mailx. Some examples you can find are even easily scriptable. Reinventing the wheel, more often than not, is not a mean for progress so I decided to go with mutt, a powerful program I always neglected favoring mailx.
mutt has a similar syntax and has built in support for attachments. Its configuration file is a powerful tool to create different sending profiles in which you can, for example:
Please note that the the option -- is necessary only for separating the addresses from a list of multiple attachments. In the case of just one attachment the line above reduces to:
I also had to modify some header and both mutt and muttrc man pages are well written and easy to search. The content of my (first) ~/.muttrc configuration file is:
This way I told mutt:
But today I had to send emails with attachments and mailx has no built in support for them. If you know something about emails standards, you could easily figure out how to do it. Google searches about the topic are full of examples of sending properly formatted mails with mailx, where properly means uuencoding the attachments, concatenating them with the mail message and then send them all piped to mailx. Some examples you can find are even easily scriptable. Reinventing the wheel, more often than not, is not a mean for progress so I decided to go with mutt, a powerful program I always neglected favoring mailx.
mutt has a similar syntax and has built in support for attachments. Its configuration file is a powerful tool to create different sending profiles in which you can, for example:
- setting user mail identity
- modify mail headers
- write and attach hooks to mail events
for i in addresses ; do
cat user-message-file | mutt -s subject -a attachment-1 ... attachment-n -- $i
done
cat user-message-file | mutt -s subject -a attachment-1 ... attachment-n -- $i
done
Please note that the the option -- is necessary only for separating the addresses from a list of multiple attachments. In the case of just one attachment the line above reduces to:
for i in addresses ; do
cat user-message-file | mutt -s subject -a attachment $i
done
cat user-message-file | mutt -s subject -a attachment $i
done
I also had to modify some header and both mutt and muttrc man pages are well written and easy to search. The content of my (first) ~/.muttrc configuration file is:
set realname="myname"
set from=myuser@mydomain.com
set use_from=yes
set use_envelope_from=yes
set from=myuser@mydomain.com
set use_from=yes
set use_envelope_from=yes
my_hdr Reply-To: anotheraddress@mydomain.com
This way I told mutt:
- to set my name
- to set the From: header
- to use the From: header
- to force sendmail to use the same address from the From: header as the envelope address
- to use a Reply-To: header
Subscribe to:
Posts (Atom)