AdSense Mobile Ad

Showing posts with label photo book. Show all posts

Wednesday, March 21, 2012

A Review of My First Blurb Photo Books

Today my first two Blurb books were delivered to me. I bought them as a kind of test to evaluate their quality, before entrusting Blurb more important and expensive orders.

This review is by no means scientific: I just express my own point of view and impressions. However, to avoid getting disappointed, I made sure I chose pictures where printing problems would be more likely to show up.

In fact, to conduct this test, I used good quality and sharp pictures with the following characteristics:
  • Pictures with well saturated primary RGB colors (such as deep blue skies or almost pure greens).
  • Pictures with several degrees of details in deep shadow areas.
  • Pictures with large and soft color gradients (such as big skies printed on a two page layout).
  • High key pictures with almost evanescent skin tones. 

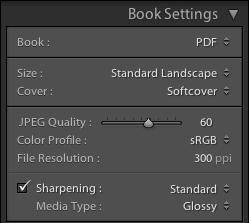
The characteristics of the books I ordered are the following:
  • Format: Standard Landscape (10x8 inches, 25x20 centimeters).
  • Cover: softcover and hardcover with dust jacket.
  • Paper: Premium Lustre (148 g/m2).
  • Number of pages: 40 (softcover), 80 (hardcover with dust jacket).
  • Price: €28.69 (40 pages, softcover) and €36.74 (80 pages, hardcover with dust jacket).

If you're wondering, I ordered the book from Spain and it looks like they have been printed in The Netherlands: the origin, according to UPS tracking information, is Eindhoven. Take this into account if your experience is different than mine.

Overall Quality

The overall quality of the book is very good. Both covers are as good as expected and both seem very resistant. The softcover is somewhat thin, but not much thinner than the cover of any paperback you can get from any major publishing company.

Bindings are very good and both have survived the "stress test" they were subjected to, including opening wide each and every page and applying a reasonable tension on the binding itself.

The only thing I'd really like, although I understand it's something impossible to ask for this price, is a sewn binding booklet. I've never seen a cheap paperback with one, however, let alone a unique copy of a book made exclusively for you.

In the next picture you can see the binding of the softcover book (the binding of the hardcover book is essentially the same):

The Binding

The Premium Lustre paper has been a good surprise: this pretty heavy (148 g/m2) paper is very pleasant to touch and I'm satisfied with the print characteristics (more on this on the following sections). For most books I wouldn't buy the cheaper Standard paper nor the more expensive ProLine papers (although I'm curious to try it, too).

Color Fidelity

Rendering colors on devices with different gamuts inevitably causes problems. Blurb uses the CMYK process on HP Indigo presses (set at a resolution of 175 lpi) and I wanted to test how good (almost) pure RGB colors would render.

When you're concerned about the color fidelity of a device output, you should always work with a color managed workflow. In my case, I'm working on a calibrated monitor and tried to soft-proof my images before sending them to Blurb in order to have an idea about what to expect.

Blurb provides only a generic ICC profile, which cannot be considered by any means reliable. To be so, they should provide a profile for every printer settings possibly used (to take into account parameters such as the paper you've chosen). However, out of curiosity, I decided to try the profile anyway and I did it both in Photoshop and in Aperture.  (A warning for Lightroom users: Blurb's profile is a CMYK one and cannot be used in Lightroom. Don't even lose time trying).

As expected, according to the profile, the rendition of many colors would be much duller than the image on the monitor.

With my great surprise, the colors in the books I received are much better than what the profile had anticipated. In fact, at first sight, the perception I had deceived me into thinking that there was no shift at all. A closer inspection, however, revealed some loss in saturation in both blues and greens, but it was much smaller than expected.

Incidentally, the printed images and the out of gamut zones (as far as I can tell) correspond more with a soft proof made in Lightroom using the sRGB profile than with the soft proof made with the Blurb ICC profile.

As stated earlier, I haven't tried any paper other than the Premium Lustre. I suppose that the result using  ProLine papers would be even better.

This is a photo of the book cover and the original picture sent to blurb (cropped):

Book Cover - Photo

Original Picture (Cropped)

Colors are satisfactorily rendered both in the shadows and in the highlights range. In the following picture you can see a close-up of a printed high-key image where the color texture is nowhere near to fading away:

Close-up (approx. 5x) of a Printed High Key Image

The original colors in the model forehead are close to Adobe RGB (240, 230, 230) and the printed version is pretty faithful.

Print Quality

The print quality of the book is very good. After careful review, I haven't spotted any problem whatsoever. Soft color gradients, even in problematic color zones, show no banding nor posterization. Here's a 100% crop of the previous picture so that you can appreciate how the blue smoothly transitions from darker to lighter:

Smooth Color Gradient

To be honest, if you inspect an image very closely, you can recognize a characteristic banding of the printing process (not very dissimilar to the texture of classical offset printing), but it's really, really hard to notice with naked eye. Here's an extremely magnified picture:

Close Detail

Conclusion

I'm very pleased with Blurb photo books and I'm likely to order more in the near future. The quality-price ratio is very good: according to my experience, it even exceeds expectations, especially if you consider the cost of a page. Here you can see Blurb pricing policy, summing it all up:
  • You pay a base €19.49 for a Standard Landscape book (10x8 in, 25x20 cm) with 20 Premium Lustre pages.
  • You pay additional €5 difference to get a book in the 20-40 pages range.
  • You pay additional €10 difference to get a book in the 40-80 pages range, and so on. 

20 more pages cost a maximum of €5, or €0.25/page.

Let's consider a direct Blurb's competitor I had the masochistic pleasure to try: Apple (with its iPhoto books). A book of the same characteristics (L-size, 20 pages, softcover), without even the possibility of choosing a paper quality, is offered here in Spain for an initial price of €20.05. The maximum number of pages per book is 100 for an additional fee of €0.70 a page.

A ridiculously high price, especially when comparing the quality of the two products. In my opinion, Blurb books have an overall better quality, especially as far as printing is concerned. Maybe, some users choose to print an iPhoto book because of the supposed user-friendliness of their tools. Being honest and trying to step back, I consider this a myth easy to debunk. Just try one of the several applications that Blurb offers to publish a photo book. I tried all of them, including the Bookify web application, and they're perfectly usable for users of any proficiency.

As a plus, if you're an amateur or a pro who owns Adobe Lightroom or InDesign, you can now design and publish a book directly from your favorite application, without any disruption of your workflow. If you're curious, in another post in the Lightroom Tutorial series I described the new Book module that appeared with Lightroom 4.

Monday, March 19, 2012

Adobe Photoshop Lightroom Tutorial - Part XXI - Making Photo Books

Part I - Index and Introduction
Part XXII - Adjustment Brushes

An interesting new feature introduced in Lightroom 4 is the possibility of creating photo books. Lightroom features a new module, called Book, where you can easily create a photo book out of a collection of pictures and save the book itself as a new kind of collection.

The new Book module is seamlessly integrated into the Lightroom workflow and you can freely jump from module to module in case you need to modify the underlying collection of photos or modify the develop settings of a picture. As usual, changes applied to a certain picture will automatically be reflected in every collection containing a reference to the same picture. Alternatively, you can have Lightroom automatically create new virtual copies of the pictures added to a book collection to isolate the changes specifically applied to pictures of a book.

The Book module features a pretty powerful WYSIWYG editor offering plenty of configurable page templates. In my opinion, the book editor was thought with simplicity in mind and is aimed at amateurs. This tool is very easy to use and will allow you to create beautiful photo books with little effort and in a short time. As such, it isn't as flexible as a fully fledged desktop publishing solution and advanced users may soon realize its shortcomings, especially as far as page and template configuration is concerned. Users of Blurb BookSmart, a tool that was probably used as the bases for the Book module, will probably consider the latter a stripped-down version of the former, especially considering the good integration that can be achieved between BookSmart and Lightroom 3 using Blurb's plugins. However, choice is good and different users will choose the tool that best suits their needs.

Once finished, a book can be exported to PDF or sent out for printing. At the moment, no Print-On-Demand service other than Blurb is available (which is, however, a good choice in terms of quality-price-ratio).

Creating a Book

A book can be created or edited in the Book module. In Lightroom, a saved book is a special kind of collection of pictures and when you switch to the Book module, Lightroom uses the currently selected library folder or collection as the set of initial available pictures for your book.

Lightroom - Book Module

In the previous picture you can see the Book module with an empty book layout. In the left panel you can see the Collections browser and in the filmstrip you can see the pictures contained in the library folder I was using when I switched to the Books module. As you see, you will be able to pick images from different collections but you won't be able to access a different folder. Hence, you should create the collections you need before creating your book if the images you plan to include into your book are scattered throughout different library folders.

As we'll see, when you save a book Lightroom will create a new collection (the book itself) selected images will be added to. Lightroom will also give you the option to create new virtual copies of the images used in the book, a very handy feature in case you want to isolate specific changes you need to apply to the book images (such as sharpening).

Choosing a Book Layout

The first thing you need to do is establishing the settings of your book using the Book Settings panel. The available settings will vary according to the book type you choose. The currently available book types are Blurb and PDF:
  • The Blurb book type is specifically designed to produce a book that can be directly uploaded to Blurb for printing.
  • The PDF book type is designed to produce a book exported as a PDF file.

The Book Settings panel (configured for a PDF book) can be seen in the following picture:

PDF Book Settings

In the Book field you can choose the book type you want to produce, and in this case it's PDF book. In the Size and Cover fields you can configure the physical layout of the book. In the current version, the following sizes are supported (which, incidentally, are the same sizes offered by Blurb):
  • Small Square (7x7 in).
  • Standard Portrait (8x10 in).
  • Standard Landscape (10x8 in).
  • Large Landscapes (13x11 in).
  • Large Square (12x12 in).
Unfortunately, the PDF book type isn't as flexible as it should be since it only offers the same book formats (size and covers) available from Blurb. If you wanted to produce a book of another size, you couldn't do it using Lightroom.

As far as the covers are concerned, these are the available options:
  • No Cover (Only available for PDF books).
  • Hardcover Image Wrap.
  • Hardcover Dust Jacket.
  • Softcover.
In this case, the available cover types are those offered by Blurb. However, they're pretty much what you need in a tool of this kind. Major information about this kind of covers can be found on the Blurb website.

Blurb Specific Options

If you're preparing a Blurb book, some Blurb-specific options will be available in the Book Settings panel, as you can see in the following picture.

Blurb Book Settings

First of all, you can choose the paper type for your book. At the moment, the following options are available (further information can be found on the Blurb website):

  • Premium Matte: 148 GSM paper.
  • Premium Lustre: 148 GSM paper.
  • ProLine Uncoated: 148 GSM paper.
  • ProLine Pearl Photo: 190 GSM paper.


Interestingly, the cheapest Standard (118 GSM) paper isn't an available option. Since you cannot downgrade a book's paper using Blurb's web interface, if you want to print a book on standard paper using Blurb, you've got to make a PDF book and upload it to Blurb manually.

Personally, I don't appreciate this deliberate lack of choice. I admit I mostly use Premium paper for my books, but I don't like being forced to choose between uploading through the Book module and paying for a more expensive paper or going through the cumbersome process of uploading a PDF to Blurb manually.

Finally, you can choose whether you want your book to have a Blurb's logo page (the default option) or remove it from your book and pay the corresponding fee.

Setting the Image Quality

If you're producing a PDF book, you can choose a set of parameters that affect the quality of the images generated by Lightroom. If you're producing a Blurb book, you cannot modify the image quality (although it seems like Blurb is using 200 ppi sRGB images, which are good enough and match the resolution of their HP Indigo printers). The available configuration fields are the following:

  • JPEG Quality slider: to set the quality of the exported JPEG files.
  • Color Profile: to set the color profile to use for the images. Available choices are: sRGB, Adobe RGB, Pro Photo RGB or a user-provided color profile.
  • File Resolution: to set the resolution of the exported images.
  • Sharpening: to set the amount of sharpening to apply to the images. Available choices are: Low, Standard and High.
  • Media Type: to set the kind of media the book will be printed on. Available choices are: Matte and Glossy.

Automatic Layout

Once your book is configured, you can start laying out your images. Please take into account that modifying the book settings will result in Lightroom automatically laying out the images on the new page format. You should carefully review your book settings before proceeding to laying out your images if you don't want to lose your work.

A good place to start is the Auto Layout panel. Instead of laying out all the images by hand, you can have Lightroom lay them out automatically using a specified preset and then apply the modification you require:

Auto Layout Panel

Fist of all, you've got to choose a page layout that Lightroom will use as a template for all the pages of the book. You can use an available preset or create one of your own. The bundled preset are designed to layout a single image on every page. If you want to modify an existing preset, or create a new one from scratch, you can choose Edit Auto Layout Preset… in the Preset list box and a configuration window will appear:

Auto Layout Preset Editor

Using the Auto Layout Preset Editor, you can define the default layout used by Lightroom, specifying:
  • A separate template for the left and right side pages. The templates can be chosen amongst the ones provided by Lightroom. Unfortunately, page templates themselves cannot be modified.
  • The zoom level to be applied to the photos. Photos can be zoomed into place to either fit or fill their destination cell.
  • Whether a caption should be added to each photo and some basic caption format settings.

Once the chosen preset has been set, you can press the Auto Layout button to have Lightroom create your book. In case you don't like the result and change your mind about the desired layout, you can use the Clear Layout button to clear the book and start again.

Laying Out the Images

No matter whether you're starting from scratch or from an automatically laid out book, you can layout your book simply dragging and dropping images into place. Depending on the layout of a page, you will see image placeholders, shown as grey cells, where you can drop an image:

Image Placeholders

Once an image is dropped, its size can be changed using the zoom slider that appear above it. If it does not, just select the image by clicking on it:

Zooming an Image

If you want to change the layout of a page, you can select it (clicking on the area just below it) and choose the desired layout in the Page panel or using the popup that can be accessed using the small black button on the bottom right corner of the page (visible on the previous image). Many available templates are available to place one, two, three or four image per page. Also, a great deal of creative templates are available in case you need to create more unconventional page layouts. Still, since page layouts cannot be customized, some users may find the available options insufficient.

An interesting layout featured by this module is the possibility of easily making two-page spreads like the one shown in the following image:

Two-Page Spread

Customizing the Page

On the right side panel you will find some configuration options that allow you to tune your pages. Here's brief review of some of them.

The Cell panel can be used to change an image padding:

Cell Panel

Using the Amount slider, you can change the padding of the selected image cell. In the following image you can see the effect achieved applying a 60 points padding to a test image:

Padding on an Image Cell

Since available page layout cannot be modified, you will find cell padding more useful than you may think at first sight.

The Caption panel lets you add captions to an image, to a page or to both of them:

Caption Panel

Photo captions can be positioned above, over or below a photo and there can be one per photo. On the other hand, page captions can be positioned above, over or below a single page and there can only be one per page. In the following picture you can see an example of both a photo and a page caption:

Photo and Page Captions

The text of either caption can be formatted using the tools available on the Type panel, a pretty basic text formatting tool that needs to be enhanced:

Type Panel


Page Background

You can change the default white background of a page using the Background panel. You can set either a solid color or a background image (some of which are bundled with Lightroom):

Solid Black Background

Graphic Background

Saving Your Book

To save a book as a specialized Lightroom collection, just use the Book/Create Saved Book menu item (or the Command-S shortcut if you're on a Mac). Lightroom will show the Create Book window where you can customize the collection to be created:

Create Book

Besides common collection attributes such as name and placement, there are specific book options that are pretty handy:

  • Include only used photos instructs Lightroom to create a new book collection including only the photos that are actually placed on a page. Any other existing image in the source collection won't be included in the newly created one.
  • Make new virtual copies instructs Lightroom to create a new virtual copy of every image included in the book collection. This option is useful if you want to isolate the changes you will apply to book images to the newly created virtual copies, instead of having them propagated to the source image.

Publishing Your Book

Once your book is finally complete, it's time to publish it. To export a book to PDF, just use the Export Book to PDF… button:

  • If your book is a PDF book, this button can be found at the bottom of the right side panel.
  • If your book is a Blurb book, you can still export it as a PDF, but the button will be located at the bottom of the left side panel.

If, on the other hand, you want to publish a Blurb book and send it for printing, you've got to use the Send Book to Blurb… button located at the bottom of the right side panel.

Conclusion

Lightroom's Book module is an easy to use, yet powerful tool that lets you easily create and publish photo books. I'm sure that many amateur photographers will appreciate it since it fills a long standing gap with other tools (such as iPhoto or Aperture), even less sophisticated than Lightroom, that have been providing such feature for a long time.

Moreover, and more importantly, this module is well integrated into Lightroom and you will continue to benefit from its the goodies without any disruption to your workflow. While it's true that it's not very flexible, even less than the original tool it's derived from (Blurb BookSmart), it has the great advantage of being an integral part of Lightroom and your productivity will surely benefit from it. Should you need a more complex tool, you could switch to a fully fledged desktop publishing solution (such as Adobe InDesign).

If you want to help me keep on writing this blog, buy your Adobe Photoshop licenses at the best price on Amazon using the links below.