AdSense Mobile Ad

Saturday, October 22, 2011

Adobe Photoshop Lightroom Tutorial - Part V - Using Filters

Part I - Index and Introduction
Part VI - Importing Your Images

Filters

As explained in the previous part, metadata is useful because it lets you organize your catalog and search for images using an incredible variety of criteria.

The Lightroom Library module is the where most of your searches will take place and it offers plenty of controls where you can start your search from.

As we've seen in the previous part, you can start a quick metadata search using:
  • The arrow control that is shown at the right side of a metadata value in the Metadata panel (only available for selected headers).
  • The arrow control that is shown at the right side of a keyword in the Keyword List panel.
  • Using the Attribute search bar in the filter bar.
The Attribute search shown in the previous part is just one of the kind of searches that the Lightroom filter bar will let you perform. The filter bar, in fact, is the place where you will perform any non-trivial metadata filtering.

Search criteria can also be saved for future use and quick access to frequently used search criteria.

The Filter Bar

The filter bar functionality is pretty intuitive:
  • It lets you build a query using the search criteria that it offers.
  • It applies the filter to the images contained in the currently selected folder and all of its sub-hierarchy.
  • It will display the results in the Lightroom main window (see Part I).
An inactive filter bar is shown in the following picture (if the filter bar is not visible, just activate it using the Show Filter Bar item in the View menu):

Lightroom Library Module - Filter Bar

The filter bars lets you build your query using criteria coming from the following sets, whose interface you can activate choosing the corresponding control in the filter bar:
  • Text: This interface is used to build a plain text search in one of the searchable text fields.
  • Attribute: This interface is used to perform a search using one of the special attribute metadata (rating, flag, label, kind) described in the previous section. 
  • Metadata: This interface is used to perform a search using whichever available metadata field.
  • Saved filter: This menu is used to open previously saved filter or to save the current search criteria into a new filter.
  • None: the None control is just used to turn filtering off.
The following pictures show the interface of the filter bar interfaces described so far:

Lightroom Library Module - Filter Bar - Text

In the Text type search, the user can make a free text search specifying the text fields to search, the text match criteria (Contains all, starts with, etc.) and the text to search.

Lightroom Library Module - Filter Bar - Attribute

In the Attribute type search, as detailed in the previous part, the user can filter the images using flags, rating, label and kind controls, as can be seen in the previous image.

Lightroom Library Module - Filter Bar - Metadata

In the Metadata type search, the user can build a criteria made up multiple metadata filters, one per column. By default, Lightroom provides 4 columns but the user can add them or remove them at will. To change the metadata a column is associated with, it's sufficient to choose another metadata field clicking on the column label. Each column will contain the available filter values for each metadata field, depending on the values that can be found in your catalog.

Lightroom Library Module - Filter Bar - Multiple Criteria

A filter can be made up of different types of criteria. As you can see in the previous image, different types of filters can be stacked up together to build a complex query.

Lightroom Library Module - Filter Bar - Filter Menu

Lightroom provides a set of prebuilt filters with the most commonly used criteria, such as the Flagged filter, one of the filters I use most. If you want to save a commonly used search criteria into a filter, just select the Save Current Settings as a New Preset... from the filter menu and the filter will be available for future use.

A reduced filter functionality is present in the viewer bar, as it can be seen in the following picture:

Lightroom Viewer Bar

In its upper right corner, in every module where this bar is present, you can select a saved filter using the filter menu and apply a quick attribute filter using flags and ratings.


If you want to help me keep on writing this blog, buy your Adobe Photoshop licenses at the best price on Amazon using the links below.

Adobe Photoshop Lightroom Tutorial - Part IV - Keywording and Metadata

Part I - Index and Introduction
Part V - Using Filters

Metadata

Metadata simply means "data about data". In the case we're interested in, images metadata, we're referring to a set of additional data that may be attached to your images to provide further detail about them. Image metadata has been sort of standardized, and the most common sets of metadata you're probably going to deal with are EXIF and IPTC. However, depending on your gear, additional proprietary metadata can be attached to your image. Especially in the case of RAW images, for their own nature, the files must contain the settings that were active in your camera at the time of shooting, so that the RAW developing tool is able to apply them in post-production. Such metadata are highly dependent on the gear you're using and there's no easy way of providing a comprehensive list. However, common examples of such metadata are:
  • Detailed information about the camera and the lens you were shooting with.
  • White temperature.
  • Exposure compensation.
  • Flash status.
  • Flash exposure compensation.
  • Metering mode.
  • ISO speed.
Some metadata are meant to be provided by the user and IPTC metadata falls almost completely in this category. The user can use IPTC fields to provide additional information about a photography such as:
  • General information about the image (title, caption, etc.).
  • Information about the image content (subject, models, etc.)
  • Information about the image location.
  • Information about the image author.
  • Information about the image copyright status.
As far as it concerns image organization, metadata is a powerful tool to help you organize and filter your data. Lightroom gives the possibility of performing searches using whatever metadata header your images may have. That's a pretty useful tool to build your smart collections or dig into your gigantic catalog looking for a specific photo whose location you cannot remember.

Very often, just a few metadata helped me restrict the search scope to a small bunch of them. For example, the camera I used, the lens and the focal length are one of the first criteria I use when digging into my catalog. And if this is not sufficient, then I rely on keywords, as explained in the next sections.

To inspect and modify an image metadata, you can use the Metadata panel, a screenshot of which is shown in the following picture.

Lightroom Library Module - Metadata Panel

If you're interested in a specific set of metadata headers, such as EXIF or IPTC, you can select it in the listbox control in the upper left corner of the panel (in the image above the EXIF set is chosen).

You will be able to introduce custom values in writable metadata headers, such as IPTC. If you want to quickly filter your images using a specific metadata value, you can use the arrow control shown on the right side of the corresponding header. This control is only available on selected metadata headers.

The Importance of Well Known Metadata Headers

Metadata is important because you can take advantage of it at any stage of your workflow, without the need of artificially tweaking it to your advantage unconsciously introducing redundancies and potential inconsistency problems. Metadata can be used, for example:
  • To organize your images: location or subject metadata can be used to search and build collections.
  • To edit your images: camera and lens information can be used to apply specific corrections, such as applying camera calibration profiles or lens correction effects.
I've seen many people manually organizing their catalogs duplicating information that could easily be stored in commonly used metadata headers such as the IPTC location headers. There's little use in creating custom keywords to do such a task:
  • If there's a standard header, just it. Chances are your tool will give you additional feature built around it than what you can do with a plain keyword. A tool could, for example, build a map based on location headers or use the copyright status of your image to choose a suitable watermark, while it could hardly do so using your own custom keywords (that it's unable to interpret).  
  • Custom keywords can be confusing, at times, since they're only labels.
My advice is: take your time exploring EXIF and IPTC headers and learn what they're meant for. They're there for a good reason.

Custom Metadata

Well known metadata such as EXIF and IPTC are such because they're the most widely used metadata headers out there. However, they're not sufficient for most practical organization purposes and you will rely on applying your own (custom) metadata to your images.

Lightroom lets your add the following kind of metadata to your images:

  • Flags: flagged or rejected.
  • Colored labels: 5 different colors currently available.
  • Ratings: a rating from 0 to 5.
  • Keywords.
Flags, labels and ratings are very intuitive tools and are distinct in that they have a direct effect on how Lightroom shows your image thumbnail in the library module.

Lightroom Library Module - How Some Metadata Is Shown in the User Interface

In the previous image, you can notice the following:
  • The first two images are flagged, as indicated by the white flag icon on the upper left corner of each thumbnail.
  • The first image was rated with 4 stars and the second with five, as indicated by the black star icons just below the image thumbnails.
  • The third image was flagged as rejected, as indicated by the black flag icon on the upper left corner of the thumbnail. Additionally, Lightroom grays out the thumbnail of rejected images, making easier to quickly identify them into the film strip.
  • The fourth image as been labelled with a yellow label, as indicated by the yellow icon on the bottom right corner of the thumbnail and by the yellow shade of the thumbnail itself.

This metadata is very useful in your everyday workflow because they let your rate your image, reject shots you don't like and flag the shots you are interested to. Lightroom also comes with prebuilt filters that let you quickly filter your images using these metadata.

Lightroom Image Module - Attribute Filters

As you can see in the previous screenshot, the Lightroom filter bar lets you quickly filter in a graphical and intuitive way using the metadata we just talked about:

  • Using the three flag icons, you can filter flagged, unflagged and rejected images.
  • Using the five star icons, you can filter images with the specified minimum rating.
  • Using the seven colored box icons, you can filter images using the specified colored label.
  • Using the three kind icons, you can filter images based on their types: images, virtual copies and videos.

Keywording

When you need more than all of what we previously described, Lightroom lets you apply custom keywords to your images. Keywords are just text labels that you can attach to your images and every image can have as many keywords as you'd like.

I use many kind of keywords:

  • Keywords that specify the image type: landscape, portrait, etc.
  • Keywords that specify the kind of event: holiday, birthday, wedding, etc.
  • Keywords that specify the kind of post-processing I applied: levels, orton, crop, black and white, duotone, etc.

The keywords you choose to use are up to you, as well as it's only the user who decides how he wants their images to be organized.

The most important advice I can give about keywords is: being consistent and coherent. I surely am about the keywords I use and over the years I've built a keyword dictionary I'm pretty comfortable with. There's no use in using keywords you won't remember. I'm almost always able to figure out which keywords I might have applied to the picture I'm looking for simply remembering how it looked like, when it was taken or the kind of event it represents.

My advice here is: experiment with keywords. At the beginning you're probably going to refine your dictionary very often. Over time, however, you will get used to a well known subset of keywords you will be using over and over again.

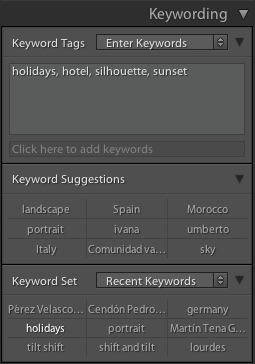
Lightroom Library Module - Keywording

The Keywording panel is used to manage the keywords of your images. You can add keywords simply by typing them in the text box shown in the previous figure. Lightroom, using your keyword history and the keystrokes, will help you quickly identify existing keywords showing them in a combo box. Also, based on the keywords already applied to the image and your keyword history usage, will try to help you suggesting candidate keywords in the 3x3 matrix labelled Keyword Suggestions that you can see in the picture.

If you're a keyword power user and your dictionary is made up of hundreds of words, you can organize them in subsets. You can select the subset you're interested to in the Keyword Set combo box and Lightroom will show them in the 3x3 matrix just below it, as seen in the previous picture (in that case, the automatically built Recent Keywords set is shown).

Managing Your Keywords

Keywords themselves can be organized in a tree structure that's handy to use especially when your dictionary is becoming pretty huge.

Lightroom Library Module - Keyword List Panel

The Keyword List panel is used to filter, create and organize your keywords. As you can see in the previous screenshot, the activity and the animal keywords are parent keywords that have some children. Clicking on the white triangle on their left will open their subtree and will show you their sub-hierarchy.

This panel can also be used to know how many pictures are labelled with a specific keyword, as indicated by the number on the right side of the keyword itself.

To quickly filter the images based on a specific keyword, you can use the right arrow icon that appears when hovering your mouse pointer over them.


If you want to help me keep on writing this blog, buy your Adobe Photoshop licenses at the best price on Amazon using the links below.

Adobe Photoshop Lightroom Tutorial - Part III - Organizing the Library

Part I - Index and Introduction
Part IV - Keywording and Metadata

The Library Module

The Library module gives you the ability to organize your photo library, which is one of the most important tasks a photographer shall do, alongside with editing them. A proper organization is basic for you to be able to safely manage your ever growing photographic library and find not only the shots you're looking for, but all of the data that you could have stored with them.

Library Organization

Lightroom lets you manage your images into catalogs (a library in its jargon). You can have as many catalogs as you'd like and you can choose which catalog to open at Lightroom startup. Since many configuration options are stored at the catalog level, you can not only distribute your images into catalogs according to your criteria, but you can also build specialized catalogs tweaked with the set of options you need.

Lightroom lets you easily organize your catalogs both physically and logically:
  • Physically organizing your catalog refers to where you store your files on the storage devices you own.
  • Logically organizing your catalog refers to how you organize the content of your library into logical structures such as collections or collection sets. The name and the capabilities of such structures may differ across different tools.
The simplest physical organization of a catalog consists of a folder structure that spreads no more than one physical disks. However, as we pointed out in Part I of this series, such a simplistic approach is insufficient under most use cases, since it does not guarantee any level of fault tolerance. For this reason, a library manager should ideally offer at least the following features:
  • The possibility of storing files across an heterogeneous set of storage devices.
  • The possibility of backing up and restoring your library simply and efficiently.

Folders

The first problem is elegantly solved in Lightroom by letting the user add any folder, and thus its contents, into the catalog. A folder can be located anywhere, provided it is accessible by your operating system, and can also be an entire physical disk. The folder abstraction provides the required flexibility to let you mix and match folders coming from whichever storage device accessible from your system, such as local hard disks, external hard disks connected by USB, FireWire or eSATA, remotely mounted file systems with the NFS and CIFS (Windows Shares) protocols.

Once folders are added to the catalog, they are virtually indistinguishable from each other and the user can transparently build and work on catalogs that span multiple storage devices. If one of such devices goes offline (for example, if you take your laptop and walk out of home), Lightroom will immediately notice and mark the folder offline. You will still be able to access the folder and see the associated image previews but will be unable to apply any kind of modification to the image. When the folder returns online, Lightroom will automatically notice it and mark the corresponding folders as online.

In the following picture, you can see the Folders panel of a catalog with two folders: the first, labeled Macintosh HD, is associated to the entire internal hard disk of my MacBook. The second, enrico, is a remotely mounted NFS file system exported by a Solaris system. Since it was offline when the snapshot was taken, it appears greyed out in the panel.

Lightroom Library Module - Folders Panel

Backups

Lightroom can be configured to run scheduled backups of its catalogs, and every catalog can have its own distinct schedule. The backup is performed in a folder chosen by the user that can as well be located in whichever storage device accessible by your operating system.

The catalog backup facility, however, has a "drawback": it performs the backup of the catalog but it does not backup any image located outside the catalog directory. Since this is often the case, you cannot rely on this service to backup all of your images and you'll have to rely on an external backup tool yourself.

Performing backups of your data on a regular basis is always a good practice, as well as using redundant and fault tolerant configurations. Unfortunately, many people aren't sensible to this problem and do not realize the importance of it until it's too late. Realizing what Lightroom can do for you is important, and at first it may seem like a big disadvantage having to backup yourself the images located outside your catalogs. However, I don't fully agree with this point of view.

First of all and to be fair, it must be said that other tools do indeed provide a complete backup solution (Aperture calls it the vaults). However, when you decide to span a catalog across multiple storage devices, you must be ready to deal with the complexities of such a solution. A solution that, on the other hand, can bring other advantages. Different storage devices can be configured differently according to the requirements they must satisfy and, thus, they may require different backup policies. The more complex your storage requirements, the more flexible the solution you need. A solution such as the Aperture vaults, while it may be handy in many cases, might not be satisfactory in others since it's too rigid: you're backing up everything in every backup.

As an example of how you can organize your catalog to take full advantage of a complex (and relatively inexpensive) storage solution, here's how my main catalog is configured:

  • The catalog itself is hosted in my local MacBook hard disk. The most recent images I import are left on this catalog, so that they're always available. Since the hard disk of my laptop is not redundant, and since I'm working almost every day on it, I configured Lightroom to back it up daily and I'm also taking at least daily backups of my entire machine using Time Machine. If I'm working on a comfortable location, I just plug my Time Machine disk (a small and handy disk I always take with me) and keep on working.
  • After a few days, I transition the images to the another folder, called enrico. This folder is located on a file system residing in a redundant disk configuration (a mirror) and it's hosted on an Solaris machine (if you feel like running free solution, you can check NexentaStor or OpenIndiana out). The folder is then mounted on my Mac using the NFS protocol. Since the disk configuration is redundant, data is pretty safe: I'm taking a daily snapshot of it which is itself backed up every night).
  • When I'm pretty finished with the images I work upon most, I transition them on another volume which for long term storage. This volume is hosted on the same machine that hosts the previous one but it's configured to apply block-level compression. ZFS compression can be tweaked according to your needs and it's pretty inexpensive, as far as it concerns CPU consumption. Since the contents of this folder have a very low volatility, I'm backing this up just once a week.
In my case, the backup of the external folders is performed using the storage technology provided by the Solaris operating system, which was chosen because it helps me fulfill a broader set of requirements, not only at the storage level. I protect my data with a redundant disk configuration and I'm using lightweight and efficient storage technologies to manage it. If I were using a solution such as the vaults, I would be losing the benefits of ZFS, and it would require much more time and resources to perform the backups I need to protect my data. Having my library manager back them up again and again would be a waste of time and resources without additional protection.

That's why Lightroom satisfies my needs: it backups my catalog according to the policy I establish. As far as it concerns the images outside the catalog, it's up to me and not to Lightroom decide how and when to back them up since only I know the characteristics of the storage solution I'm using.

Collections

The possibility of logically organizing your images outside the boundaries of the rigid physical organization of your catalog is a very handy feature almost every library manager will offer.

Lightroom lets you logically organize your images in a hierarchy of collections. Collections and collections sets are pretty much like virtual containers in which you store references to your images. For all practical purpose, this feature lets you build photo albums in which you can add photographies from anywhere in your catalog. The same photo, moreover, can be added to as many collections as you need. Since a collection is just a collection of references, you're not duplicating any information. On the contrary: should you modify an image, the updates will instantly propagate in all the collections the image belongs to.

Collections can be organized in a tree structures using collection sets: as their name implies, you can build your hierarchy of collection sets to organize your collections. In the next image you can see an example of a collection set hierarchy.

Lightroom Library Module - Collections

Smart Collections

Smart collections are a very special (and handy) kind of collections. Instead of manually adding photos to it, a smart collection automatically chooses the photos based on the search criteria you establish. Let's suppose you want to create an album with all your flagged photos that contain the Africa and Holidays keywords.

The first option you have is creating a collection and dragging the desired photos into it. But what if in the future you shoot more photos, and flag them with the same keywords you're interested in? Well, the choice is up to you. If you want your collection to be "static", just proceed as described. But if you want your collection to be dynamic (smart, in Lightroom jargon), you can create a smart collection. When creating a smart collection, Lightroom will ask you for the search criteria you want to apply to it. Every time you use the collection, Lightroom will fill it up with the results that satisfy the search criteria you chose.

Smart collections are a very handy feature to organize some of your images without having to manually create and manage them. Smart collections are not "magic", however: they just rely on metadata you applied to your images to perform the search. Smart collections move the complexities of organizing your images into the metadata domain (that we'll describe in the next part).

The bottom line is: collections are the basic tool to logically organize your images. Most of the time, they will suffice for the most basic use cases. However, metadata and keywording are powerful tools that bring additional flexibility and should not be overlooked, not even by novice users. The organization of a library should be consistent over time, and that is a goal you can achieve only if you fully understand how your tools work.

The following image shows the search criteria used during the creation of a smart collection to filter out portraits taken during a sunset. The search contains three criteria:

  • The first filters images that have been flagged.
  • The second filters images that contain the portrait keyword.
  • The third filters images that contain the sunset keyword.
For the filter to work as you expect it to, you have to apply the keywords you're interested to to your images. In my workflow, it's the second thing I do right after importing them.  Sometimes, as I work on them, I apply additional keywords that I couldn't foresee (such as cropped, black and white, duotone, sepia, orton, etc.)


Lightroom Library Module - Creating a Smart Collection


Publish Services

Publish services let you publish the images in your catalog on different kinds of external services. Lightroom 3 supports the following kind of services:
  • Hard drive.
  • Facebook.
  • Flickr.
  • SmugMug.
For many people, these will be sufficient. However, you can find Lightroom plugins to support additional types of services (such as Google+). And if no one satisfies your needs and you're also a proficient programmer, you can build your own from scratch!

Using a publish service is very easy, too. You can simply build collections into a configured publish service and add your images to it. When you're ready, you just publish them and Lightroom will do the heavy lifting for you, applying the export options you set up and publishing the exported image to the target service.

A publish service collection is indistinguishable from a "regular" collection: you just work on them as you usually do. Lightroom will also keep track of added, modified and deleted images and will apply all of the modifications at the next publishing operation.

Lightroom Library Module - Publish Services Panel


If you want to help me keep on writing this blog, buy your Adobe Photoshop licenses at the best price on Amazon using the links below.

Adobe Photoshop Lightroom Tutorial - Part II - Lightroom Workflow

Part I - Index and Introduction
Part III - Organizing the Library

Workflow

Lightroom forces a kind of rigid workflow to the user. Lightroom's user interface reflects the Lightroom workflow very clearly. As you can see in the following picture, Lightroom's user interface is made up of modules, each of which is dedicated to a different phase of the workflow.

Lightroom User Interface - Library Module
Every modules organizes and segregates the features that Lightroom offers to the user. The available modules are:
  • Library: this module is used to organize the photographic library.
  • Develop: this module is used to develop the files. Develop is Lightroom's jargon for editing, with a clear reference to the good ol' darkroom days.
  • Slideshow: this module is used to create slideshows.
  • Print: this module is used to manage print jobs.
  • Web: this module is used to create web sites.

Whether this organization is good for you, I cannot tell. I suspect there's no right or wrong, here, it just depends on how you're used to work. As far as it concerns myself, it fits very cleanly on what I am used to:
  • I start in the Library module either choosing existing photos, importing new ones or shooting tethered.
  • I use the Develop module to apply the corrections I want.
  • Sometimes I use the Print module to print the images I'm interested in.
  • Far less often I end up in the Slideshow or Web modules to generate a slideshow, a video or a small web site.
Although I like this scheme, it seem to be a source of major complaint amongst Lightroom detractors. The big drawback when compared to other tools, according to many reviewers, is the inability of using a function of one module when you're into another. Well, that's not an issue for me, either. Remember that Lightroom modules are just an user interface organization criterions. Instead of cluttering the UI pushing too many functions (or palettes) in the same window, they're organized in modules (different windows) that you can switch to when needed. Moreover, the keyboard shortcuts, as well as the menu, are global: if you're using a module and select a function of another one, Lightroom will instantly change module while processing your request. Since Lightroom performance is very good, you won't notice a big delay (unless you're loading an image for the first time in your working session). Nevertheless, I recognize that the ability of editing an image in whichever phase of the workflow (something that Aperture allows) may be convenient in some situations.

Lightroom Windows

The structure of the Lightroom user interface is common to all modules and is shown in the following image.

Lightroom Window Structure

The window is made up of the following:
  • A title bar, on the uppermost part of the window.
  • A viewer bar, on the lowermost part of the window.
  • Two palettes, on the left and right sides of the window.
  • A working area, the innermost part of the window.
  • A toolbar, just below the working area.

The Title and the Viewer Bar
The upper part of the window, the title bar, provides the controls that let the user switch between modules. As you can see in the picture, on the right side of the title bar, a control is provided for each of the modules: Library, Develop, Slideshow, Print and Web.

Lightroom Title Bar

The lower part of the window it's a handy viewer that lets you quickly sweep through the thumbnails of the photos in your current folder (or collection), select a new image to work upon, apply a saved filter to the current selection (using the controls on its right side), jump to the most recent sources you visited (using the menu that appear clicking on the image title) and manage the views on the Lightroom windows (using the windows controls marked with 1 and 2).

Lightroom Viewer Bar

Palettes
The palettes on the left and right sides of the Lightroom window host panels. A panel encapsulates a set of related controls and can be collapsed and expanded, to take better advantage of the limited available space. The panel that appear in the palettes depend on the module that is selected. In the screenshot shown in the following picture, you can se a palette with the Navigator panel expanded and all of the remaining ones collapsed.

A Lightroom Palette With Some Panels
The Working Area and the Toolbar
The working area is the central part of the Lightroom window and its contents depend on the currently selected module. Some modules, such as the Library, allow for multiple working area views, and the user can switch between them and customize them using the control provided in the working area toolbar.

Lighroom Working Area and Toolbar

In the previous screenshot, the grid view for the working area of the Library module is shown.


If you want to help me keep on writing this blog, buy your Adobe Photoshop licenses at the best price on Amazon using the links below.

Adobe Photoshop Lightroom Tutorial - Part I - Index and Introduction

Part I - Index and Introduction
Part II - Lightroom Workflow
Part III - Organizing the Library
Part IV - Keywording and Metadata
Part V - Using Filters
Part VI - Importing Your Images
Part VII - Basic Editing Tools
Part VIII - Developing Your Images, The Basics
Part IX - Reading and Interpreting the Histogram - Basic Adjustments
Part X - White Balance
Part XI - The Tonal Scale
Part XII - Presence Controls
Part XIII - Using Presence Controls To Enhance The Eyes
Part XIV - Using Presence Controls to Smooth the Skin
Part XV - Speeding Up Your Workflow Using Presets and the Painter Tool
Part XVI - Saving And Migrating Your Adobe Lightroom Presets
Part XVII - Tone Curve
Part XVIII - Tools - Effective Cropping, Straightening and Leveling
Part XIX - Graduated Filters
Part XX - Exposure vs. Brightness
Part XXI - Making Photo Books
Part XXII - Adjustment Brushes
Part XXIII - Understanding Channel Mixing to Achieve Effective Black and White Photos
Part XXIV - Organising Your Photo Catalog Using Metadata and Keywords

Introduction

Choosing the right tool to "develop" your RAW files is an important task: chances are you'll stick with it for a long time. And if you change your mind at a later time, chances are the migration path is not as easy as we'd like. Since I'm willing to commit to my hobby but unwilling to lose time changing tools from time to time, I wanted to make sure that I made the right decision. As a software developer and integrator, I'm perfectly aware of how much migrations cost, and my spare time is, well, kind of scarce. I've seen friends jumping from tool to tool (not only photography ones), only because of a new bleeding-edge feature, losing time migrating libraries from one tool to another. I just say no. And friends do not let friends do this, either, so that I'm writing this blog post hoping it will be of some help to you photography enthusiasts out there. Moreover: if such features are so good, rest assured that they'll end up finding their way into competitors' tools as well, in one incarnation or another.

I've tried many photography tools in the last few years, and the most important advice I can give you in this introduction is: many of them provide pretty similar features, so don't be afraid of choosing the wrong one. If you stick with proven ones (such as Adobe Photoshop Lightroom or Apple Aperture), you won't be missing any critical feature. However, since I'm sticking to Adobe Lightroom, I want to quickly summarize why I made this choice, in the first place. I'm won't be comparing Lightroom to any other tool in particular: the web is full of such reviews (which I used myself).

The Reasons Why I chose Lightroom

I stuck with Lightroom since the first time I tried it. It's an amazing tool, powerful yet pretty easy to use and it's available on multiple platforms. If you want to try it, you can download a 30-days trial from Adobe website. And if you decide to buy it, you can have a look at Amazon's: that's where I bought mine and chances are it's even cheaper than buying it directly from Adobe.

Lightroom is both an editing tool and a library manager. When you compare it with other software and make your choice, you should not only compare its RAW developing capabilities and the editing tools it offers. You should assess many often-overlooked aspects that may have a great impact in your workflow as a photographer in the years to come. Some of the aspects that I took into account when making the decision are:
  • How it deals with large quantities of files: when you start with photography you may not think about it, but whether you're a professional or not, your library is going to grow over time. RAW files are typically big in size and expect them to grow further as sensors resolutions increases as well. Since you don't want your tools' performance to degrade over time, it's wise you test your candidate tools in such an use case.
  • How it helps you organize your library: a big library is pretty useless if you can't your way into it. The software you choose should let you organize your items in a way that's comfortable to you and should at least provide the tools you need to organize, index and search amongst the items you're going to store in it.
  • How it deals with distributed storage systems: there's often no good reason for monolithic libraries and you're not going to store your entire library in a single hard disk. Period. Why? It depends on many factors but: your PC may not be equipped with a redundant storage system. If it is, you may not want to backup and restore the entire library in case something goes wrong: you'd rather split your library, according to your criteria, across different storage systems, and restore only what is lost from a backup. If you haven't got a redundant storage system, it's even more critical that you perform your backups on a regular basis and at least each time you import a new file into your library. Unfortunately, many people don't, and when your hard disk break it's to late for regrets. Let's face it: your hard disk will break, sooner or later. Just be prepared when it happens.
  • How it integrates with other tools: depending on your workflow, you might be using more than one tool during your workflow. Manually exporting a file from the library, editing it in another tool and importing it again into the library is nonsense and defies the very same nature of the a library manager. Even if you don't need it know, it's wise you assess how the tools you like are going to integrate other tools into your workflow. If you're using online services (such as SmugMug, Flickr, Google+, etc.), you should also assess how the tool integrates with them.
  • How wide is the ecosystem around it: the benefits of an economy of scale aren't limited to pricing policies only. The wider the audience that uses a tools, the better your overall experience with it might be. Chances are in the internet you will find plenty of information, tutorials, mailing lists, forums and user groups. If a tool is extensible, you may find a growing number of plugins for it, too, to extend its features.
  • How many supported systems there are: no matter how good a system is, I'm not willing to lock myself to one in particular. In this virtualized world, it's becoming a smaller issue, but it still is in some important cases: Apple Mac OS X, for example, can only be run upon Apple's hardware. If you're sticking to a Mac-only software, you're sticking to having Apple's hardware too. On the other hand, if you depend on Windows, Solaris, Linux (and many other operating systems), you can run them as virtualized guest instances in a great variety of configurations.

Why did I choose Lightroom? Lightroom performance, when measured against this evaluation matrix, was the clear winner and the best tool that fits my needs. It might not be yours, however, and the best way to find out is: download the software you're assessing and try it yourself.

If you want to help me keep on writing this blog, buy your Adobe Photoshop licenses at the best price on Amazon using the links below.