AdSense Mobile Ad

Thursday, December 8, 2011

Adobe Photoshop Lightroom Tutorial - Part XIV - Using Presence Controls to Smooth the Skin

Part I - Index and Introduction
Part XV - Speeding Up Your Workflow Using Presets and the Painter Tool

Local Contrast to Make Softer or Rougher Surfaces

In a couple of previous posts (see here and here) we learned about local contrast and how this effect can be easily achieved in Adobe Photoshop Lightroom. Local contrast, or Clarity in Lightroom's jargon, literally refers to the amount of contrast that's present locally in areas of colors and tones transitions of your image. Local contrast allows you to tweak your image without modifying the overall contrast and the tonal scale of your image:
  • Increasing the local contrast "sharpens" transitions and gives rougher surfaces. 
  • Decreasing the local contrast gives smoother surfaces.
Although clarity can be adjusted at the image level (I often raise it a bit to get punchier images) by its own nature local contrast is an adjustment that you often want to brush into your image.

Smoothing the Skin

One of the uses of a negative clarity is skin smoothing. Skin isn't so smooth a surface and unless your model has got a perfect one and your lighting conditions are optimal, his skin won't appear as smooth as we'd like. Here, we're not talking about skin imperfections (you're going to manually remove those with other brushes) but skin texture.

Depending on the image you'd like to get, you may need to correct the skin texture somehow. If you want to give your portrait a "dreamy" and "diffused" look and feel, this is a way to achieve it. As usual, there are plenty of way of doing it in Photoshop but this post will focus on the clarity (local contrast) adjustment. One of the good things of this adjustment is that it's really easy to use and it usually gives very good results with little effort.

To have an idea of what you're going to achieve, you can lower overall clarity of a portrait and see what happens. The reduced local contrast is going to take away sharpness to your model skin and smooth its surface. But unless you're happy with this result, you'd better take a brush and apply clarity locally.

Adobe Photoshop Lightroom ships with a Soften Skin brush since version 3. This brush is defined as follows:

Adobe Photoshop Lightroom - Soften Skin Brush

As you can see, this brush applies a negative Clarity adjustment of -100 (the minimum) and raises the Sharpness a bit to balance the extreme smoothing effect. There's no silver bullet here: you've got to try and tweak the brush parameters yourself until you get the result you expect.

Personally, I don't like this brush: it's too "extreme". I'd rather use a Clarity adjustment in the [-50,-60] range and adjust sharpness and saturation according to my taste.

A personal suggestion: in portraits where you're looking for a really smooth skin, try to desaturate the skin a bit. I find the results are more natural.

A Test Image

This is a crop from an image in which I want to brush in some negative clarity to smooth the skin of the model. This image was taken with bounce flash in a small room: the flash was bounced with an angle close to 80 degrees and the light hasn't lit evenly the face of the model. Remember: photography is all about light and you should try to get the results you want right out of the camera. Unfortunately, sometimes we cannot prepare the setup we need to get the right shot and that's when it's right to fix things in post production.

Original Image (Cropped)

Look at the original image. This is a cropped section of a shot a took by surprise: the model wasn't even wearing any make up. Besides having to remove some skin imperfections, I really don't like the overall texture of the skin. Also, the bounce flash hasn't properly lit the eyes and the skin underneath them. That's what I'm trying to fix with a negative clarity adjustment: I'll try to reduce the local contrast without affecting too much the overall texture of the skin or completely removing those shadows ending up with an unnaturally flat image.


Final Image (Cropped)

This is the result after brushing in some negative clarity (-70) and some sharpness. The result is much smoother but it's not yet unnatural. Since it's not a studio image and I want to preserve the overall look of the shot, I don't want to go any further.

In this image I also tweaked the eyes as explained in the previous post.


If you want to help me keep on writing this blog, buy your Adobe Photoshop licenses at the best price on Amazon using the links below.

Adobe Photoshop Lightroom Tutorial - Part XIII - Using Presence Controls To Enhance The Eyes

Part I - Index and Introduction
Part XIV - Using Presence Controls to Smooth the Skin

In the previous parts of this Adobe Photoshop Lightroom Tutorial we've described how presence controls work in order for you to have a deeper understanding of what's going on during the development of your image. In this part of the tutorial we'll use some of these controls to slightly "enhance" the eyes of a model and make them "pop".

The Original Image

The original image was taken with a bounced flash: we decide to bounce the flash from the ceiling to achieve a softer and more diffused lightning but, sometimes, parts of your subject won't be sufficiently lightened. It's not generally a problem, since soft shadows are part of the effect we want to achieve with bounced flash, but sometimes we want eyes to be brighter. Because of their natural position and depending upon the lightning conditions (we usually avoid light to bounce directly on them), eyes are often poorly lit with a resulting loss of color saturation and natural look.

Original Image - Poorly Lit Eyes

In this example photo the effect is subtle: as an absolute value, you can consider eyes to be properly exposed. However, this is an effect of the slight overexposure I gave to the entire shot. If you have a look at the skin tone of the model, you'll realize that the key of this image if fairly high.

Tweaking the Iris

Adobe Photoshop Lightroom version 3 already comes with a brush that's suitable to enhance the iris. You can choose a Lightroom brush, or even create one of your own, selecting the brush icon just below the histogram (in the Develop module), and then choosing a brush from the drop-down menu.

Lightroom Irish Enhance Brush

Let's have a look at how this brush is defined and try to understand what's going on. Take into account that every image is different and that there's no silver bullet:
  • It raises the exposure of about 2/3 of an f-stop.
  • It raises the saturation.
  • It raises the local contrast (clarity).
Pretty intuitive, isn't it? The exposure compensation will make the iris brighter and the increased saturation will make its color pop. The local contrast enhancement is a subtler effect that might not be very visible depending on the iris. Remember from a previous post that local contrast is a technique used to add depth to an image raising the contrast only locally, without affecting the overall dynamic range. Depending on the dynamic range found in the iris, this adjustment will have a bigger or smaller effect. You'll probably notice it more in clear irises, such as blue eyes ones, where you often find radial "stripes" of different tones: clarity is going to make them really pop.

Tweaking the Sclera (the White of the Eye)

The sclera (the white of the eye) may be affected by the same problem: a slight underexposure. Other times it may be affected by problems that are even worse and it may appear not at all white. To quickly fix such a problem we can use a different brush with the following settings:

Custom Brush - Tweaking the White of the Eyes

What does this brush do? The following:

  • It raises the brightness.
  • It decreases the saturation.

As we recall from the previous post, raising the brightness is a way to brighten an image without affecting its white point. That's why this is one of the (few) cases in which I prefer to use brightness instead of exposure: the sclera, as well as teeth, may be already bright in your image. Raising the exposure of such a zone may clip some channels: for this reason, we choose to be conservative and raise the brightness instead. Decreasing the saturation is going to remove any color cast that your eyes may have, such as small rashes.

The Final Image

Here you can see the final image. You can notice how the irises are deeper and more saturated and the sclera, especially the one of the model's right eye, is brighter. The glance has more depth. The effect is subtle and it had better be: eyes are going to attract people's attention and you don't want to give them an unnatural look.

Final Image (Cropped)


If you want to help me keep on writing this blog, buy your Adobe Photoshop licenses at the best price on Amazon using the links below.

Sunday, November 27, 2011

A New Firmware Is Available for the Nikon D5100

Nikon has released an updated firmware for its consumer DSLR camera, the Nikon D5100. The new firmware, v. 1.01, officially solves the following bugs:

  • Some memory cards weren't recognized correctly.
  • The selective color retouch tool sometimes left the border of an image unchanged when the image quality was set to NEF+JPG and the image size was set to M or S.
  • The exposure differential when taking HDR images using matrix metering and automatic exposure differential is not fixed to 2 EV any longer.
Installing the firmware is straightforward:
  • Copy the firmware image to a memory card root folder and insert the card into the camera.
  • Choose the Firmware version item in the camera Configuration menu.
  • Use the Update menu item and follow the on-screen instructions. The upgrade will take less than a couple of minutes.
  • Turn off the camera and remove the memory card.
  • Turn on the camera, check if the new firmware has been installed, using the Firmware version item in the camera Configuration menu.
  • Turn off the camera and wait at least 5 seconds before using it.

Undocumented Changes

I discovered that the weird Auto ISO behaviour with a hot-shoe mounted flash that I described in another post has suffered a change. With the new firmware, the Auto ISO behaviour with both the pop-up flash and a hot-shoe mounted flash is the same and is consistent with the Auto ISO documented behaviour: the ISO is automatically raised up to the maximum value specified in the camera settings.

Sunday, November 13, 2011

Network Configuration in Solaris 11 with NWAM Profiles

Oracle has just released the Solaris 11 operating system, the new production ready Solaris major release. It's an "interesting" release since it's the first Solaris major release under the Oracle egemony and it inherits all of the technologies many of us have been using, in the last few years, in the Solaris Express and OpenSolaris releases that Sun Microsystems used to provide.

This blog post is the first part of a series of quick wrap ups for the impatient to quickly start and configure their new Solaris 11 servers. My advice is always the same: read the manual.

Network Configuration Changes in Solaris 11

Network configuration in Solaris 11 is pretty different than it was in earlier Solaris releases (including Solaris Express) and many administrators may be taken by surprise. Some of these changes were introduced in the corresponding OpenSolaris projects, such as Crossbows, and may be known by many of us. To sum things up, the major differences are the following:
  • Network configuration is now managed by a profile.
  • The dladm command now centralizes the configuration of layer 2 datalinks: many tasks performed by the ifconfig command on previous Solaris releases are now to be performed using the dladm command.
  • Datalink names aren't bound to their hardware driver name any longer.
  • IP interfaces on layer 3 are configured by using the ipadm command: the venerable ifconfig command has been deprecated in the Solaris 11 release.
  • IP network multi pathing (IPMP) groups are now implemented as IP interface and as such, configured with the ipadm command.
  • The new ipmpstat command has been introduced to gather statistics about IPMP groups.
  • Network virtualization has been implemented on the network device level.

The Solaris 11 Network Stack

The new Solaris 11 network stack is similar to Solaris 10's. Yet, some improvements have been introduced that administrators are simply going to love.
In the new network stack, the software layer has been decoupled from the hardware layer: this means that:
  • The network configuration of a system (or a zone) is insulated from the hardware it's running upon. 
  • As already stated, datalink names can be customized.
  • Many network abstractions (such as VNICs) are managed in the datalink layer: this means that all of the datalink configurations can be centrally managed with one administrative interface.
On Solaris 11, then, datalinks aren't named from the underlying physical devices and, by default, are named using the netn scheme, where n is a 0-based integer index. This apparently minor modification has a very important consequence: if you modify the underlying hardware, a network configuration may still be valid if the datalink name is left unchanged. This is really handy, for example:
  • If the underlying hardware of a box changes.
  • If you migrate zones across systems.
  • If you write generic configurations for a wide set of boxes.
The mapping between a datalink and the underlying physical device can be inspected with the dladm command:

$ dladm show-phys
LINK  MEDIA     STATE  SPEED  DUPLEX  DEVICE
net0  Ethernet  up     1000   full    e1000g0
net1  Ethernet  up     1000   full    e1000g1

Network Auto-Magic (NWAM)

Long time users of older Solaris Express releases will remember the introduction of the Network Auto-Magic feature into the operating system. NWAM is a feature that automates the basic network configuration of a Solaris box. NWAM in Solaris 11 has been greatly enhanced and it now supports the following concepts:
  • NCP.
  • Location.  
An NCP is a an administrative unit that specifies the configuration of the components of the network setup such as physical links and IP interfaces. An NCP is itself made up of NCUs (Network Configuration Units) representing the configuration of a physical link or interface.

A Location profile is another administrative unit that let the administrator specify:
  • The conditions under which a profile should be activated.
  • The naming service configuration.
  • The domain name.
  • The IP filter rules.
  • The IPSec policy.
At a given time, only one NCP and one Location profile will be active in a Solaris system.

NWAM is handy when a system network configuration is changed often and an administrator, in those cases, can encapsulate the different and required configurations in profiles (NCPs and Location profiles) and activate them when needed.

If you're using the Solaris 11 desktop, you can use the Network Preferences application (which can be found into the System/Administration menu) to quickly build NCPs and Location profiles.

Network Preferences

In the following sections we will use some NWAM administrative commands but we won't dig into this subject any more and let NWAM administration be the topic of another post.

Configuring the Network

Depending on how a newly Solaris 11 installation has been performed, your initial network configuration may differ. If you've installed it from the Live CD, the Automatic NCP and the Automatic Location profile are active. These profiles are pretty simple: they configure every IP interface and the name service using DHCP, leaving any other configuration option (IP filters, IPSec, etc.) disabled.

If you're using Solaris on your PC this configuration may be good for you but chances are you might be installing some server that requires a less trivial network configuration.

Creating an NCP profile
The first thing you're going to do is creating a new NCP:

$ netcfg create ncp datacenter

The datacenter NCP will be the container of our configuration and we will add the NCU that we need for every link and IP interface we're going to configure.

# netcfg
netcfg> select ncp datacenter
netcfg:ncp:datacenter> create ncu phys net0
Created ncu 'net0'.  Walking properties ...
activation-mode (manual) [manual|prioritized]> 
link-mac-addr> 
link-autopush> 
link-mtu> 
netcfg:ncp:datacenter:ncu:net0> end
Committed changes
netcfg:ncp:datacenter> create ncu ip net0
Created ncu 'net0'.  Walking properties ...
ip-version (ipv4,ipv6) [ipv4|ipv6]> ipv4
ipv4-addrsrc (dhcp) [dhcp|static]> static
ipv4-addr> 192.168.1.53
ipv4-default-route> 192.168.1.1
netcfg:ncp:datacenter:ncu:net0> end
Committed changes
netcfg:ncp:datacenter> exit

With the netcfg command we created an NCP with the following characteristics:

  • It has an NCU for a physical interface (net0). This NCU has been configured with default values for all of its properties (such as MAC address or MTU).
  • It has an NCU for an IP interface (net0). This NCU has been configured with a static IPv4 address and a default router.
If you activate this profile, your system will reconfigure the network according to the settings of this NCP:

# netadm enable -p ncp datacenter
Enabling ncp 'datacenter'

If we now check the IP interfaces we can see how they've been configured according to the above-mentioned NCUs: the net1 IP interface is up while the net0 interface has disappeared.

# ipadm show-if
IFNAME  CLASS     STATE  ACTIVE OVER
lo0     loopback  ok     yes    --
net1    ip        ok     yes    --

If we check the IP addresses currently used, the ipadm command confirms that only net1 has been assigned an address which is the static address we configured in the NCU. Again, net0 has disappeared.

# ipadm show-addr
ADDROBJ  TYPE    STATE  ADDR
lo0/v4   static  ok     127.0.0.1/8
net1/_a  static  ok     192.168.1.53/24
lo0/v6   static  ok     ::1/128

If we know check the state of the datalinks, we can see that net0 is in the unknown state while net1 is up.

# dladm show-phys
LINK  MEDIA     STATE    SPEED  DUPLEX  DEVICE
net0  Ethernet  unknown  1000   full    e1000g0
net1  Ethernet  up       1000   full    e1000g1

If we wanted to add both the net0 datalink and IP interface into the profile, we could simply modify it and create the corresponding NCUs.

If we now try to resolve some name, however, we discover that it's not going to work. If you remember, we're still using the Automatic location profile which configure the name resolver using DHCP. In this case, however, DHCP isn't being used so that the resolver is not going to resolve any name.

What we need now, is a corresponding location profile.

Creating a Location Profile
To configure the resolver settings, we can now create a new location profile, using once more the netcfg command:

netcfg> create loc datacenter
Created loc 'datacenter'.  Walking properties ...
activation-mode (manual) [manual|conditional-any|conditional-all]> 
nameservices (dns) [dns|files|nis|ldap]> 
nameservices-config-file ("/etc/nsswitch.dns")> 
dns-nameservice-configsrc (dhcp) [manual|dhcp]> manual
dns-nameservice-domain> 
dns-nameservice-servers> 192.168.1.1
dns-nameservice-search> yourdomain.com
dns-nameservice-sortlist> 
dns-nameservice-options> 
nfsv4-domain> 
ipfilter-config-file> 
ipfilter-v6-config-file> 
ipnat-config-file> 
ippool-config-file> 
ike-config-file> 
ipsecpolicy-config-file> 
netcfg:loc:datacenter> 
netcfg:loc:datacenter> end
Committed changes
netcfg> end

As soon as we enable the newly created location profile, the resolver is going to use the configured settings and it's just going to work:

$ netadm enable -p loc datacenter
Enabling loc 'datacenter'

$ nslookup www.oracle.com
Server: 192.168.1.1
Address: 192.168.1.1#53

Non-authoritative answer:
www.oracle.com canonical name = www.oracle.com.edgekey.net.
www.oracle.com.edgekey.net canonical name = e4606.b.akamaiedge.net.
Name: e4606.b.akamaiedge.net
Address: 2.20.190.174

Conclusion

As you can see, configuring the basic network settings in a Solaris 11 system is clean and easy. The new administrative interface lets you easily define, store and activate on-demand multiple network configuration for your system without the need of writing and maintaing multiple copies of the old style Solaris network configuration files.

Friday, November 11, 2011

Orton Imagery in Adobe Photoshop

The Orton imagery (a.k.a. Orton effect), named after the photographer Michael Orton, is a technique whose goal is achieving regions of high details and regions of low details in the same image.
The original technique was developed making sandwiches of slide films of the same scene taken with different levels of overexposures and different focussed areas. However, one could also choose to blend completely different slides to achieve more dramatic and artistic effects.

The Orton effect can be easily replicated in the domain of digital photography and, depending on the shooting conditions, even without bracketing exposures or voluntarily defocusing some shots. If you're shooting RAW, it's really easy to modify the exposure of a shot without loosing information, at least for relatively small adjustments: it all depends on the specific camera and RAW file format.

I agree that it's always better if you try to get things right on camera, but sometimes you simply don't known the effects you're going to use in post production. However, since what we need is usually just a maximum +2 f-stop overexposure, there's really no issue doing it during your post-production workflow.

The Basics

As we stated in the introduction, the Orton effect originated with slide films:
  • Two shots differently overexposed were taken.
  • One of them was taken out of focus.
  • The two positive slides were "sandwiched" one above the other.
Since one of the two shots has to be taken out of focus, perfect alignment isn't an issue so don't worry if you're not shooting with a tripod when you realize you're going to take an Orton-candidate shot.

In the digital domain, you aren't going to physically slide any slide and you're going to blend a couple of layers instead. To simulate the effect of two positive layers one above the others, we're going to use the Multiply blending mode:
  • Multiply darkens the lower layer based on the darkness of the upper layer.
This is consistent with what happens to a slide sandwich:
  • Being positive, the white is transparent, and the superposition of two transparent slides filters no light (if we ignore the effect of the slide plastic material itself).
  • Any non transparent area will filter (darken) the light that passes through hence two overlapped slides will filter the light twice.

Overexposing the Image

Since the overlapping layers will be multiplied, they should be overexposed so as to preserve the desired exposure of the resulting image. There's no formula to determine how much the two layers must be overexposed, just trial and error and a bit of experience.

As a rule of thumb, a total overexposure of 2 or 3 f-stops will usually give good results. However, care must be taken:
  • To avoid to clip some channel up: this may be an issue with images with large highlight areas that will be clipped with little overexposure.
  • To avoid to clip some channel down: this may be an issue with images with large shadow areas that are going to clip the black point when multiplied.
Usually, my golden rule is:
  • The darker an image, the more I overexpose it, paying attention not to clip the white.
Once a channel is clipped, information is lost. Even if you multiply two layers where the white is clipped, the result in the clipped pixels will still be white.

Defocusing the Image

This is the most critical step, indeed. If you defocus the image on camera, you're taking advantage of your lens bokeh. This is something difficult to replicate in post production, and few software have some better blurring algorithms rather than motion blur or gaussian blur.

I usually rely on the gaussian blur filter to defocus an image in post production but, if you're a Photoshop user, you could use the more advanced lens blur filter.

How To Overexpose

As I said, you've got two choices:
  • Either you overexpose on camera.
  • Or you overexpose on post production.
If you're choosing the quickest path, I seriously recommend you do it only if you shoot RAW. Shooting RAW has got the advantage of recording more dynamic range than what it's actually shown in the picture. When you overexpose a RAW image you're going to get better results, especially in the shadows area, where the additional information will bring up more details in the darkest tones.
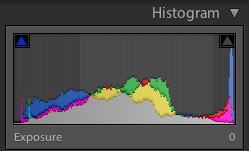
For the sake of this example, we're going to overexpose a RAW image in post production using Adobe Lightroom. As you can see from the histogram, the blue and red channels are going to be clipped as soon as we overexpose the image.

Histogram of the Original Image

In this case, I decided to apply a minimum overexposure of 1 f-stop and postpone the final decision after checking the final result. The original image and the resulting overexposed image by 1 f-stop are the following:

Original Image

Image Overexposed by 1 f-stop

Much of the area of the petals may seem burned out but, fortunately, there's still sufficient information for the multiply blending mode to bring down in the final result, as you can see from the following image:


Orton Effect in Photoshop

Now that the two overexposed images are ready, let's switch to Photoshop to compose the final Orton image. This process is pretty simple and Photoshop is not required: you can use Photoshop Elements or The Gimp, just to cite a few. In this case, we're going to use Photoshop Elements.
The first step is trivial: opening the two images.

The Two Images Opened in Photoshop Elements

The second step is pasting the second photo as a new layer in the first photo. The quickest way to do it is:
  • Use the Select/All menu option.
  • Choose the Move tool from the palette (or press the V key).
  • Drag the selected image into the other. In Photoshop Elements you are required to drag it over the title tab, first, to have Photoshop switch between the two documents.
  • Photoshop will automatically create the second layer for you.
  • Use the move tool to align the two images.
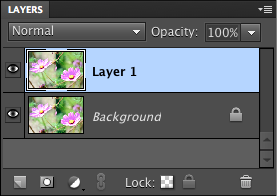
In the layer palette, you should see the newly created layer.

Layer Palette - Resulting Layers

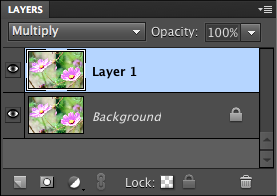
Now, change the blending mode of the upper layer to Multiply.

Layer Palette - Second Layer Blended with Multiply

The result so far should be a darker, more contrasted and more saturated image such as the following:

Resulting Image After Applying the Multiply Blending Mode

The last step is blurring the upper image. In this case we're going to use the gaussian blur filter but, if you've got some other blurring filter, you can try and explore new possibilities.

Also, the "quantity of blur" (radius, in the case of the gaussian blur filter) will depend on your image. For a good Orton effect you need to blur an image so that details are lost but shapes preserved. With a flower of such size in a 16 Megapixels image, I applied the gaussian blur filter with a radius of 20 pixels to achieve the following result (only the blurred layer is shown):

Gaussian Blur Filtered Layer with Radius = 20 px

The Result

The final result is this:

Final Result - Orton Effect

As you can see, the Orton effect is faithfully reproduced.

It's important to realize that every image is different, and so is the effect that you've got in your mind. The parameters you're going to use can be tweaked in order to achieve the desired effect:
  • If you want a softer (or sharper) image, just raise (or lower) the gaussian blur radius.
  • If the image is too dark, raise the overexposure of one or both of the layers.
  • If the image is too light, lower the overexposure of one or both of the layers.

A Tip For Who's Not Shooting RAW

If you want to apply this effect to a non-RAW image, you need to overexpose it using other means. The only thing you can refrain from trying is using the Brightness adjustment. It's just not designed for that and the results you're going to achieve will be awful, at best.

A good technique to simulate an overexposure in Photoshop (or The Gimp) is using the Screen blending mode. The screen blending mode can be thought as the opposite of the Multiply blending mode:
  • It brightens the lower layer proportionally to the brightness of the upper layer.
Blending an image with itself with the Screen blending mode is a good way to simulate an overexposure.

If you want to help me keep on writing this blog, buy your Adobe Photoshop licenses at the best price on Amazon using the links below.