The original technique was developed making sandwiches of slide films of the same scene taken with different levels of overexposures and different focussed areas. However, one could also choose to blend completely different slides to achieve more dramatic and artistic effects.
The Orton effect can be easily replicated in the domain of digital photography and, depending on the shooting conditions, even without bracketing exposures or voluntarily defocusing some shots. If you're shooting RAW, it's really easy to modify the exposure of a shot without loosing information, at least for relatively small adjustments: it all depends on the specific camera and RAW file format.
I agree that it's always better if you try to get things right on camera, but sometimes you simply don't known the effects you're going to use in post production. However, since what we need is usually just a maximum +2 f-stop overexposure, there's really no issue doing it during your post-production workflow.
The Basics
As we stated in the introduction, the Orton effect originated with slide films:- Two shots differently overexposed were taken.
- One of them was taken out of focus.
- The two positive slides were "sandwiched" one above the other.
In the digital domain, you aren't going to physically slide any slide and you're going to blend a couple of layers instead. To simulate the effect of two positive layers one above the others, we're going to use the Multiply blending mode:
- Multiply darkens the lower layer based on the darkness of the upper layer.
- Being positive, the white is transparent, and the superposition of two transparent slides filters no light (if we ignore the effect of the slide plastic material itself).
- Any non transparent area will filter (darken) the light that passes through hence two overlapped slides will filter the light twice.
Overexposing the Image
Since the overlapping layers will be multiplied, they should be overexposed so as to preserve the desired exposure of the resulting image. There's no formula to determine how much the two layers must be overexposed, just trial and error and a bit of experience.As a rule of thumb, a total overexposure of 2 or 3 f-stops will usually give good results. However, care must be taken:
- To avoid to clip some channel up: this may be an issue with images with large highlight areas that will be clipped with little overexposure.
- To avoid to clip some channel down: this may be an issue with images with large shadow areas that are going to clip the black point when multiplied.
- The darker an image, the more I overexpose it, paying attention not to clip the white.
Defocusing the Image
This is the most critical step, indeed. If you defocus the image on camera, you're taking advantage of your lens bokeh. This is something difficult to replicate in post production, and few software have some better blurring algorithms rather than motion blur or gaussian blur.I usually rely on the gaussian blur filter to defocus an image in post production but, if you're a Photoshop user, you could use the more advanced lens blur filter.
How To Overexpose
As I said, you've got two choices:- Either you overexpose on camera.
- Or you overexpose on post production.
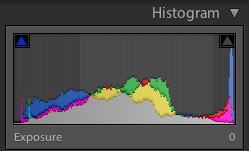
For the sake of this example, we're going to overexpose a RAW image in post production using Adobe Lightroom. As you can see from the histogram, the blue and red channels are going to be clipped as soon as we overexpose the image.
 |
| Histogram of the Original Image |
In this case, I decided to apply a minimum overexposure of 1 f-stop and postpone the final decision after checking the final result. The original image and the resulting overexposed image by 1 f-stop are the following:
 |
| Original Image |
 |
| Image Overexposed by 1 f-stop |
Much of the area of the petals may seem burned out but, fortunately, there's still sufficient information for the multiply blending mode to bring down in the final result, as you can see from the following image:
Orton Effect in Photoshop
Now that the two overexposed images are ready, let's switch to Photoshop to compose the final Orton image. This process is pretty simple and Photoshop is not required: you can use Photoshop Elements or The Gimp, just to cite a few. In this case, we're going to use Photoshop Elements.The first step is trivial: opening the two images.
 |
| The Two Images Opened in Photoshop Elements |
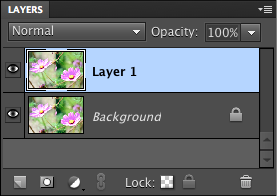
The second step is pasting the second photo as a new layer in the first photo. The quickest way to do it is:
- Use the Select/All menu option.
- Choose the Move tool from the palette (or press the V key).
- Drag the selected image into the other. In Photoshop Elements you are required to drag it over the title tab, first, to have Photoshop switch between the two documents.
- Photoshop will automatically create the second layer for you.
- Use the move tool to align the two images.
 |
| Layer Palette - Resulting Layers |
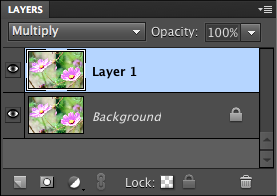
Now, change the blending mode of the upper layer to Multiply.
 |
| Layer Palette - Second Layer Blended with Multiply |
The result so far should be a darker, more contrasted and more saturated image such as the following:
 |
| Resulting Image After Applying the Multiply Blending Mode |
The last step is blurring the upper image. In this case we're going to use the gaussian blur filter but, if you've got some other blurring filter, you can try and explore new possibilities.
Also, the "quantity of blur" (radius, in the case of the gaussian blur filter) will depend on your image. For a good Orton effect you need to blur an image so that details are lost but shapes preserved. With a flower of such size in a 16 Megapixels image, I applied the gaussian blur filter with a radius of 20 pixels to achieve the following result (only the blurred layer is shown):
 |
| Gaussian Blur Filtered Layer with Radius = 20 px |
The Result
The final result is this: |
| Final Result - Orton Effect |
As you can see, the Orton effect is faithfully reproduced.
It's important to realize that every image is different, and so is the effect that you've got in your mind. The parameters you're going to use can be tweaked in order to achieve the desired effect:
- If you want a softer (or sharper) image, just raise (or lower) the gaussian blur radius.
- If the image is too dark, raise the overexposure of one or both of the layers.
- If the image is too light, lower the overexposure of one or both of the layers.
A Tip For Who's Not Shooting RAW
If you want to apply this effect to a non-RAW image, you need to overexpose it using other means. The only thing you can refrain from trying is using the Brightness adjustment. It's just not designed for that and the results you're going to achieve will be awful, at best.A good technique to simulate an overexposure in Photoshop (or The Gimp) is using the Screen blending mode. The screen blending mode can be thought as the opposite of the Multiply blending mode:
- It brightens the lower layer proportionally to the brightness of the upper layer.
If you want to help me keep on writing this blog, buy your Adobe Photoshop licenses at the best price on Amazon using the links below.

No comments:
Post a Comment