More than two years ago I wrote tm-cleanup.sh, a shell script to delete Time Machine backups. During this time it has proven very useful to me, and it's been serving its purpose as it is, with barely any modification at all.
However, I've been asked for help and clarifications quite a number of times by non-tech-savvy users who had some issues using the CLI. For this reason I thought that adding an interactive, dialog-based interface to this script may help people "visualise" what's going on when running tm-cleanup.sh.
The new interface has been added in v. 2.0.0, and can be opened by simply issuing the following command with no options:
$ sudo tm-cleanup.sh
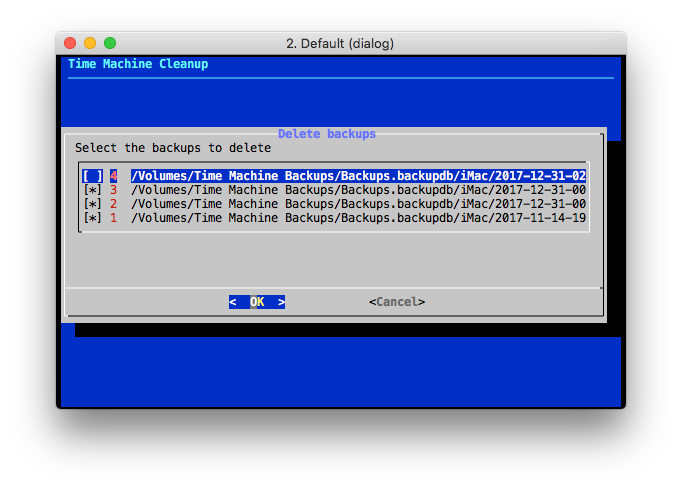
The interactive interface opens a menu where the backup deletion operation can be triggered. The user is then presented the list of existing Time Machine backups and they can be individually selected and then deleted. Here's a screenshot of the interface showing the existing backups:
The documentation of the repository describes in detail both interfaces. I hope people will find it useful.
AdSense Mobile Ad
Showing posts with label backup. Show all posts
Monday, January 1, 2018
Saturday, May 2, 2015
A Shell Script to Delete Old Time Machine Backups and Free Disk Space
In another post I described the procedure to manually delete Time Machine snapshots and optionally shrink the disk image (in case a sparse bundle is being used) in order to free up disk space.
I have written a shell script, tm-cleanup.sh, to automate the backup deletion. The script accepts an optional argument to specify the maximum backup age in days: older backups are deleted (by default, backups older than 30 days are deleted).
The latest version of the script can be obtained by cloning its GitHub repository and, optionally, run its installation script to create symbolic links to it into /usr/local/bin:
$ sudo make install
I have written a shell script, tm-cleanup.sh, to automate the backup deletion. The script accepts an optional argument to specify the maximum backup age in days: older backups are deleted (by default, backups older than 30 days are deleted).
The latest version of the script can be obtained by cloning its GitHub repository and, optionally, run its installation script to create symbolic links to it into /usr/local/bin:
$ sudo make install
Monday, March 17, 2014
Shrink Your Time Machine Backups and Free Disk Space
Update: In a newer post, I describe a shell script I published to automate Time Machine backup deletion.
Time Machine is a backup and restore tool from Apple which is very well integrated into OS X. In my personal opinion Time Machine is not yet awesome and its shortcomings often force me to use alternative methods when I need to backup files and folders with certain characteristics.
The most important use case in which I strongly discourage anybody to use Time Machine is the backup of frequently updated big files. Time Machine always copies the whole file because it is not able to transfer only the differences between the previous state of a file and the current one. This fact has many detrimental consequences:
Anyway, no matter how Time Machine has eaten up a lot of your disk space, it may come a moment when you really need to free some of it, possibly deleting old backups and shrinking a Time Machine sparse bundle disk image.
Time Machine is a backup and restore tool from Apple which is very well integrated into OS X. In my personal opinion Time Machine is not yet awesome and its shortcomings often force me to use alternative methods when I need to backup files and folders with certain characteristics.
The most important use case in which I strongly discourage anybody to use Time Machine is the backup of frequently updated big files. Time Machine always copies the whole file because it is not able to transfer only the differences between the previous state of a file and the current one. This fact has many detrimental consequences:
- Backups are slow.
- Backups may take a huge amount of disk space.
When I say huge, I mean enormous. Think about a virtual machine disk stored as a file in your disk: if just one bit of that file changes (and you can bet it changes every time you use your virtual machine), Time Machine will perform a copy of the whole file the next time a backup is run.
Fortunately, there exist tools which are able to examine a file and transfer only the difference with a previous stored state, such as rsync, on which you can rely to build your custom backup policies.
Anyway, no matter how Time Machine has eaten up a lot of your disk space, it may come a moment when you really need to free some of it, possibly deleting old backups and shrinking a Time Machine sparse bundle disk image.
Deleting Old Backups
Old backups can be deleted in many ways, the simplest one being the following:- Open the Time Machine application when the Finder application is in the foreground.
- Navigate to the backup to be deleted double clicking on the corresponding position of the ruler on the right side of the screen.
- Right click with the mouse on the empty space in the Finder.
- Select Delete Backup.
Time Machine will ask you to introduce the super user password and then it will delete the selected backup.
Unfortunately this method is very clumsy if you need to delete many backups.
Another way is using the tmutil command to perform the deletion. Not only it is simpler, but it will allow you to do it programmatically if you need to. To delete a backup using tmutil you must perform the following operations:
- Make sure your time machine backup disk is mounted (the simplest way to do it is opening the Time Machine application).
- The format of the backup folders created by Time Machine is YYYY-MM-DD-HHmmss. If you want to delete a specific backup, you can use the following command:
Time Machine currently stores its backups in a folder named after the backed up machine, into the Backups.backupdb folder in the backup disk. This means that, if your machine is called iMac and your backup disk is mounted on /Volumes/Time Machine Backups, then backups will be located in the following folder:
/Volumes/Time Machine Backups/Backups.backupdb/iMac
If you want to delete the 2014-02-02-123411 backup, you must run the following command:
/Volumes/Time Machine Backups/Backups.backupdb/iMac
If you want to delete the 2014-02-02-123411 backup, you must run the following command:
$ sudo tmutil delete /Volumes/Time Machine Backups/Backups.backupdb/iMac/2014-02-02-123411
You can easily make a script, for example, to delete all the backups of a specific month. The following commands will delete all the backups created in January 2014 (lines were split with \):
$ sudo bash
Password:
$ for i in /Volumes/Time\ Machine\ Backups/Backups.backupdb/iMac/2014-01* ; \
do \
tmutil delete "$i" ; \
done
In this case, though, you will have to mount the disk image file created for every machine and named after it. Time machine creates sparse bundle disk images which can be mounted using the Disk Utility application:
In this case, when Time Machine frees disk space, the space is freed inside the disk image, but unless the disk image itself frees it as well, the result is that no space is relinquished outside of it.
Fortunately, unallocated space can be freed from a sparse bundle using the following command (make sure the disk image is not mounted when executing this command):
$ sudo hdiutil compact /path/to/disk-image
Starting to compact…
Reclaiming free space…
.................................................................................................................................................................................................................
Finishing compaction…
Reclaimed 11.2 GB out of 118.7 GB possible.
As you can see, hdiutil reports the space which has been reclaimed and you should now see the specified amount of space as additional free space in the corresponding disk.
You can easily make a script, for example, to delete all the backups of a specific month. The following commands will delete all the backups created in January 2014 (lines were split with \):
$ sudo bash
Password:
$ for i in /Volumes/Time\ Machine\ Backups/Backups.backupdb/iMac/2014-01* ; \
do \
tmutil delete "$i" ; \
done
Deleting Backups of Any Machine
The same commands can be used to delete backups performed by any machine, not only the machine you are executing them from. This is particularly useful if your time machine backup disk is located on a NAS (such as Apple's Time Capsule).In this case, though, you will have to mount the disk image file created for every machine and named after it. Time machine creates sparse bundle disk images which can be mounted using the Disk Utility application:
- Open the Disk Utility application.
- Choose the File/Open Disk Image... menu item (⌥⌘O).
- Choose the disk image file corresponding to the backup disk of the machine whose backups you want to delete.
Freeing Space
Now that you are able to delete backups, you may notice that no disk space is relinquished if a sparse bundle disk image is being used as backup disk, which is the default behaviour when the backup disk is not a locally attached physical disk.In this case, when Time Machine frees disk space, the space is freed inside the disk image, but unless the disk image itself frees it as well, the result is that no space is relinquished outside of it.
Fortunately, unallocated space can be freed from a sparse bundle using the following command (make sure the disk image is not mounted when executing this command):
$ sudo hdiutil compact /path/to/disk-image
Starting to compact…
Reclaiming free space…
.................................................................................................................................................................................................................
Finishing compaction…
Reclaimed 11.2 GB out of 118.7 GB possible.
As you can see, hdiutil reports the space which has been reclaimed and you should now see the specified amount of space as additional free space in the corresponding disk.
Thursday, January 10, 2013
Backups Using Amazon S3 and Glacier: A Clarification
Some days ago I published a post about the recent integration of Glacier as a new storage class in Amazon S3 and how it pages the way to new and interesting use cases, even for home users, despite being a service more geared towards enterprise users. The post was then kindly cited by Ted Forbes on the latest instalment (at the time of writing) of his excellent photography podcast, The Art Of Photography: Episode 118, Photo Storage with Amazon Glacier and S3. The podcast has surely driven a great deal of visits to my blog post, and I've received lots of emails with questions related to it.
Many of them asked whether I ever did, or why the post did not, consider other more user-friendly backup solutions in the cloud. In fact, most of these comments focussed on completely different kind of services, with a particular emphasis on services which enable easy and automatic backups of both entire computers, drives, or folders.
Now, it was never my intention to go into details of that kind of offering, and I won't do it know. But I do think that a followup to the original post is necessary to clarify a couple of things.
First of all, I want to stress the relevance of a fundamental assumption that I took for granted when choosing S3 and Glacier as a cold storage service for some files of mine: I want to offload files from my disks, assuming I'm done working with them and won't almost certainly need to access them in the medium term (if not in the foreseeable future). Ted made a great work in his podcast episode in explaining how Amazon S3 and Glacier can be used and in suggesting some interesting use cases. Ted certainly did a better job than I did in the original blog post in suggesting that Glacier is an interesting option to offload big files we don't use often to a reliable and affordable cloud storage service.
In fact, in my current workflow there's no room (nor will) for other kinds of strategies than offloading from my workstations, and I suspect many users out there have got similar workflows and issues (I guess photographers do). Some kind of content is very "bulky": photographs and video footage can easily reach the tens of gigabytes per work session, if not more, and even an amateur photographer like me can easily overgrow its hard disk, no matter how big it is. Of course, I've always kept on expanding my disk pools at home to satisfy the always increasing need of space, but I'm certainly not willing to maintain unnecessary files on the internal hard disks of my machine beyond the amount of time strictly necessary to work on them. Once I'm done with them, I either back them up in my home storage appliance (if I foresee the need to have them quickly available) or I offload them.
That's the use case Glacier is great for! I'm not asking for anything more, nor anything less, than an affordable and reliable site to store them until I'll need them, should it ever happen.
To make a long story short, I agree there are lots of alternatives out there, each of them with its own features, strengths and shortcomings, and different level of complexity. Google Drive, for example, is just great to keep a relatively small amount of content organised and synchronised across a wide range of devices. CrashPlan offerings for home users are a great way to start easily backing up entire computers and drives. Zoolz have got a similar offerings, with distinct online and cold storage tiers.
Nevertheless, what I really don't like about some of this services is the fact that they sometimes charge depending on the number of users and/or computers you're backing up. I'm using many different devices and, because of my workflow, they're all still pretty easy to setup and contain pretty much the same data: I just keep locally the applications I need and the data I'm working on. Everything else is not kept in my the internal hard drives. This approach is very convenient because I never worry about the loss of a machine: I just need to install the OS and the applications which, of course, I always keep available. As an OS X user I don't even use Time Machine, because it's quicker (much quicker) to just reinstall the OS and the apps I need. Let alone synchronising tens of gigabytes over the internet. For me it's just non sense, I just need to work fast and to recover fast. But I recognise it's certainly appealing to lot of other users with different needs.
For that reason, in my workflow I really don't need nor want any client synchronising anything on the wire. I just load a bunch of data I'm working on on my workstations (a photo session, for example), back it up locally elsewhere (as you should always do with assets you need and cannot lose) and, when I'm finished with it, I offload it somewhere else and delete it from my drives.
That somewhere is currently Amazon S3 and Amazon Glacier: it's affordable, it's easy to use and no matter how many devices I'm working on, I can always grab my data if I need it.
Many of them asked whether I ever did, or why the post did not, consider other more user-friendly backup solutions in the cloud. In fact, most of these comments focussed on completely different kind of services, with a particular emphasis on services which enable easy and automatic backups of both entire computers, drives, or folders.
Now, it was never my intention to go into details of that kind of offering, and I won't do it know. But I do think that a followup to the original post is necessary to clarify a couple of things.
First of all, I want to stress the relevance of a fundamental assumption that I took for granted when choosing S3 and Glacier as a cold storage service for some files of mine: I want to offload files from my disks, assuming I'm done working with them and won't almost certainly need to access them in the medium term (if not in the foreseeable future). Ted made a great work in his podcast episode in explaining how Amazon S3 and Glacier can be used and in suggesting some interesting use cases. Ted certainly did a better job than I did in the original blog post in suggesting that Glacier is an interesting option to offload big files we don't use often to a reliable and affordable cloud storage service.
In fact, in my current workflow there's no room (nor will) for other kinds of strategies than offloading from my workstations, and I suspect many users out there have got similar workflows and issues (I guess photographers do). Some kind of content is very "bulky": photographs and video footage can easily reach the tens of gigabytes per work session, if not more, and even an amateur photographer like me can easily overgrow its hard disk, no matter how big it is. Of course, I've always kept on expanding my disk pools at home to satisfy the always increasing need of space, but I'm certainly not willing to maintain unnecessary files on the internal hard disks of my machine beyond the amount of time strictly necessary to work on them. Once I'm done with them, I either back them up in my home storage appliance (if I foresee the need to have them quickly available) or I offload them.
That's the use case Glacier is great for! I'm not asking for anything more, nor anything less, than an affordable and reliable site to store them until I'll need them, should it ever happen.
To make a long story short, I agree there are lots of alternatives out there, each of them with its own features, strengths and shortcomings, and different level of complexity. Google Drive, for example, is just great to keep a relatively small amount of content organised and synchronised across a wide range of devices. CrashPlan offerings for home users are a great way to start easily backing up entire computers and drives. Zoolz have got a similar offerings, with distinct online and cold storage tiers.
Nevertheless, what I really don't like about some of this services is the fact that they sometimes charge depending on the number of users and/or computers you're backing up. I'm using many different devices and, because of my workflow, they're all still pretty easy to setup and contain pretty much the same data: I just keep locally the applications I need and the data I'm working on. Everything else is not kept in my the internal hard drives. This approach is very convenient because I never worry about the loss of a machine: I just need to install the OS and the applications which, of course, I always keep available. As an OS X user I don't even use Time Machine, because it's quicker (much quicker) to just reinstall the OS and the apps I need. Let alone synchronising tens of gigabytes over the internet. For me it's just non sense, I just need to work fast and to recover fast. But I recognise it's certainly appealing to lot of other users with different needs.
For that reason, in my workflow I really don't need nor want any client synchronising anything on the wire. I just load a bunch of data I'm working on on my workstations (a photo session, for example), back it up locally elsewhere (as you should always do with assets you need and cannot lose) and, when I'm finished with it, I offload it somewhere else and delete it from my drives.
That somewhere is currently Amazon S3 and Amazon Glacier: it's affordable, it's easy to use and no matter how many devices I'm working on, I can always grab my data if I need it.
Sunday, December 30, 2012
Amazon S3 and Glacier: A Cheap Solution for Long Term Storage Needs
In the last few years, lots of cloud-based storage services began providing relatively cheap solutions to many classes of storage needs. Many of them, especially consumer-oriented ones such as DropBox, Google Drive and Microsoft SkyDrive, try to appeal their users with free tiers and collaborative and social features. Google Drive is a clear case of this trend, having "absorbed" many of the features of the well-known Google Docs applications, seamlessly integrating them into easy to use applications for many platforms, both mobile and desktop-oriented.
I've been using these services for a long time now, and despite being really happy with them, I've been looking for alternative solutions for other kinds of storage needs. As an amateur photographer, for example, I generate a lot of files on a monthly basis, and my long-term storage need for backup is currently in the tens of gigabytes per month. If I used Google Drive to satisfy those needs, supposing I'm already in the terabyte range, I'd pay almost $50 per month! Competitors don't offer seriously cheaper solutions either. At that price, one could argue that a decent home-based storage solution could be a better solution to his problems.
The Backup Problem
The problem is that many consumer cloud storage services are not really meant for backup, and you're paying for a service which keeps your files always online. On the other hand, typical backup strategies involve storing files in mediums which are kept offline, typically reducing the total cost of the solution. At home, you could store your files in DVDs, and keep hard disk space available for other tasks. Instead of DVDs, you could use hard drives as well. We're not considering management issues here (DVDs and hard drives can fail over time, even if kept off and properly stored) but the important thing to grasp here is that different storage needs can be satisfied by different kind of storage classes, to minimize the long-term storage costs of assets whose size is most probably only going to grow over time.
This kind of issues has been addressed by Amazon, which recently rolled out a new service for low-cost long-term storage needs: Amazon Glacier.
But Glacier is a different kind of beast. For starters, Glacier requires you to keep track of a Glacier-generated document identifier every time you upload a new file. Basically, it acts like a gigantic database where you store your files and retrieve them by key. No fancy user interface, no typical file system hierarchies such as folders to organize your content.
Glacier's design philosophy is great for system integrators and enterprise applications using the Glacier API to meet their storage needs, but it certainly keeps the average user away from it.
S3 is a cloud storage web service which pioneered the cloud storage offerings, and it's as easy to use as any other consumer-oriented cloud storage service. In fact, if you're not willing to use the good S3 web interface, lots of S3 clients for almost every platform exist. Many of them even let you mount an S3 bucket as if it were an hard disk.
In the past, the downside of S3 for backup scenarios has always been its price, which was much higher than that of its competitors: 1 terabyte costs approximately $95 per month (for standard redundancy storage).
The great news is that now that Glacier has been integrated with S3, you can have the best of both worlds:
The only important thing to keep in mind is that files hosted on Glacier are kept offline and can be downloaded only if you request a "restore" job. A restore job can take up to 5 hours to be executed, but that's certainly acceptable in a non-critical backup/restore scenario.
In the previous image you can see a lifecycle rule of a bucket of mine, which move content to Glacier according to the rules I defined. You can create as many rules as you need and rules can contain both transitions and expirations. In this use case, we're interested in transitions:
As you can see in the previous image, the afore-mentioned S3 lifecycle rule instructs S3 to migrate all content from the images/ folder to Glacier after just 1 day (the minimum amount of time you can select). All files uploaded into the images directory will automatically be transitioned to glacier by S3.
As previously stated, the integration is transparent and you'll keep on seeing your content into your S3 bucket even after it's been transitioned to Glacier:
You can initiate a restore job from within the S3 user interface using a new Action menu item:
When you initiate a restore job for part of your content (of course you can select only the files you need), you can specify the amount of time the content will be kept online, before being automatically migrated to Glacier again:
This is great since you won't need to remember to transition content to Glacier again: you simply ask S3 to bring your content online for the specified amount of time.
Everybody has got files to backup, and many people is unfortunately unaware of the intrinsic fragility of typical home-based backup strategies, let alone users that never perform any kind of backups. Hard disks fail, that's just a fact, you just don't know when it's going to happen. And besides hard disk failures, other problems may appear over time such as undetected data corruption, which can only be addressed using dedicated storage technologies (such as the ZFS file system), all of which are usually out of range of many user, either for their cost or for their skill requirements for setup and management.
In the last 6 years, I've been running a dedicated Solaris server for my storage needs, and I bought at least 10 hard drives. When I projected the total cost of ownership of this solution I realised how Glacier would allow me to spare a big amount of money. And it did.
Of course I'm still keeping a local copy of everything because I sometimes require quick access to it, but I reduced the redundancy of my disk pools to the bare minimum, and still have a good night sleep because I know that whatever happens my data is still safe at Amazon premises. If a disk breaks (it happened a few days ago), I'm not worried about array reconstruction, because it's not an issue any longer, and I just use two-way mirrors instead of more costly solutions. I could even give up using a mirror altogether, but I'm not willing to reconstruct the content from Glacier every time a disk fails (and it's going to happen at least once every 2/3 years, according to my personal statistics).
So far, I never needed to restore anything from Glacier, but I'm sure that day will eventually come. And I want to be prepared. And you should want to as well.
P.S.: Ted Forbes has cited this blog post in Episode 118 (Photo Storage with Amazon Glacier and S3) of The Art of Photography, his excellent podcast about photography. If you still don't know it, you should check it out. Ted is an amazing guy and his podcast is awesome, with content that ranges from tips, techniques and interesting digressions on the art of photography. I've learnt a lot from him and I bet you will, too.
This kind of issues has been addressed by Amazon, which recently rolled out a new service for low-cost long-term storage needs: Amazon Glacier.
What Glacier Is Not
As soon as Glacier was announced, there has been a lot of talking about it. At a cost of $0.01 per gigabyte per month, it clearly seemed an affordable solution for this kind of problems. The cost of one terabyte would be $10 per month, 5 times cheaper than Google Drive, 10 times cheaper than DropBox (at the time of writing).But Glacier is a different kind of beast. For starters, Glacier requires you to keep track of a Glacier-generated document identifier every time you upload a new file. Basically, it acts like a gigantic database where you store your files and retrieve them by key. No fancy user interface, no typical file system hierarchies such as folders to organize your content.
Glacier's design philosophy is great for system integrators and enterprise applications using the Glacier API to meet their storage needs, but it certainly keeps the average user away from it.
Glacier Can Be Used as a New Storage Class in S3
Even if Glacier was meant and rolled out with enterprise users in mind, at the time of release the Glacier documentation already stated that Glacier would be seamlessly integrated with S3 in the near future.S3 is a cloud storage web service which pioneered the cloud storage offerings, and it's as easy to use as any other consumer-oriented cloud storage service. In fact, if you're not willing to use the good S3 web interface, lots of S3 clients for almost every platform exist. Many of them even let you mount an S3 bucket as if it were an hard disk.
In the past, the downside of S3 for backup scenarios has always been its price, which was much higher than that of its competitors: 1 terabyte costs approximately $95 per month (for standard redundancy storage).
The great news is that now that Glacier has been integrated with S3, you can have the best of both worlds:
- You can use S3 as your primary user interface to manage your storage. This means that you can keep on using your favourite S3 clients to manage the service.
- You can configure S3 to transparently move content to Glacier using lifecycle policies.
- You will pay Glacier's fees for content that's been moved to Glacier.
- The integration is completely transparent and seamless: you won't need to perform any other kind of operation, your content will be transitioned to Glacier according to your rules and it will always be visible into your S3 bucket.
The only important thing to keep in mind is that files hosted on Glacier are kept offline and can be downloaded only if you request a "restore" job. A restore job can take up to 5 hours to be executed, but that's certainly acceptable in a non-critical backup/restore scenario.
How To Configure S3 and Use the Glacier Storage Class
The Glacier storage class cannot be used directly when uploading files to S3. Instead, transitions to Glacier are managed by a bucket's lifecycle rules. If you select one of your S3 buckets, you can use the Lifecycle properties to configure seamless file transitions to Glacier:![]() |
| S3 Bucket Lifecycle Properties |
In the previous image you can see a lifecycle rule of a bucket of mine, which move content to Glacier according to the rules I defined. You can create as many rules as you need and rules can contain both transitions and expirations. In this use case, we're interested in transitions:
![]() |
| S3 Lifecycle Rule - Transition to Glacier |
As you can see in the previous image, the afore-mentioned S3 lifecycle rule instructs S3 to migrate all content from the images/ folder to Glacier after just 1 day (the minimum amount of time you can select). All files uploaded into the images directory will automatically be transitioned to glacier by S3.
As previously stated, the integration is transparent and you'll keep on seeing your content into your S3 bucket even after it's been transitioned to Glacier:
| S3 Bucket Showing Glacier Content |
Requesting a Restore Job
The seamless integration between the two services don't finish here. Glacier files are kept offline and if you try to download them you'll get an error instructing you to initiate a restore job.You can initiate a restore job from within the S3 user interface using a new Action menu item:
![]() |
| S3 Actions Menu - Initiate Restore |
When you initiate a restore job for part of your content (of course you can select only the files you need), you can specify the amount of time the content will be kept online, before being automatically migrated to Glacier again:
![]() |
| S3 Initiation a Restore Job on Glacier Content |
This is great since you won't need to remember to transition content to Glacier again: you simply ask S3 to bring your content online for the specified amount of time.
Conclusions
This post quickly outlines the benefit of storing a backup copy of your important content on Amazon Glacier, taking advantage of the ease of use and the affordable price of this service. Glacier integration in S3 enables any kind of users to take advantage of it without even changing your existing S3 workflow. And if you're new to S3, it's just as easy to use as any other cloud storage service out there. Maybe their applications are not as fancy as Google's, but their offer is unmatched today, and there are lots of easy to use S3 clients, either free or commercial (such as Cyberduck and Transmit if you're a Mac user), or even browser based S3 clients such as plugins for Firefox and Google Chrome.Everybody has got files to backup, and many people is unfortunately unaware of the intrinsic fragility of typical home-based backup strategies, let alone users that never perform any kind of backups. Hard disks fail, that's just a fact, you just don't know when it's going to happen. And besides hard disk failures, other problems may appear over time such as undetected data corruption, which can only be addressed using dedicated storage technologies (such as the ZFS file system), all of which are usually out of range of many user, either for their cost or for their skill requirements for setup and management.
In the last 6 years, I've been running a dedicated Solaris server for my storage needs, and I bought at least 10 hard drives. When I projected the total cost of ownership of this solution I realised how Glacier would allow me to spare a big amount of money. And it did.
Of course I'm still keeping a local copy of everything because I sometimes require quick access to it, but I reduced the redundancy of my disk pools to the bare minimum, and still have a good night sleep because I know that whatever happens my data is still safe at Amazon premises. If a disk breaks (it happened a few days ago), I'm not worried about array reconstruction, because it's not an issue any longer, and I just use two-way mirrors instead of more costly solutions. I could even give up using a mirror altogether, but I'm not willing to reconstruct the content from Glacier every time a disk fails (and it's going to happen at least once every 2/3 years, according to my personal statistics).
So far, I never needed to restore anything from Glacier, but I'm sure that day will eventually come. And I want to be prepared. And you should want to as well.
P.S.: Ted Forbes has cited this blog post in Episode 118 (Photo Storage with Amazon Glacier and S3) of The Art of Photography, his excellent podcast about photography. If you still don't know it, you should check it out. Ted is an amazing guy and his podcast is awesome, with content that ranges from tips, techniques and interesting digressions on the art of photography. I've learnt a lot from him and I bet you will, too.
Tuesday, May 29, 2012
High CPU and I/O activity? Disable Time Machine local backups
Some weeks ago I wrote a blog post about how mdworker can sometimes jeopardize your computer resources. Since then, I experienced an enhancement of my computer's performance. But it was not sufficient.
I'm telling nothing new: I have often read myself how disabling Time Machine local backups as well can have beneficial performance effects. The interesting part is how I realized.
I'm using OS X on two machines: a MacBook Pro and an iMac. The iMac was restored from a Time Machine backup of the MacBook Pro and:
This means that, at least as far as applications and the operating systems are concerned, they cannot have diverged so much over time.
Interestingly, though, the iMac performs much better than the iMac, even if the latter has got half the quantity of RAM the former has (8 GB).
I always had issues with Time Machine, mainly because I'm working on huge files and Time Machine does not perform incremental, or delta backups: it backs up the entire file each time it runs and detects a change. In fact, I spend most of the time using virtual machines (for development purposes), Lightroom catalogs and... Apple Mail: all the working files' size of these application is in the gigabyte order of magnitude).
What I hadn't realized (yet) is the huge performance impact of Time Machine local backups. On a daily basis I'm changing gigabytes of data on my hard disk and, as a consequence, Time Machine local backups were generating a storm of CPU and I/O activity. The impact was visible only on the MacBook Pro since Time Machine local backups are enable by default only on laptops. Once I disabled them, I had a huge performance improvement (and, as a consequence, freed up a great deal of space in my hard disk).
If you're running OS X Lion on a laptop, chances are local backups are enabled. If they are, you'll see the fancy .MobileBackups directory in your hard disk root. To disable local backups, just run the following command:
$ sudo tmutil disablelocal
After rebooting, OS X Lion will transition the .MobileBackups folder to .MobileBackups.trash and finally delete it. Depending on its actual size, it will take a certain amount of time. In my case, begin bigger than 100 GB, it took approximately five minutes.
I'm telling nothing new: I have often read myself how disabling Time Machine local backups as well can have beneficial performance effects. The interesting part is how I realized.
I'm using OS X on two machines: a MacBook Pro and an iMac. The iMac was restored from a Time Machine backup of the MacBook Pro and:
- I'm using the same applications on them.
- I'm using the same applications data on them (synchronized using rsync).
This means that, at least as far as applications and the operating systems are concerned, they cannot have diverged so much over time.
Interestingly, though, the iMac performs much better than the iMac, even if the latter has got half the quantity of RAM the former has (8 GB).
I always had issues with Time Machine, mainly because I'm working on huge files and Time Machine does not perform incremental, or delta backups: it backs up the entire file each time it runs and detects a change. In fact, I spend most of the time using virtual machines (for development purposes), Lightroom catalogs and... Apple Mail: all the working files' size of these application is in the gigabyte order of magnitude).
What I hadn't realized (yet) is the huge performance impact of Time Machine local backups. On a daily basis I'm changing gigabytes of data on my hard disk and, as a consequence, Time Machine local backups were generating a storm of CPU and I/O activity. The impact was visible only on the MacBook Pro since Time Machine local backups are enable by default only on laptops. Once I disabled them, I had a huge performance improvement (and, as a consequence, freed up a great deal of space in my hard disk).
If you're running OS X Lion on a laptop, chances are local backups are enabled. If they are, you'll see the fancy .MobileBackups directory in your hard disk root. To disable local backups, just run the following command:
$ sudo tmutil disablelocal
After rebooting, OS X Lion will transition the .MobileBackups folder to .MobileBackups.trash and finally delete it. Depending on its actual size, it will take a certain amount of time. In my case, begin bigger than 100 GB, it took approximately five minutes.
Wednesday, October 12, 2011
How To Disable Time Machine Local Backups (and Relinquish Space in the MobileBackups Folder)
This morning, after importing a bunch of RAW files from my Nikon camera, I was startled (once more) by the lack of responsiveness of my MacBook Pro running OS X Lion.
Since the update, in fact, I'm growing pretty disappointed with Lion. It never roared just like the good ole Snow Leopard. The Lion cub has only shyly purred and whined, so far.
One of the things that bothers me most is Spotlight performance. Assuming you noticed it, have you ever wondered what the mdworker process is doing when it jeopardizes your Mac resources? I have: staring impotently at the screen, listening to the spinning rust crackling, powerlessly witnessing how the operating system is waiting to complete who-knows-what.
This morning, I opened Lightroom, started importing some RAW files, and started working on them. Well, trying to work on them while Lion was performing its... "housekeeping".
Frustrated, I expressed my anger on Google+. A friend of mine, Joaquin, pointed out both the cause and a workaround of the new Lion's behaviour.
It turns out that Lion is performing periodic local backupsthat will be flushed upon your time machine disk when connected. Thinking about versions, aren't you? Anyway, that's also why the new /.MobileBackups folder into your OS X hard disk is eating up disk space. Never noticed purple and white snapshot lines in Lion's Time Machine user interface? White ones are local backups, purple ones are "regular"time machine backups on an external disk. Well, local backups are kept for 8 days and they'll be taken only if you've got enough space on your disk. However, if you, like me, manage huge quantities of big files (such as a camera RAW files), this feature can start eating up an enormous amount of space.
If you, like me, feel like turning off this amazing feature you can use the following command:
$ sudo tmutil disablelocal
Should you change your mind about it, you can always turn it on again using:
$ sudo tmutil enablelocal
These are just the kind of options that should be accessible in the user interface.
Hope this helps you.
Since the update, in fact, I'm growing pretty disappointed with Lion. It never roared just like the good ole Snow Leopard. The Lion cub has only shyly purred and whined, so far.
One of the things that bothers me most is Spotlight performance. Assuming you noticed it, have you ever wondered what the mdworker process is doing when it jeopardizes your Mac resources? I have: staring impotently at the screen, listening to the spinning rust crackling, powerlessly witnessing how the operating system is waiting to complete who-knows-what.
This morning, I opened Lightroom, started importing some RAW files, and started working on them. Well, trying to work on them while Lion was performing its... "housekeeping".
Frustrated, I expressed my anger on Google+. A friend of mine, Joaquin, pointed out both the cause and a workaround of the new Lion's behaviour.
It turns out that Lion is performing periodic local backups
If you, like me, feel like turning off this amazing feature you can use the following command:
$ sudo tmutil disablelocal
Should you change your mind about it, you can always turn it on again using:
$ sudo tmutil enablelocal
These are just the kind of options that should be accessible in the user interface.
Hope this helps you.
Saturday, January 17, 2009
Backing up ZFS file systems
This is one of the good things ZFS has brought us. Backing up a file system is a ubiquitous problem, even in your home PC, if you're wise and care about your data. As many things in ZFS, due to the telescoping nature of this file system (using words of ZFS' father, Jeff Bonwick), backing up is tightly connected to other ZFS' concepts: in this case, snapshots and clones.
Now you have a photo of the zpool-name/filesystem-name ZFS file system in a given point in time. You can check about its existence by issuing:
which in this moment, in my machines, gives me:
This means that the ZFS file system which hosts my home directory has been snapshotted and there's a snapshot named 20081231.
This file contains the entire ZFS file system: files and all the rest of metadata. Everything. The good thing is that you can receive a ZFS file system just doing:
$ pfexec zfs receive another-zpool-name/another-filesystem-name <>
This operation creates the another-filesystem-name on pool another-zpool-name (it can even be the same zpool you generated the dump from) and a snapshot called snapshot-name will also be created. In the case of full dumps, the destination file system must not exist and will be created for you. Easy. Full back up with just two lines, a bit of patience and sufficient disk space.
There are the usual variations on the theme. You don't really need store the dump in a file, you could just pipe send into receive and do it in just one line with no need of extra storage for the dump file:
And if you want to send it to another machine, no problems at all:
Incredibly simple. ZFS is really revolutionary.
Snapshotting
ZFS lets the administrator perform inexpensive snapshots of a mounted filesystem. Snapshots are just what their name implies: a photo of a ZFS file system in a given point in time. Since that moment, the file system from which the snapshot was generated and the snapshot itself begin to branch and the space required by the snapshot will roughly be the space occupied by the differences between these two entities. If you delete a 1 GB file from a snapshotted filesystem, for example, the space accounted for that file will go in charge of the snapshot which, obviously, must keep track of it because that file existed when the snapshot was created. So far, so good (and easy). Creating snapshot is also incredibly easy: provided that you have a role with the required privileges you just issued the following command:$ pfexec zfs snapshot zpool-name/filesystem-name@snapshot-name
Now you have a photo of the zpool-name/filesystem-name ZFS file system in a given point in time. You can check about its existence by issuing:
$ zfs list -t snapshot
which in this moment, in my machines, gives me:
$ zfs list -t snapshot
NAME USED AVAIL REFER MOUNTPOINT
rpool/export/home/enrico@20081231 71.3M - 14.9G -
[...]
NAME USED AVAIL REFER MOUNTPOINT
rpool/export/home/enrico@20081231 71.3M - 14.9G -
[...]
This means that the ZFS file system which hosts my home directory has been snapshotted and there's a snapshot named 20081231.
Cloning
Cloning is pretty much like snapshotting with the difference that the result of the operation is another ZFS file system, obviously mounted in another mount point, which can be used like whichever file system. Like snapshots, the clone and the originating file system will begin to diverge and differences will begin to occupy space in the clone. The official ZFS administration documentation has detailed and complete information about this topic.Backing up
This isn't really how documentation calls it: they just refer to it with ZFS send and receive operations. As seen, we've got a mean to snapshot a file system: there's no need to unmount a file system or run the risk of getting a set of inconsistent data because a modification occurred during the operation. This alone is worth switching to ZFS, in my opinion. Now there's more: a snapshot can be dumped (serialized) to a file with a simple command:$ pfexec zfs send zpool-name/filesystem-name@snapshot-name > dump-file-name
This file contains the entire ZFS file system: files and all the rest of metadata. Everything. The good thing is that you can receive a ZFS file system just doing:
$ pfexec zfs receive another-zpool-name/another-filesystem-name <>
This operation creates the another-filesystem-name on pool another-zpool-name (it can even be the same zpool you generated the dump from) and a snapshot called snapshot-name will also be created. In the case of full dumps, the destination file system must not exist and will be created for you. Easy. Full back up with just two lines, a bit of patience and sufficient disk space.
There are the usual variations on the theme. You don't really need store the dump in a file, you could just pipe send into receive and do it in just one line with no need of extra storage for the dump file:
# zfs send zpool-name/filesystem-name@snapshot-name | zfs receive another-zpool-name/another-filesystem-name
And if you want to send it to another machine, no problems at all:
# zfs send zpool-name/filesystem-name@snapshot-name | ssh anothermachine zfs receive another-zpool-name/another-filesystem-name
Incredibly simple. ZFS is really revolutionary.
Incremental backups
ZFS, obviously, lets you do incremental send and receive with the -i option which lets you send the differences between one snapshot and another. These differences will be loaded and applied at the receiver side: in this case, obviously, the source snapshot must already exist. You start with a full send and then you go on with increments. It's the way I'm backing up our machines and it's fast, economic and reliable. A great reason to switch to ZFS, let alone Solaris.
Subscribe to:
Posts (Atom)


