Metadata, in one of its simplest form, is defined as "data about data". In the case of photography, for example, you may think about EXIF data attached to your image: they provide technical information (camera settings, geolocation information etc.) about the picture. Depending on the tool you use, you can go beyond what's provided by standards (such as EXIF or IPTC) and provide your own metadata.
What's the point of using metadata? The basic idea is organizing your images and thus being able to make searches based on some criteria. For example, you may want to search for images shot with a specific camera, or with a specific lens; or you may looking for pictures taken at a certain shutter speed, aperture or geospatial coordinates. Or you may be willing to search for pictures using non-technical criteria, such as a portrait shot at a wedding and processed in black and white. Can you imagine what your Internet experience would be if search engines didn't exist? You couldn't find a way to the information you're looking for, and the very concept of "Internet" as you know it would be defied. The same thing happens with your photo catalogs. How could you possibly find something if you couldn't search using the criteria you need? Amateur photographers with small catalogs may be able to find the pictures they're looking for manually scanning the catalog, or trying to remember which folder or collection a picture is in. But as soon as your catalogs grow larger and larger things get worse and the problem starts to be insurmountable. That's why some products exist which provide the tools you need to overcome this problem. In fact, there's a dedicated category of such products: image management databases and Adobe Photoshop Lightroom is one of them.
If you're using Lightroom, you already know your images are stored into a catalog which acts as a "proxy" between you and the images managed by Lightroom. The catalog is basically a database which stores additional information (metadata) alongside your images. Such metadata makes the database searchable, so that you can look for images using search criteria. Lightroom, in this respect, is extremely helpful and powerful in that:
- It comes with out-of-the-box support for an extensive set of well known or frequently used metadata (such as ratings, EXIF and IPTC).
- It lets you extend the metadata model using your own keywords.
- It lets you easily build search criteria mixing and matching any type of searchable field.
- It lets you define smart collections, that is collections of pictures whose content are defined by a search filter and are automatically updated.
These are just the most important features provided by Lightroom, and we'll discover more of them in the following sections.
Flags, Ratings and Labels
The simplest forms of metadata you can catalog your images with are flags, ratings and labels:- Flags are used to pick or reject an image.
- Ratings are used to rate images on a scale from 0 stars to 5.
- Label is a one of 5 color codes (Red, Yellow, Green, Blue and Purple) that can be assigned to an image.
While the meaning of flags and ratings is pretty well defined, the meaning of labels can be customized by the user. By default, labels are just "colours" but their name, and thus their meaning, can be customized to be meaningful for the user. Lightroom, for example, provides an additional naming scheme for labels, inherited by Adobe Bridge, that uses the following convention:
- Red: Select
- Yellow: Second
- Green: Approved
- Blue: Review
- Purple: To Do
You're free, however, to assign your own meanings to colour labels. In my workflow, for example, I just use the common three traffic light colours (red, yellow and green) to transition images from the undeveloped, partially developed and done states.
In the following picture, you can see a screenshot of some pictures in my catalog. Three of them (the first, the second and the third) are flagged because I picked them, rated (with 4, 3 and 4 stars respectively) and labelled green (because I finished processing them). The second image is unflagged (it's neither rejected nor picked), unrated (0 stars) and partially developed (yellow label).
 |
| Flags, ratings and labels |
The basic rating and labeling metadata are flexible and easy to use and can be largely adjusted to any development workflow. In my workflow, for example, flags are used before starting developing images in order to pick only the pictures eligible for development. Images to be deleted, are marked as rejected and deleted pretty soon. Images I'm not sure about are left unflagged even if, eventually, they'll either be picked or rejected (and thus deleted). Ratings are usually applied at the end of the development process and are usually immutable while colour labels are just a quick visual aid to quickly identify pictures I should be working on. Eventually, when I finish developing a folder (or collection) all pictures will be labeled green.
Metadata
Images can be assigned metadata of many kinds. Lightroom support many kinds of metadata including:- EXIF
- IPTC
- DNG
- Location
- Metadata defined in a custom plugin
Metadata can be inspected and modified using the Metadata panel in the Library module:
 |
| Metadata Panel |
As you can see in the previous image, the Metadata panel shows information about the chosen type of metadata (in this case EXIF and IPTC) and lets you modify the writeable fields. At the topmost part of the panel, Lightroom provides some commonly used fields (Rating, Label, Title, Caption, etc.) as a convenience to speed up metadata editing.
To change the currently displayed metadata category, you just need to select the desired one in the list box in the upper left corner of the panel. In my Lightroom setup, these are the available choices:
 |
| Metadata Categories |
If you're a developer, you could also extend available metadata writing a custom Lightroom plugin using the Lightroom SDK. Most users (even professional ones), however, will be just satisfied with what Lightroom offers out of the box.
Location Metadata
Location metadata is the perfect way to geographically localize where a shot was taken. Nowadays, many cameras populate these fields using data gathered by a GPS device, such as modern smartphones or GPS-equipped cameras. Many DSLR, however, still lack this functionality and their pictures require the user to manually introduce location metadata.Up to Lightroom 3, location metadata were just made up of text fields, but with the latest Lightroom release (v. 4 at time of writing) you can use the Map module to populate these fields by dragging and dropping images over a map:
 |
| Map Module |
Once an image is dropped over the map, Lightroom will automatically update its location metadata, as you can see in the following picture:
 |
| Location Metadata of a Photo |
The Map module also provides the possibility of saving a location, a functionality that can greatly speed up your workflow. To save or load a location, just use the controls found in the Saved Locations panel of the Map module.
Since location metadata may contain sensitive information you're willing to protect, you may want to ensure that information about some locations are never exported. That might be the case of information about your home location, for example. To have Lightroom protect a location, you can add it to the list of saved locations and mark it as private:
 |
| New Private Location |
In the New Location dialog box, you can specify a radius which will determine the area of the (circular) location you're saving and a checkbox that can be used to mark it as private. If an image is tagged into a private location, the corresponding metadata will never be exported, no matter which export mechanism or publish service is used.
Applying Metadata Changes to Multiple Images
Very often you find yourself applying the same metadata to multiple images. For example, it may often be the case for metadata in the location, copyright, contact and workflow categories. Lightroom offers two ways to perform "bulk" metadata changes:- Metadata synchronization.
- Metadata presets.
Metadata synchronization is very similar to develop settings synchronization: you apply the modification you need to a picture and then sync other pictures with it. To sync metadata with a reference image, just select all the images to be synced paying attention that the reference image be the first image in the selection set. Once the images are select, press the Sync Metadata button in the bottom left corner of the right module panel:
 |
| Sync Buttons |
Ligthroom will present a form in which fields to be synced can be chosen and copied to the metadata set of the other images.
Metadata presets are a very similar concept, with the difference that metadata values are saved in a preset (instead of copied from a reference image) and applied to a set of images. To create a preset, select the Edit Metadata Preset item in the Metadata menu or in the Preset listbox in the topmost section of the Metadata panel. A form will be presented in which fields to be saved in the preset can be chosen. A saved preset can be applied to one or multiple images simply selecting the corresponding preset in the Preset listbox.
Metadata presets are handy when a set of metadata values is frequently applied to many photos. To speed up my workflow, for example, I created a preset for each of the fixed sets of metadata I commonly use, such as contact information, copyright information and common locations where I use to shoot. Metadata synchronization, on the other hand, is more suitable when many images share a common set of characteristics (same job, same event, same model, etc.) whose value, however, aren't worth creating a preset which will most likely be scarcely reusable.
Keywords
Lightroom lets you apply keywords to an image. Keywords, or tags (an alternate name used in other contexts such as Flickr or Google+), are just text labels that can be searched for: hence, they provide a mean for an user to freely organize the catalog using user defined "keys". In this sense, keywords are the building blocks you use to organize your catalog "your own way". Metadata described so far, in fact, was related to some technical aspects of a picture or some standard attribute set (camera settings, location, etc.). Keywords, on the other hand, are "the words you use to describe a picture" and, hence, to keep your catalog organized using words meaningful to you.You may want to define, for example, keywords for each style of photography you produce (portraits, landscape, etc.), for treatments you apply (duotone, sepia, black & white, cropped, etc.), names of persons appearing in a photo, etc.
Adding and Removing Keywords
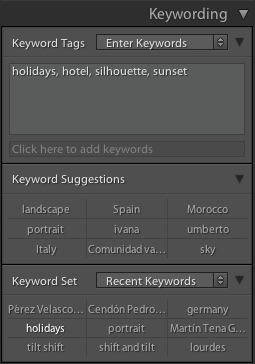
To assign keywords to a picture, just use the Keywording or Keyword List panels of the Library module. The Keywording panel, shown in the following picture, is made up several distinct controls:- The Keyword Tags list box, used to change what's shown in the keywords box.
- The keyword box, where you can see a list of keywords applied to your image whose content depend on the current Keyword Tags selection.
- A text box that lets you add keywords.
- Two grids, Keywords Suggestions and Keyword Set, which provide a visual shortcut to two set of keywords.
 |
| Keywording Panel |
By default, the keyword box shows the keywords currently assigned to the selected picture(s). In case of a multiple selection, a keyword that's only assigned to a subset of images is postfixed by an asterisk (*). To add a keyword, you just need to type it in the keyword text box and press Enter: the keyword will be added to the currently selected image(s) and created (with the default options) if it's the first time you use it. If you want to tweak the behaviour of a keyword, as described in the following section, you maybe want to create it manually before entering it or manually changing its options later. I usually prefer creating them manually in order not to forget changing their options afterwards.
To speed up your workflow, Lightroom lets you quickly select keywords from two 3x3 grids: Keywords Suggestions and Keyword Set. The former contains suggestions based on last used keywords, based on the keywords currently applied to an image; you'll see that adding or removing keywords to the current image triggers a suggestions change as well. The latter, on the other hand, is made up of a static list of keywords you can create, save and use. Using the listbox on the right side of the keyword set grid (showing Outdoor Photography in the previous image) you can select, create, edit and remove your own keyword sets. Lightroom ships with some example sets but you should create your own, reflecting your "keywording habits" for each kind of photography you're interested to.
To remove a keyword, just deselect it from one of the suggestion grids or manually delete it from the keyword list.
Keyword List
The Keyword List panel shows a graphical representation of the current keyword tree. In fact, keywords aren't just a flat set of tags: Lightroom let you organize keywords into a hierarchy, as shown in the following picture: |
| Keyword List |
The quickest way to build is a hierarchy out of already existing keywords is just rearranging them with your mouse. If you drag a keyword over another, the former will convert into a child of the latter.
But what's the point of building and maintaining a hierarchy? It's not only constraining the size of a keyword list that could potentially grow to a considerable size. The keyword hierarchy allows you to organize concepts in a tree establishing an "is a" relationship with the containing keywords. In the picture above, for example, the keyword cat is the leaf of the subtree animal/mammal/cat. That is: in the hierarchy I'm using the cat is a mammal and is an animal. This way, you don't have to tag an image three times (cat, mammal and animal) but just one: cat.
You can tweak how keywords behave in the hierarchy. In the example above, we wanted cat to be a mammal an an animal. There may be cases where you just use the hierarchy for organizational purpose and don't want a picture to automatically acquire all the containing keywords as well. For the same purpose, you may want to organize your catalog using certain keywords (such as names) but you want to prevent those keywords to appear elsewhere, such as in exported or published images. In this case, you can just edit a keyword and specify the behaviour you need (right clicking on it and selecting Edit Keyword Tag):
 |
| Edit Keyword Tag |
In the Edit Keyword Tag window you can see how the behaviour of a keyword can be tweaked:
- A keyword can be included in an export (or publish) operation if the Include on Export checkbox is selected.
- A picture will inherit containing keywords if Export Containing Keywords is selected.
- A picture will inherit a keywords synonyms (more on this in the following sections) if Export Synonyms is selected.
Effective Keywords
We've just seen how the set of keywords applied to an image not only depends on the ones you explicitly added but also on the behaviour and the operation keywords are considered for. If you want to inspect the list of keywords effectively applied to an image you can use the Keywording panel and choose the list you're interested in.In the Keywords section we've seen that the Keywording panel features a Keyword Tags list box. Depending on your choice, the behaviour of the panel will change:
- Enter Keywords: the default choice, whose functionality has been described in the Keywords section.
- Keywords & Containing Keywords: if you choose this option, the panel will turn read-only and will show the list of all keywords inherited by the image (as described in the Keyword List section).
- Will Export: if you choose this option, the panel will turn read-only and will show the list of all keywords that will be exported with the selected image.
Synonyms
In the Edit Keyword Tag window you may have notice a Synonyms text box whose functionality we haven't described yet. Lightroom lets you associate a set of synonyms to a keyword: synonyms can be thought as an additional list of keywords associated with a keyword, whose primary purpose is search. A synonym, in fact, won't even appear in the keyword list and can only be consulted checking the configuration of each specific keyword.Many users wonder when a synonym or a keyword should be used. That really depends on how you build your own keyword hierarchy but here are some guidelines. You should try to keep your keywords hierarchy simple, clear and intuitive so that your workflow is smooth. Also, keywords represent concepts and we know that, literally speaking, a pure synonym doesn't offer nothing new, just an alternate spelling. This is a clear case in which a synonym should be created instead of yet another keyword.
Other times, some words just doesn't fit well into your keyword hierarchy. Let's take my animal hierarchy. I defined a cat as a mammal and an animal. What about pet? Or clawed? Or furry? You cannot feasibly build a hierarchy containing all nuances that can possibly come to your mind. Also, a cat can certainly be considered a "pet", but a bird can as well. But in my hierarchy, a cat is a mammal while a bird is not. What should I do? Create a pet keyword for each of them? You can easily see how that hierarchy can become more and more cluttered if we try to introduce these concepts. In this case, you'd better use a synonym. A cat may be a synonym of "pet", of "clawed", as well as a bird may.
If you then want a synonym to be inherited from a keyword, you can select the "Export Synonyms" options of the affected keyword so that it will be explicitly listed in the keyword list of an exported or published photo.
Searching and Filtering
Any kind of metadata can be used to search and filter your catalog images. In Part V of this tutorial we already described the basic search and filtering facilities of Lightroom, so that we will only summarize them here.A filter by flags, ratings or labels can easily be built using the Attribute filter bar. As you can see in the next image, you can just select on the graphical user interface the values you're interested in and Lightroom will filter the contents of the currently selected folder (or collection) according to your choices.
 |
| Attribute filter |
If you want to filter using keywords, you can use multiple techniques. The first is using a Metadata filter. You can configure a Keyword column for such a filter and select the keywords you want to filter with. In the following image you can see how Lightroom intelligently makes things easy including only used keywords in the currently selected folder (or collection).
 |
| Metadata Filter (stacked with a Text Filter) |
Another way to search using a keyword is using a Text search. You can either freely search on every searchable field or narrowing the choice specifying the field you want to look for (as seen in the following images).
 |
| Text Filter |
 |
| Text Filter - Searchable Field |
The last method you can use to filter for a specific keyword is using the Keyword List panel to build a quick filter. When you hover a keyword with your mouse, a small arrow appears on the right of the keyword record, as highlighted in red in the following image. Pressing the arrow control makes Lightroom create a Metadata filter using the selected keyword. If you need to filter with just one keyword, this method is probably the quickest one.
 |
| Keyword List |
Filters can also be stacked together to build even more complex search queries, mixing and matching criteria built onto any metadata field that Lightroom manages:
 |
| Multiple Filters Stacked Together |
Conclusions
As we've seen, Lightroom provides excellent management capabilities and you can keep your catalog perfectly organized with very little effort. The point of an image management database is just this: making your ever growing catalog manageable. There would be no point in storing thousands of images if you couldn't effectively use the tool to quickly retrieve what you're looking for.Some photographers start to use this kind of tools without realising their real potential nor the issues they'll start experiencing when their catalogs overgrows a set of few hundreds images. Lightroom, furthermore, is an excellent tool to develop your RAW files and it's easy to forget about it being a catalog manager as well.
That's why is very important to learn about these feature soon and start applying them to your regular workflow. The sooner, the better.
Protect Your Privacy
I want to stress once more how Lightroom can help you protect sensitive data (keywords and location information) so that you don't accidentally publish them.Protecting the location information is probably easier because, even if geolocation data is often added automatically and you may forget about it, Lightroom gives a simple solution to this problem: just create a private location specifying its centre and its radius and just forget about it.
In the case of keywords, marking them as not exportable is up to you and you may easily forget, especially if you get used to creating them automatically from the Keywording panel. Lightroom, furthermore, does not separately manage subject names as other tools do and this fact induces users to define a keyword hierarchy for it. If you forget to configure each and every keyword according to your needs, private data may unexpectedly leak.
If you want to help me keep on writing this blog, buy your Adobe Photoshop licenses at the best price on Amazon using the links below.