AdSense Mobile Ad

Showing posts with label eclipse. Show all posts

Tuesday, February 11, 2014

How to Include Apple Frameworks' Headers in C/C++ Projects in IDEs Lacking Proper Support such as Eclipse CDT and NetBeans

C and C++ programmers using OS X have a nice selection of IDEs at their disposal, including Apple's XCode, Eclipse CDTNetBeans and the forthcoming JetBrains C/C++ IDE. Each one has its strengths and weaknesses, and the best choice is often dictated by personal tastes and requirements.

However, if you have ever written OS X or iOS-specific code, you already discovered that Apple uses a non-standard header organisation. This organisation stems from the concept of "framework" that, according to Apple official documentation, is:

[...] a hierarchical directory that encapsulates shared resources, such as a dynamic shared library, nib files, image files, localized strings, header files, and reference documentation in a single package.

Needless to say, C/C++ compilers and linkers for OS X have been updated to correctly use framework resources. From a C/C++ programmer perspective, nowadays the only practical difference with any other UNIX-flavour is the requirement of using specific linker flags (-framework).

The Problem with Framework Headers

There's an important catch, though. A Framework is organised in a directory hierarchy containing the header files into the Headers subdirectory, and such hierarchy can be nested: that is, a framework directory may contain a set of sub-framework subdirectories, each one organised as a self-contained framework with the same directory structure. The CoreServices framework, one of the basic OS X frameworks, contains a set of sub-frameworks including OSServices and LaunchServices, just to name a few.

Two of the most popular cross-platform C/C++ IDEs, Eclipse CDT and NetBeans, do not feature proper support for OS X frameworks yet. Eclipse CDT is making some progresses, but there still are open bugs which make Eclipse CDT practically unusable for serious OS X programming, at least as far as Eclipse CDT Kepler is concerned. You can see the status and the description of the most important Eclipse bugs in the following links:
What these bugs say, to make the long story short, is that frameworks are still unusable, especially so when they are nested.

Solutions

There is no easy solution yet, and I'm only aware of the following workarounds:
  • Using XCode.
  • Provide a "flattened" include directory containing symlinks to the header directories of each framework (at least the ones you need).

Using XCode

Using Apple's official C/C++ IDE is a solution to overcome the framework headers problem but it's hardly a "workaround"; instead, it's a switch to another IDE. Apple XCode is a good IDE for C/C++ project and it's being constantly improved, but there are important reasons not to use XCode, at least in certain situations. The most important reasons why I do not use XCode are the following:
  • I want to use the same IDE on different operating systems, and XCode is available only on OS X.
  • I want to use an extensible IDE with a good plugin ecosystem: XCode, in my opinion, is not a good choice here.
  • I want to use an IDE that supports the GNU Build System (AKA GNU Autotools). I've tried many times to maintain such projects with XCode but I couldn't find an efficient workflow.

Provide a Flattened Include Directory

A real solution to the headers problem is providing an alternate include directory that your IDE may correctly scan and parse. Let's clarify the reasons why the problem originates in order to understand the rationale behind this solution. The framework directory organisation is tricky because of the following reasons (none of which is taken into account by the above-mentioned IDEs):

  • A framework root directory is named after the framework to whose name the suffix .framework is added.
  • Headers are found into the Headers subdirectory of the framework root.
  • As explained in the previous section, frameworks can be nested.
Nested frameworks are particularly tricky and I'll illustrate it with an example. This statement:

#include <CoreServices/CoreServices.h>

is supposed to do include the CoreServices.h file, located into the Headers subdirectory of the CoreServices framework root directory (CoreServices.framework), which is located in one of the operating system framework search path:
  • /System/Library/Frameworks
  • /Library/Frameworks
Recent Eclipse CDT releases, for example, are able to do this correctly. Nevertheless, they do not work correctly when a framework header uses a nested framework header. The problem with nested frameworks is that this statement (locate into the CoreServices.h file)

#include <OSServices/OSServices.h>

is supposed to include the OSService.h file, located into the Headers subdirectory of the OSServices framework root directory. But this framework is not located into the framework search path, but it's nested (as a sub-framework) into the CoreServices framework.

Both Eclipse CDT and NetBeans fail to interpret this kind of statements correctly, and as a consequence header files are not properly found nor scanned.

The easiest way to trick the IDE into including the files "correctly" is the following:
  • Providing a new include directory.
  • The include directory will contain symbolic links to the header directories of each required framework (and all its sub-frameworks).
  • The name of the symbolic links will be the framework name, stripping the .framework suffix.
This way, when the IDE sees the #include statement of a nested header such as

#include <OSServices/OSServices.h>

it will be able to find the OSServices.h header file by following the OSServices symbolic link, which takes to the sub-framework include directory.

Automating the Creation of the Symbolic Links to the Header Directories

To automate this task I've written a shell script you can find in this GitHub repository. What it does is creating all the relevant links in the current directory. For example, the following command:

$ link-osx-framework-headers.zsh CoreServices

creates the following symbolic links (ls output stripped):

$ ls
AE
CarbonCore
CoreServices
DictionaryServices
LaunchServices
Metadata
OSServices
SearchKit

each one linking to the corresponding include directory, including for nested sub-frameworks:

$ ls -l OSServices 
OSServices -> /System/Library/Frameworks/CoreServices.framework/Versions/A/Frameworks/OSServices.framework/Headers

Listing the Available Frameworks

If you do not remember the name of a framework you need you can have the script list all the available frameworks by simply invoking it with no parameters:

% link-osx-framework-headers.zsh
/System/Library/Frameworks/AGL.framework
/System/Library/Frameworks/AVFoundation.framework
[...snip...]
/Library/Frameworks/iLifeSlideshow.framework
/Library/Frameworks/iTunesLibrary.framework

Configuring the IDE

To have your IDE scan the newly created include directory, you have to configure it appropriately. Typically every C/C++ IDE will let you add include paths, where header files are searched. In the case of Eclipse CDT, for example, you can:
  • Right-click a project and choose Properties (⌘I on OS X).
  • Navigate to the C/C++ General/Paths and Symbols pane.
  • Choose the Includes tab (the first one).
  • Add the include directory for your language (C, C++ or both).
Eclipse let you add directories of different kinds:
  • Workspace.
  • File system.
If the directory containing the symbolic links is into the project root, you can include it as a Workspace path, otherwise specify its path as a File System directory. In the following screenshot you can see a workspace include path:
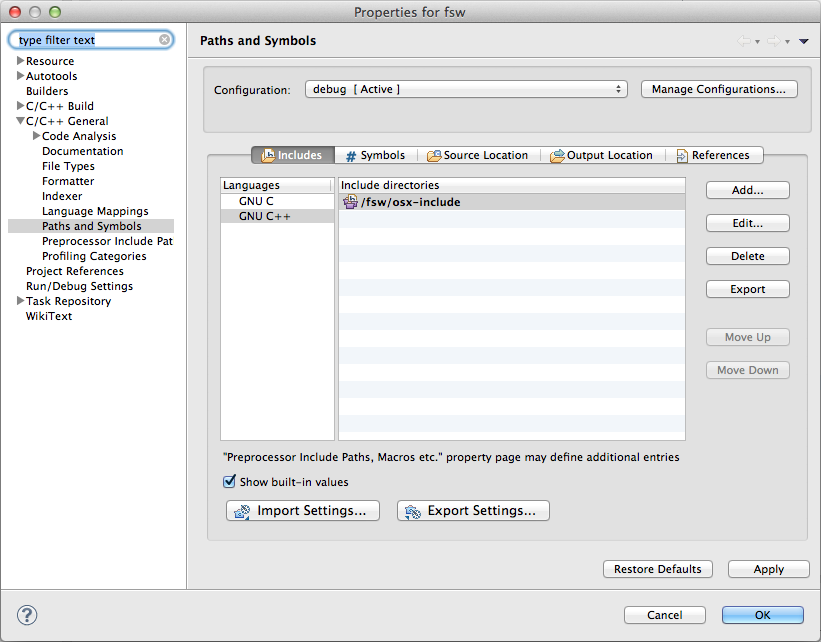
Eclipse CDT - C/C++ Include Path

Making a System-Wide Include Directory

You could be tempted to make a single include directory with symbolic links for all the framework. That's easy to do:
  • Have link-osx-framework-headers.zsh list all the frameworks.
  • Pipe it through a while read loop.
  • Have link-osx-framework-headers.zsh create each links for each framework.
In shell parlance (using Z Shell):

$ exec zsh
$ link-osx-framework-headers.zsh | \
  while read fmk ; do \
    link-osx-framework-headers.zsh ${${fmk:t}:r} ; \
  done

The workspace include directory still is my favourite option. On the one hand you have to make one include directory for each project and configure each project individually, but on the other hand you are just including the frameworks you really use, thus reducing the quantity of files scanned by the IDE. If you use an external build system, such as the GNU Build System, I find it easier to setup the include directory alongside the Autotools configuration files, so that I keep the files seen by the IDE "in sync" with the package configuration.

Tuesday, September 17, 2013

C/C++ Project Built with GNU Build System (A.K.A. GNU Autotools): NetBeans vs. Eclipse CDT

Recently, I had to work on a C++ project built with the GNU Build System and decided to use the NetBeans IDE. I already use NetBeans for many Java EE projects and since it claims support for the GNU Build System it was natural for me to import the project there.

I encountered some issues due to the fact that the GNU Build System I was using was deployed in my home directory (OS X (1.8) ships old components which I could not use). To try to solve this issue, I decided to try Eclipse CDT.

Neither tool solved that problem, but I had the opportunity of working side-by-side on the same project with two widely used IDEs I never used for serious C++ programming before. After a couple of months I had a very clear idea about what each IDE offered me in this specific use case and made my final decision. This post is not a detailed comparison of all their features: first of all, because I believe that the "Eclipse vs. NetBeans" debate, even though in the C/C++ realm, is more a matter of taste rather than a matter of functionality. Secondly, because there is plenty of information on the internet. What I could not find, and that is the reason I am writing this blog post, is how these tools compare when the GNU Build System is part of the equation.

Both IDEs Claim Support for the GNU Build System

As stated in the introduction, both IDEs claim support for the GNU Build System and in fact I could build my project in less than 10 minutes in either IDE without previous knowledge. However, setting up my workspace with either tool was a very different experience.

Setting up the project in NetBeans was so easy that at first I thought it ignored the build system altogether. NetBeans imported the sources, configured my OS toolchain, detected the presence of autoconf and automake files, configured the project running configure and built it straight away.

Setting up the project in Eclipse CDT was easy, but not as straightforward as it was with NetBeans, the main difference being Eclipse CDT requiring manual intervention (a click, basically) to setup the GNU Build System in the imported project. On the bright side, as we will see, Eclipse CDT is much more configurable than NetBeans and offers you clean ways to configure how the build system is invoked.

Importing the Sources into a NetBeans Project

Importing the project sources into a NetBeans project is straightforward. First of all, uncompress your source tar-ball somewhere (assuming you created it with make dist). Then, choose File/New Project and select the C/C++ Project with Existing Sources in the New Project dialog, as shown in the next picture.

Create New C++ Project

In the next dialog, just choose the path of your sources and an appropriate tool collection (this project is a C++11 project, so that CLang was chosen on OS X). If you leave the configuration mode to automatic NetBeans will check for the existence of either a make file or a configuration script and will setup your project to configure and build in the its root directory. If you prefer building it in a separate directory or have multiple build configurations, then choose Custom and fine tune your project.

Configure C++ Project

NetBeans will create a new project using your sources, will configure it and make it:

Running configure

Running make

From now on, until you modify your configuration files, you can just build the project in NetBeans and make will be invoked on the generated makefile.

If you need to reconfigure the project, you can select Project/More Build Commands/Reconfigure Project. A configuration dialog will pop up where you can specify additional configure parameters:

Configure parameters

As you have seen, NetBeans offers a very easy way to import a project built with the GNU Build System with almost no user interaction. The basic functionality (configure and make) is there, hidden behind a very thin and intuitive UI layer.

Importing the Sources into an Eclipse CDT Project

Creating a working Eclipse CDT project from the same tar-ball is easy, but not as easy as it is with NetBeans.  First of all, choose File/Import/Existing Code as Makefile Project:

Import Existing Code


In the next dialog, pretty much as in the NetBeans case, the only required user input is the source path.

Configure C++ Project

When Eclipse imports the project it does not detect the presence of GNU Build System configuration files. To configure the build system, the user must select File/New/Convert to a C/C++ Autotools Project (a very bad naming choice, because I would not expect to find this feature in the File/New submenu):

Convert C++ Project to Autotools Project

Once the project has been converted to an Autotools project, Eclipse will run configure and you can start working on it.

Running configure

Since only CLang can properly compile this C++11 project on OS X 1.8, I need to reconfigure the project (basically, to have Eclipse add CXX=clang++ when invoking configure).

Autotools configuration is where Eclipse CDT shines. Autotools settings can be found in the project settings:

Configuring the Build System

As you can see, this is more than what NetBeans offers. Common configure parameters are hierarchically organised in a tree where they can be set with handy UI controls:

Configuring the Compiler

Once the compiler has been set, the project built correctly:

Running make

Comparison

I've been using both environments for a couple of months, switching between one and the other without experiencing any major issue, even working on different platforms, alternating the use of OS X and Linux

According to my experience, I think both IDEs offer a solid working environment featuring a nice integration of the GNU Build System into the UI. On the usability side, I think NetBeans' UI is cleaner, more intuitive and easier to use. I think this is true in general, and it's one of the reasons I usually stick with NetBeans for Java SE and Java EE development.

On the other hand, Eclipse CDT offers much finer control over the build system. As we have seen, the build settings lets you tweak many configure parameters from a handy UI and they can be saved in configurations.

The Eclipse CDT project settings supposedly let you specify alternate paths for the GNU Build System tools:

Configuring the Build System Paths

This feature would be very handy, since it's not uncommon to install updated versions of the tools in an alternate location. Unfortunately, I was unable to have it working properly when the alternate versions are not on the user path (which is when I'd use this customisation in the first place). Even though the correct version is invoked by Eclipse, the "wrong" version (the one in the path) when a tool invokes another one (as in the case of autoreconf). Which seems reasonable, since the GNU Build System are shell scripts. In fact, when I first saw this dialog, I wondered how it could work in my case, in which I've got a local autoconf and automake installation in my home directory.

Considering the IDE as a whole, I still prefer NetBeans to Eclipse CDT. C/C++ support is integrated and the UI is easier and intuitive. Eclipse CDT is certainly more configurable and offers features which NetBeans lacks, such as support for configure.ac and Makefile.am files which NetBeans treats as plain text files. Despite these gaps, though, I believe NetBeans wins on the UI usability side.

Code Formatting

Another of my major concerns with NetBeans for C/C++ was the lack of proper, configurable code formatting tools. For a while I even tried using GNU indent to fill this gap but the workflow was disruptive and prone to error since indent support for C++ is still experimental. Fortunately, this gap has been filled and now you can instruct NetBeans to format your C/C++ code using the most commonly used coding styles, such as:
  • Apache.
  • BSD (ANSI and OpenSolaris).
  • GNU.
  • K&R.
  • Linux Kernel.
  • MySQL.
  • NetBeans.
  • Whitesmiths.

NetBeans Code Formatter

The list of supported styles is in fact longer than what Eclipse CDT currently offers:
  • BSD/Allman.
  • GNU.
  • K&R.
  • Linux.
  • Whitesmiths.

Eclipse Code Formatter

On the other hand, if you need to create a customised style from scratch, Eclipse CDT is still superior as far as customisation options are concerned.

Both code formatters work pretty well and I found only few quirks. Both IDEs offer good tools and I think that nowadays they're equally usable.

Tool Collection Management

NetBeans manages the tool collections of a platform in a clean way, separating the configuration of a tool collection from the configuration of a project. This way, you can change define a new tool collection, or choose another between the available ones in your system, and use it to build a project as a simple drop-in replacement of the original. This is especially handy not only in the case you're testing the build with different tool chains, but also in the case you're building the same project on different platforms.

In the following pictures, you can see the definition of the two tool collections which are available by default on OS X (1.8): clang and gcc.

CLang Tool Collection

GNU Tool Collection

The project I've been working on had to build on both OS X and Linux. When using NetBeans, I can just open the project on either platform and choose the appropriate tool collection. In fact, each time I switched from OS X to Linux, NetBeans detected an invalid tool (CLang++ was not available) and offered to reconfigure the project.

In the following picture you can see how a project can be configured to use a tool collection. Once the tool collection is chosen, NetBeans will automatically reconfigure the project.

Project Configuration

When using Eclipse CDT, on the other hand, the C++ compiler is selected using (or removing altogether) the CXX flag. There's no automatic or easy way to reconfigure the project as NetBeans does and while it's certainly technically easy to change the compiler variable, it's a usability problem. On the usability side, NetBeans clearly wins.

Conclusion

An IDE is a very important tool in the life of a programmer, and choosing an IDE is a very delicate process which may have huge impact on your performance. On the one hand, I often try different IDEs to choose the best one for a specific use case. On the other hand, becoming proficient on an IDE is a process which requires time and, depending on the situation (project scheduling is a tyrant), I feel it's better for me to stick with a well known IDE and be (very) productive from the beginning, rather than switching to a brand new one because it offers features than the former lacks.

If you are already a NetBeans or Eclipse user, stick with it. Most of the times you'll be fine and will not need anything else. Maybe you'll find a solid reason to switch to another IDE, and when that time comes, the best thing is try more than one and decide yourself.

That's what I did. I'm a long time NetBeans user and started the project with it. I found some minor issues and used those problems as an opportunity to investigate other IDEs, such as Eclipse CDT. While working on NetBeans is familiar and comfortable to me, I recognise I was very willing to check out the latest Eclipse CDT (Kepler at the time of writing) and see whether I should reconsider my IDE choice.

At the end I decided to stay with NetBeans because of its usability features, especially the tool collection management, even though Eclipse CDT offers a much finer control over the build system configuration: but being able to easily switch OS and/or tool collection as NetBeans does was the deal-breaker for me.