AdSense Mobile Ad

Tuesday, May 27, 2014

EMCCountryPickerController: A Country Picker View Controller for iOS

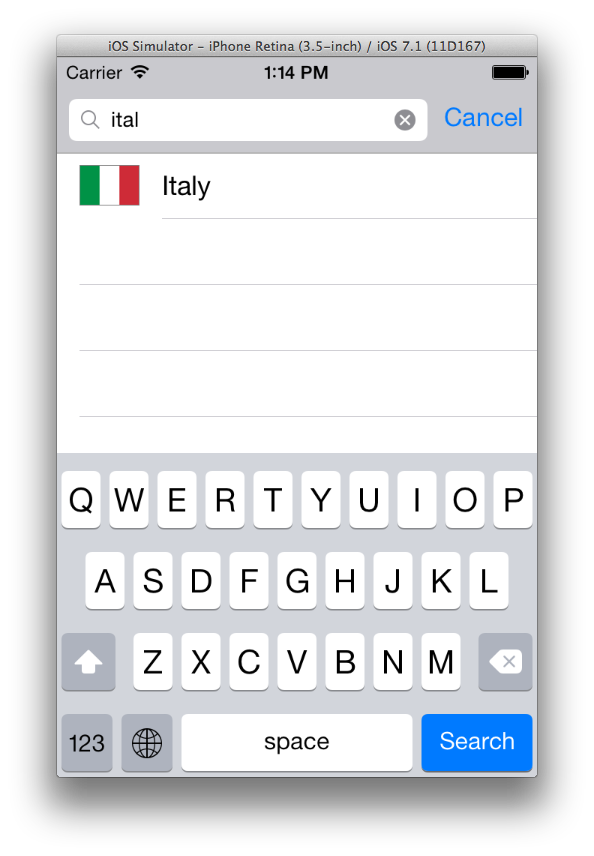
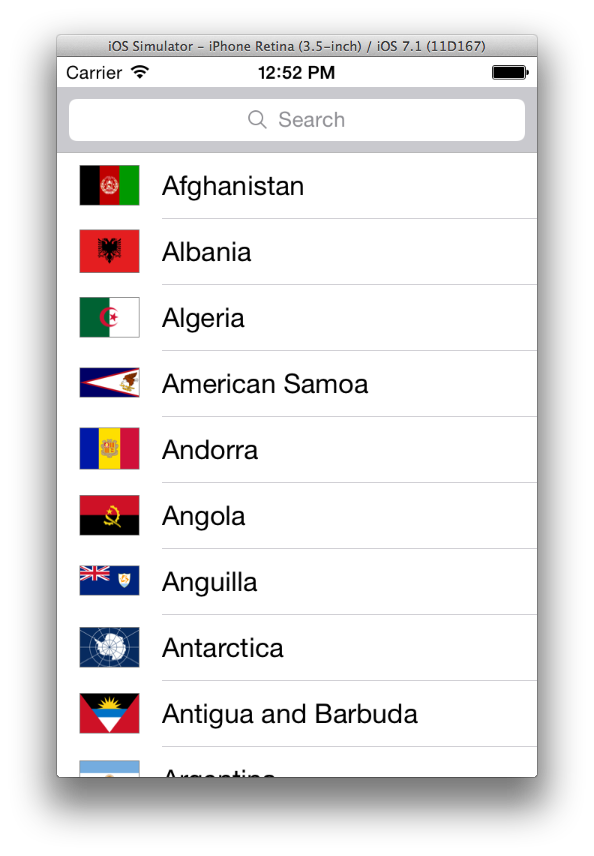
EMCCountryPickerController is a view controller I've built that lets you choose a country from a searchable list that includes all the countries assigned an ISO 3166-1 alpha-2 two-letter country codes.


EMCCountryPickerController is extremely simple to use:
  • It just has to be presented.
  • The user interacts with the user interface and selects a country.
  • The selection is communicated to a delegate, which dismisses the view controller and uses the results.
Comprehensive usage details, as well as a complete demo project, can be found in its GitHub repository.

This component features also has the following additional features:
  • Country name can be localised (some localisations are already provided, such as English and Italian).
  • Flag borders can be drawn and customised.
  • Flags can be optionally turned off.

The controller includes the flag of all the available countries, rasterised from a SVG file in the public domain. The controller is distributed with the BSD 3-clause license.

Installation

Besides grabbing the sources and the resource files from its GitHub repository, the quickest way to use the controller is using CocoaPods and adding a reference to the EMCCountryPickerController pod to your project Podfile:

pod 'EMCCountryPickerController', '~> 1.1'

Enjoy.

Thursday, March 20, 2014

Autoconf Macros to Check for C++11 Features in the Header

C++11 introduces a lot of improvements and new features to the C++ language and the C++ Standard Library. Compilers and libraries are still implementing such features and it is likely your toolchain is still missing some piece, even though the ones I am using (GCC and CLang) are catching up quickly.

While on the one hand the GNU Build System is mostly used to build C projects and an historical lack of C++ macros is suffered, on the other hand there were no C++11 specific macro to check for library compliance.

For this reason, I began writing my own set of macros some weeks ago starting from what I needed at the time: C++11 features in the <functional> header. So far, I have written the following macros which cover all the new C++11 features in that header:

All the macros except AX_CXX_HAVE_PLACEHOLDERS were submitted to the GNU Autoconf Archive some weeks ago and are already available for use: just follow the link on the macro name, download the m4 file and use it. I submitted AX_CXX_HAVE_PLACEHOLDERS this morning and I expect it to be available shortly: I will update this post as soon as this macro has been accepted.

For those who want to contribute to this set of macros, you can check out their GitHub repository.

Monday, March 17, 2014

Shrink Your Time Machine Backups and Free Disk Space

Update: In a newer post, I describe a shell script I published to automate Time Machine backup deletion.

Time Machine is a backup and restore tool from Apple which is very well integrated into OS X. In my personal opinion Time Machine is not yet awesome and its shortcomings often force me to use alternative methods when I need to backup files and folders with certain characteristics.

The most important use case in which I strongly discourage anybody to use Time Machine is the backup of frequently updated big files. Time Machine always copies the whole file because it is not able to transfer only the differences between the previous state of a file and the current one. This fact has many detrimental consequences:
  • Backups are slow.
  • Backups may take a huge amount of disk space.
When I say huge, I mean enormous. Think about a virtual machine disk stored as a file in your disk: if just one bit of that file changes (and you can bet it changes every time you use your virtual machine), Time Machine will perform a copy of the whole file the next time a backup is run.

Fortunately, there exist tools which are able to examine a file and transfer only the difference with a previous stored state, such as rsync, on which you can rely to build your custom backup policies.

Anyway, no matter how Time Machine has eaten up a lot of your disk space, it may come a moment when you really need to free some of it, possibly deleting old backups and shrinking a Time Machine sparse bundle disk image.

Deleting Old Backups

Old backups can be deleted in many ways, the simplest one being the following:
  • Open the Time Machine application when the Finder application is in the foreground.
  • Navigate to the backup to be deleted double clicking on the corresponding position of the ruler on the right side of the screen.
  • Right click with the mouse on the empty space in the Finder.
  • Select Delete Backup.
Time Machine will ask you to introduce the super user password and then it will delete the selected backup.

Unfortunately this method is very clumsy if you need to delete many backups.

Another way is using the tmutil command to perform the deletion. Not only it is simpler, but it will allow you to do it programmatically if you need to. To delete a backup using tmutil you must perform the following operations:
  • Make sure your time machine backup disk is mounted (the simplest way to do it is opening the Time Machine application).
  • The format of the backup folders created by Time Machine is YYYY-MM-DD-HHmmss. If you want to delete a specific backup, you can use the following command:
$ sudo tmutil delete /full/path/to/backup/Backups.backupdb/machine/backup-name

Time Machine currently stores its backups in a folder named after the backed up machine, into the Backups.backupdb folder in the backup disk. This means that, if your machine is called iMac and your backup disk is mounted on /Volumes/Time Machine Backups, then backups will be located in the following folder:

/Volumes/Time Machine Backups/Backups.backupdb/iMac

If you want to delete the 2014-02-02-123411 backup, you must run the following command:

$ sudo tmutil delete /Volumes/Time Machine Backups/Backups.backupdb/iMac/2014-02-02-123411

You can easily make a script, for example, to delete all the backups of a specific month. The following commands will delete all the backups created in January 2014 (lines were split with \):

$ sudo bash
Password:
$ for i in /Volumes/Time\ Machine\ Backups/Backups.backupdb/iMac/2014-01* ; \
  do \
    tmutil delete "$i" ; \
  done

Deleting Backups of Any Machine

The same commands can be used to delete backups performed by any machine, not only the machine you are executing them from. This is particularly useful if your time machine backup disk is located on a NAS (such as Apple's Time Capsule).

In this case, though, you will have to mount the disk image file created for every machine and named after it. Time machine creates sparse bundle disk images which can be mounted using the Disk Utility application:
  • Open the Disk Utility application.
  • Choose the File/Open Disk Image... menu item (⌥⌘O).
  • Choose the disk image file corresponding to the backup disk of the machine whose backups you want to delete.
Disk Utility will mount the disk image and you can now use the commands shown above to delete the time machine backups stored in this disk image.

Freeing Space

Now that you are able to delete backups, you may notice that no disk space is relinquished if a sparse bundle disk image is being used as backup disk, which is the default behaviour when the backup disk is not a locally attached physical disk.

In this case, when Time Machine frees disk space, the space is freed inside the disk image, but unless the disk image itself frees it as well, the result is that no space is relinquished outside of it.

Fortunately, unallocated space can be freed from a sparse bundle using the following command (make sure the disk image is not mounted when executing this command):

$ sudo hdiutil compact /path/to/disk-image
Starting to compact…
Reclaiming free space…
.................................................................................................................................................................................................................
Finishing compaction…
Reclaimed 11.2 GB out of 118.7 GB possible.

As you can see, hdiutil reports the space which has been reclaimed and you should now see the specified amount of space as additional free space in the corresponding disk.

Tuesday, February 25, 2014

Creating an Apple XCode Project Using the GNU Build System (a.k.a. Autotools)

Some posts ago I wrote about two of the best portable C/C++ IDEs, NetBeans and Eclipse CDT, and their support for projects configured and built with the GNU Build System (a.k.a. Autotools). The only shortcoming of these IDEs is the lack of support for Apple frameworks and in another post I showed one possible workaround and provided the ZSH script I use, hosted on GitHub, to automatically create the soft links to include in the C/C++ include paths of your project.

Sometimes, however, it may be desirable to use Apple XCode instead of the aforementioned IDEs. Since there's no native support for the GNU Build System in XCode, some manual configuration must be performed to have XCode use the Makefile (and the other artefacts) generated by autoconf and automake for your project.

In this use case I prefer to maintain the sources completely separated from the XCode project. XCode lets you add references to the source files in a project, so that the physical location of either thing is irrelevant. Moreover, you won't risk polluting the sources with XCode-specific files and adding them by mistake to your source code repository.

Creating the project

First of all, an External Build System project must be created:

Create External Build System project

In the project options window, type the name of the project and your name: since the build is made using your autotools configuration files, these fields are irrelevant and are only used to label the XCode project:

Choose options for the project

Unless you want to use another make binary, you can leave the Build Tool path as is.

After setting up your project options, XCode will ask you the location where your new project must be created.

Configuring the Build Directory

As you know, the sources must be configured with the configure script (created by the GNU Build System) in order for them to be built on a specific platform. Since XCode has no knowledge of this mechanism, you must configure as a build directory a directory where the sources have been configured.

Once again, I prefer configuring the build on a separate directory, instead of doing it directly in the sources folder. This way, I do not pollute the source trees with object files and any other artefact created during configuration and build.

To configure your sources you must perform the following operations:
  • Go to the designated build directory of your XCode project (I usually create the build directory in the project root).
  • Run the configure script from your source root directory:
$ [sources]/configure [opts]

Now, the build directory path must be set into your project configuration:
  • Select the project root node in the Project Navigator pane.
  • Set the build directory in the Directory field, as shown in the following screenshot.

Project build directory

The configuration of the build directory is a one-time task for each target, no matter how many times you reconfigure the build in that folder. If you plan to have more than one kind of build, such as debug build and release builds (each one with different configuration options), just create multiple targets in different build directories (such as build/debug and build/release), each one configured separately. To create a new target in an XCode project, use the File/New/Target menu item.

Adding Sources to the Project

Your new XCode project will be empty and source files must be added to it. To add existing sources to your project you can use the Add files to [project-name] menu item in the File menu or in the contextual menu that appears when you right click over your project root in the Project Navigator pane. Alternatively, you can use the ⌥⌘A shortcut.

In the add files window, choose the files and/or the directories to be added. If you want to, you now have the opportunity to create groups or folder references for any added folders.

Build

Now you are ready to build your sources from XCode using the GNU Build System. And if you wonder where your build output is, in XCode the Log Navigator pane must be used.
Saturday, February 15, 2014

fsw: a File System Event Monitor for OS X and *BSD Systems

A very often demanded feature by many different types of users is the possibility of receiving an event when a change in a specific file or directory occurs. One of the most common way to consume such an event in a UNIX(-like) system would be:
  • Having a command which lets you watch a set of files or directories outputting on standard output a detailed record for each event received.
  • Piping such a process to a shell script that reacts accordingly.

Many UNIX and UNIX-like systems provide kernel facilities, subsystems and programs providing the possibility of receiving file system change events:
  • Silicon Graphic's portable FAM.
  • FreeBSD's kqueue, originated in FreeBSD and available on many *BSD systems.
  • Linux inotify.
  • Apple OS X FSEvents API.

However, unlike Linux (where inotifywatch is available), neither OS X nor kqueue-enabled *BSD systems provide a user-land program for users to take advantage of those APIs. That's why I decided to fill the gap and write a small C++ program: fsw, a shell-friendly file system event notifier for OS X and kqueue-enabled *BSD systems, hosted on GitHub.

fsw

fsw will let you subscribe to file system change events on multiple files or directories:

$ fsw file-0 ... file-n

When a file system event is received, fsw prints a complete record of the event such as

Sat Feb 15 00:26:30 2014 - /full/path/to/file:created renamed modified changeOwner isFile 
Sat Feb 15 00:26:31 2014 - /full/path/to/file:created renamed modified changeOwner xattrMod isFile

that include the following information:
  • The timestamp when the event was received.
  • The full path of the changed file or directory.
  • The list of event flags, describing the type of change that occurred.

Watchers

fsw implements three kind of watchers:
  • A watcher based on the File System Events API, available only on Apple OS X.
  • A watcher based on kqueue, an event notification interface introduced in FreeBSD 4.1 and supported on most *BSD systems (including OS X).
  • The poll watcher, a watcher which periodically stats the file system, saves file modification times in memory and manually calculates file system changes.

The limitations of fsw depend largely on the watcher being used:
  • The FSEvents watcher, available only on Apple OS X, has no known limitations and scales very well with the number of files being observed.
  • The kqueue watcher, available on any *BSD system featuring kqueue, requires a file descriptor to be opened for every file being watched. As a result, this watcher scales badly with the number of files being observed and may begin to misbehave as soon as the fsw process runs out of file descriptors. In this case, fsw dumps one error on standard error for every file that cannot be opened.
  • The poll watcher, available on any platform, only relies on available CPU and memory to perform its task. The performance of this watcher degrades linearly with the number of files being watched.

Recommendations

  • On OS X, use only the FSEvents watcher.
  • If the number of files to observe is sufficiently small, use the kqueue watcher. Beware that on some systems the maximum number of file descriptors that can be opened by a process is set to a very low value (values as low as 256 are not uncommon), even if the operating system may allow a much larger value. In this case, check your OS documentation to raise this limit on either a per process or a system-wide basis.
  • If feasible, watch directories instead of watching files.
  • If none of the above applies, use the poll watcher. The authors' experience indicates that fsw requires approximately 150 MB or RAM memory to observe a hierarchy of 500.000 files with a minimum path length of 32 characters. A common bottleneck of the poll watcher is disk access, since stat()-ing a great number of files may take a huge amount of time. In this case, the latency should be set to a sufficiently large value in order to reduce the performance degradation that may result from frequent disk access.

Configuring the Latency

Events are passed to the watching process via a callback and every callback call pass an array of events. When creating the event stream, a latency is specified and it defines how many seconds d (a double value) elapse between a callback invocation and another. fsw lets users specify the desired latency using the -l/--latency options:

$ fsw -l 5 .

In this case, fsw receives change events every 5 seconds.

Other Options

fsw currently supports the following options:
  • -f, --format-time: Print the event time using the specified format.
  • -h, --help: Show this message.
  • -k, --kqueue: Use the kqueue watcher.
  • -l, --latency=DOUBLE: Set the latency.
  • -n, --numeric: Print numeric event mask.
  • -p, --poll: Use the poll watcher.
  • -r, --recursive: Recurse subdirectories.
  • -t, --time-format: Print the event time using the specified format.
  • -u, --utc-time: Print the event time as UTC time.
  • -v, --verbose: Verbose output.

Installing fsw

fsw is a C++ project using the GNU Build System and can be installed on any supported system (OS X, v. >= 10.6 or any *BSD system supported kqueue).

Regular users should download a release tarball, uncompress it, configure it and build it:

$ ./configure
$ make

If you're a developer and have the GNU Build System installed on your machine, you can clone the git repository to get the sources:

$ git clone https://github.com/emcrisostomo/fsw.git

Then, cd into fsw directory, bootstrap the GNU Build System, configure it and build it:

$ ./autogen.sh
$ ./configure
$ make

Finally, no matter you used a release tarball or the repository sources, you can install it system-wide to /usr/local by running the following command:

$ sudo make install

If you cannot install it on /usr/local or you just prefer to install it on a private directory, you can use the following command instead:

$ DESTDIR=/installation/path make install

Documentation

fsw ships with a detailed man page you can consulting using the following command:

$ man fsw

Getting Help or Giving Feedback

If you experience some issues or simply want to give your feedback, please contact me.