When I started having the need of decoding JSON Web Tokens quite often, I felt the urge of writing a program that allowed me to do it quickly. There are excellent options, such as jwt.io, but as soon as you need to do this operation often it becomes clumsy. And if you need to process multiple tokens, or further process the output, it becomes a necessity.
That's why I wrote a little shell script that allows you to do just that. jwt-decode will accept a list of tokens as arguments and will decode them on standard output. The syntax is the following:
$ jwt-decode token ...
{
"alg": "RS256",
"typ": "JWT",
"kid": "sbS_BWBm0GzfIQRnYWolcWDRnjqwDTY_Aq6Fn_boqKM"
}
{
"jti": "271151a3-db11-4f37-a724-4cf9957774f4",
"exp": 1530979706,
"nbf": 0,
"iat": 1523117306,
"iss": "https://domain.com/auth/realms/realm",
"aud": "app-name",
"sub": "5132c417-d772-420e-b5db-401ea633dca1",
"typ": "Bearer",
"azp": "app",
"auth_time": 0,
"session_state": "84e6a759-e54d-4fd7-9fcf-bb51131aab89",
"acr": "1",
"allowed-origins": [
""
],
"realm_access": {
"roles": [
"role0",
"role1",
"role2"
]
},
"resource_access": {
"account": {
"roles": [
"manage-account",
"manage-account-links",
"view-profile"
]
}
},
"custom-property": "1797"
}
...
You can find jwt-cli on GitHub.
Saturday, April 14, 2018


Monday, January 1, 2018
tm-cleanup.sh: A Shell Script to Delete Old Time Machine Backups Now Features an Interactive Interface
More than two years ago I wrote tm-cleanup.sh, a shell script to delete Time Machine backups. During this time it has proven very useful to me, and it's been serving its purpose as it is, with barely any modification at all.
However, I've been asked for help and clarifications quite a number of times by non-tech-savvy users who had some issues using the CLI. For this reason I thought that adding an interactive, dialog-based interface to this script may help people "visualise" what's going on when running tm-cleanup.sh.
The new interface has been added in v. 2.0.0, and can be opened by simply issuing the following command with no options:
$ sudo tm-cleanup.sh
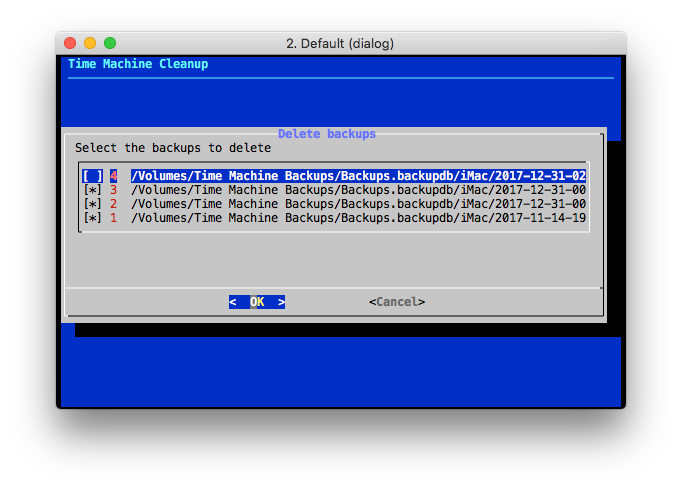
The interactive interface opens a menu where the backup deletion operation can be triggered. The user is then presented the list of existing Time Machine backups and they can be individually selected and then deleted. Here's a screenshot of the interface showing the existing backups:
The documentation of the repository describes in detail both interfaces. I hope people will find it useful.
However, I've been asked for help and clarifications quite a number of times by non-tech-savvy users who had some issues using the CLI. For this reason I thought that adding an interactive, dialog-based interface to this script may help people "visualise" what's going on when running tm-cleanup.sh.
The new interface has been added in v. 2.0.0, and can be opened by simply issuing the following command with no options:
$ sudo tm-cleanup.sh
The interactive interface opens a menu where the backup deletion operation can be triggered. The user is then presented the list of existing Time Machine backups and they can be individually selected and then deleted. Here's a screenshot of the interface showing the existing backups:
The documentation of the repository describes in detail both interfaces. I hope people will find it useful.
Thursday, December 21, 2017
Starting an Emacs Daemon Automatically and Transparently using ZSH
If GNU Emacs is one of your editors of choice, then you may want to consider running Emacs as a server. Using an Emacs server is very convenient, especially if you open many Emacs processes (as it happens when the EDITOR variable is set to emacs in your shell). The reasons why you would use an Emacs server are manifold, and the most important are:
- Using an Emacs server results in a great increase in speed and responsiveness of Emacs.
- The fact that sharing the same Emacs process implies sharing buffers, command history, and many other information.
Starting an Emacs Server
An Emacs server can be started in two ways:- Running Emacs as a daemon, using the --daemon option:
$ emacs --daemon
- By launching it from inside an Emacs process using the server-start function:
M-x server-start
Once an Emacs server is running, you can use the emacsclient program to tell a running Emacs server to visit a file. The server and the client are quite sophisticated, and you can use them for example to connect a client to a server running on a remote machine. Most of the time, however, you'll be running the daemon and the client on the same host.
A question I get often is: how to start the server if it's not running and then connect to it? I've seen a lot of solutions to this problem, and probably one of the commonest is starting an Emacs server at login, and then using emacsclient to connect to it.
There's a fundamental thing I don't like about it: it's not transparent. However, since it's a very common approach, I'll quickly document how it's accomplished on macOS.
A question I get often is: how to start the server if it's not running and then connect to it? I've seen a lot of solutions to this problem, and probably one of the commonest is starting an Emacs server at login, and then using emacsclient to connect to it.
There's a fundamental thing I don't like about it: it's not transparent. However, since it's a very common approach, I'll quickly document how it's accomplished on macOS.
Starting an Emacs Daemon on macOS at Login
The canonical way to start a process when a user logs in on macOS is using launchd. launchd is the "system wide and per-user daemon/agent manager" and it "manages processes, both for the system as a whole and for individual users" (launchd(8) man page). The processes to be started at user login are called launch agents and are defined in plist files in the ~/Library/LaunchAgents directory.
The easiest way to start an Emacs server, then, is to launch emacs with the --daemon option. The corresponding launch agent file is the following:
Note: the emacs path and the UserName element must contain correct values for your system.
Once the launch agent descriptor has been created, it can be loaded using the following command:
# launchctl load -w /Library/LaunchAgents/gnu.emacs.daemon.plist
This solution is fine, but it has two major disadvantages: it requires a configuration, and the configuration is non-portable.
Fortunately, this is very easy to accomplish with emacsclient and ZSH:
Once the launch agent descriptor has been created, it can be loaded using the following command:
# launchctl load -w /Library/LaunchAgents/gnu.emacs.daemon.plist
This solution is fine, but it has two major disadvantages: it requires a configuration, and the configuration is non-portable.
Starting an Emacs Daemon On-Demand and Transparently
A simpler and portable solution (provided you're using ZSH) is leveraging emacsclient's ability to start a daemon if none is found in a ZSH function. Instead of having to explicitly use emacsclient after a server has been started, wouldn't it be nice to always use the same command, start a server if none is running, and connect to it transparently? Assuming we can do that, why not just calling this command emacs?Fortunately, this is very easy to accomplish with emacsclient and ZSH:
- emacsclient is able to start an Emacs daemon if none is running using the -a option with an empty argument.
- emacsclient can be invoked without a file name when the -c option is used, in which case a new frame showing the *scratch* buffer is created, mimicking emacs behaviour.
- ZSH lets us easily create "aliases on steroids" using a function such as the following:
Now, every time you invoke emacs in ZSH, the shell will run the emacs() function instead, which will run emacsclient -c -a= and will forward all its arguments to it.
When using an Emacs daemon there are some things to take into account. And that's what the official documentation is for. I will only say that since you are now sharing a single Emacs process, its frames and its buffers, you may now want to use C-x # when done with a buffer (or C-x C-k). This way you will kill the buffer and it won't be left hanging around.
When using an Emacs daemon there are some things to take into account. And that's what the official documentation is for. I will only say that since you are now sharing a single Emacs process, its frames and its buffers, you may now want to use C-x # when done with a buffer (or C-x C-k). This way you will kill the buffer and it won't be left hanging around.
Monday, November 27, 2017
Installing macOS High Sierra from Scratch: Not So Good a User Experience
One week ago a MacBook Pro of a relative of mine stopped booting. The symptoms indicated a hard disk failure, and the diagnosis confirmed it. I ordered a replacement drive on Amazon and I decided to allocate 30 minutes of a bright Saturday morning to fix it. The procedure should have been very simple:
- Create a bootable image of the latest macOS (High Sierra).
- In the meantime, swap the hard disk in the MacBook Pro (a procedure that hardly takes more than 10 minutes on a MacBook with a serviceable hard disk drive such as this one).
- Boot from an external device.
- Launch the installation.
- Go out and run.
Unfortunately, it took at least twice the estimated time and three macOS installation attempts.
Attempt 1: Launching the macOS Installer
The MacBook Pro booted the base system correctly from the external device, but when I launched the installer, it failed with the following message:
This copy of the Install macOS High Sierra.app application is damaged and can't be used to install macOS.
A quick search confirmed that this error frequently appears since macOS Sierra and the workarounds I found are quite imaginative. Apparently, many people thinks the installer is actually broken and are trying to download it again. Fortunately, it didn't take that much time to fix the problem. A post on the Apple website described the same problem (although on Sierra) and its solution (after several calls to Apple customer support, according to the author): deleting the ./Contents/SharedSupport/InstallInfo.plist from the bootable image should do the trick. And it did.
Attempt 2: Launching the macOS Installer
The second attempt looked promising: the installer now launched correctly. Unfortunately, it failed on the second screen with the following message:
The recovery server could not be contacted.
The first thing I do in these cases is open a terminal and perform basic checks. The second check I made caught the problem: the system was reporting January, 1st 2001 as the current date. Therefore, most probably, the HTTPS connection to the recovery server was failing because the certificate check was failing (chances are the validity period of that certificate appeared to be in the future).
I fixed the date using the date command and restarted the macOS installer.
Attempt 3: Finding the Hard Disk Drive
The installer was now working, but it couldn't find any disk to install the system. I quitted the installer (for the third time) and opened Disk Utility. To my surprise, Disk Utility couldn't find any internal disk either. Again, a quick search confirmed the obvious: High Sierra's Disk Utility doesn't recognise unformatted internal drives. I opened the terminal again in order to quickly format the drive:
- First of all, confirm the disk is available and its device name:
$ diskutil list
/dev/disk0 (internal, physical):
[...snip...]
- Then, format it to make it available to Disk Utility:
$ diskutil eraseDisk JHFS+ NewDisk GPT disk0
Disk Utility could now see the device. I reformatted it using APFS, restarted the installer again and this time the I successfully made it to the end of the installation.
Final Thoughts
I never needed to reinstall OS X or macOS on any of the three computers I owned in the last 10 years: this was the first macOS installation from scratch I performed in a very long time. However, the three errors I experienced have three characteristics in common which make this experience unsettling:
- They are obscure and difficult to troubleshoot. I bet most non-tech-savvy user would have to ask for help.
- They have been known for years.
- They are, or seem to be, easily solvable. The date problem, for instance: why wouldn't an installer which requires a working Internet connection not synchronise the current time using NTP?
Come on Apple, you can do better than this.
Saturday, November 18, 2017
Making Native Language Support (NLS) and gettext Optional
I've decided to write this blog post after noticing how many people were asking me to make gettext optional when building fswatch. At the beginning I actually thought it was optional. And I never dug any deeper into the matter because, apparently, everybody experiencing this problem was building fswatch from the repository sources instead of building it from a release tar-ball. I would typically answer to build the release tar-ball instead and I would hear no more complaints.
Making gettext optional is easy, and should be a best practice when writing a piece of software. However, I've seen so many questions in the Internet about this topic that I've decided to write a blog post where I would outline the reasons why you should do it and how you should do it using the GNU Autotools.
The Autotools are not required by end users. The scripts generated by the Autotools are fully independent from them. These script are then bundled with the sources (in a distribution) which is often called a release tar-ball.
As you can see, the goal of the Autotools is making users' life simple, not maintainers'. In fact, maintainers need to have the Autotools components they use in order to generate a distribution. These are the sources you typically find in a package repository such as fswatch. That's why you don't find any configure script in the source repository: it's created when a release is created and a distribution is packaged.
Perhaps not surprisingly, GNU gettext is one of the components software authors may use conditionally. configure would then check the build environment to detect the availability of all the required gettext components and enable Native Language Support (NLS) if all checks succeed.
It goes without saying that the maintainers do need gettext installed in their machines in order to be able to use these macros, to create the configuration scripts and to create a package distribution.
All the other Makefile fragments required to use gettext, such as defining the LOCALEDIR to load catalog files and linking against libintl, do not need to be modified. Even if always adding @LTLIBINTL@ to LDADD may seem odd at first, the Autoconf output variable LTLIBINTL is documented to expand to an empty string when NLS is not being used.
# Prepare gettext-related symbols used by programs
AM_CPPFLAGS += -DLOCALEDIR=\"$(localedir)\"
# Link program against libintl if gettext is being used
prog_LDADD += @LTLIBINTL@
Making gettext optional is easy, and should be a best practice when writing a piece of software. However, I've seen so many questions in the Internet about this topic that I've decided to write a blog post where I would outline the reasons why you should do it and how you should do it using the GNU Autotools.
So, What's the Issue With Building From Repository Sources?
Actually there's no issue. But probably many people asking that question don't know how the Autotools work. Autoconf is a tool whose goal is producing scripts (the ubiquitous configure script) that configure the source code before building it to adapt it to the characteristics of the current system. In a typical flow the user does nothing but running configure. The script will run and will test for the presence of all the features requested by the author. The presence of a feature, or its lack thereof, can then be used to parametrise Makefiles, or more generally, be used to conditionally drive the execution of other tests or scripts.The Autotools are not required by end users. The scripts generated by the Autotools are fully independent from them. These script are then bundled with the sources (in a distribution) which is often called a release tar-ball.
As you can see, the goal of the Autotools is making users' life simple, not maintainers'. In fact, maintainers need to have the Autotools components they use in order to generate a distribution. These are the sources you typically find in a package repository such as fswatch. That's why you don't find any configure script in the source repository: it's created when a release is created and a distribution is packaged.
Perhaps not surprisingly, GNU gettext is one of the components software authors may use conditionally. configure would then check the build environment to detect the availability of all the required gettext components and enable Native Language Support (NLS) if all checks succeed.
What's Special About Gettext?
This Autotools overview doesn't explain, though, what's the issue about gettext. If it's just one of the many configuration checks performed by configure, what's the relationship with the Autotools and the repository sources? The answer is that gettext provides a tight integration with the Autotools, in the form of ready to use Autoconf and Automake macros to support the gettext operations during a normal workflow, such as:- Extracting strings from sources.
- Creating template files (POT files).
- Creating translation files (PO files).
- Updating template files.
- Merging changes into translation files.
- Compiling translation files into message catalogs.
- Shipping required files in a distribution.
- Installing message catalogs.
It goes without saying that the maintainers do need gettext installed in their machines in order to be able to use these macros, to create the configuration scripts and to create a package distribution.
Making gettext Optional
To make gettext optional, we have to perform at least these operations in the Autoconf configuration file (configure.ac):- Use the AM_GNU_GETTEXT macro to check whether NLS should be used. If it should be used, the USE_NLS variable would be set to yes.
- Create an Automake conditional to propagate this information to the Makefiles, perhaps using something in the lines of:
AM_GNU_GETTEXT([external])
AM_GNU_GETTEXT_VERSION([0.19.4])
AM_CONDITIONAL([USE_NLS], [test "x${USE_NLS}" = "xyes"])
AM_GNU_GETTEXT_VERSION([0.19.4])
AM_CONDITIONAL([USE_NLS], [test "x${USE_NLS}" = "xyes"])
In the Makefiles, we have to leverage these information to:
- Conditionally distribute NLS-related files such as ABOUT-NLS:
if USE_NLS
dist_doc_DATA += ABOUT-NLS
endif
dist_doc_DATA += ABOUT-NLS
endif
- Conditionally execute NLS-related targets. What I typically do is segregating all NLS-related stuff in a directory (po) which is conditionally processed by the Makefile:
if USE_NLS
PO_SUBDIR = po
endif
SUBDIRS = other_paths $(PO_SUBDIR)
# Prepare gettext-related symbols used by programs
AM_CPPFLAGS += -DLOCALEDIR=\"$(localedir)\"
# Link program against libintl if gettext is being used
prog_LDADD += @LTLIBINTL@
Conclusion
This is all that's required to make gettext optional in your Autotools package. With these few changes, users will now be able to let configure automatically determine whether to enable or disable NLS, and even disabling it using the --disable-nls option:
$ ./configure --disable-nls
Saturday, May 2, 2015
A Shell Script to Delete Old Time Machine Backups and Free Disk Space
In another post I described the procedure to manually delete Time Machine snapshots and optionally shrink the disk image (in case a sparse bundle is being used) in order to free up disk space.
I have written a shell script, tm-cleanup.sh, to automate the backup deletion. The script accepts an optional argument to specify the maximum backup age in days: older backups are deleted (by default, backups older than 30 days are deleted).
The latest version of the script can be obtained by cloning its GitHub repository and, optionally, run its installation script to create symbolic links to it into /usr/local/bin:
$ sudo make install
I have written a shell script, tm-cleanup.sh, to automate the backup deletion. The script accepts an optional argument to specify the maximum backup age in days: older backups are deleted (by default, backups older than 30 days are deleted).
The latest version of the script can be obtained by cloning its GitHub repository and, optionally, run its installation script to create symbolic links to it into /usr/local/bin:
$ sudo make install
Friday, October 17, 2014
Installing Drupal on FreeBSD
Drupal ports have been available on FreeBSD since quite a long time, and binary packages can be installed very quickly. However, manual setup is required to connect Drupal to the database and have Apache serve the Drupal website. In this post I'll describe the setup procedure of Drupal 7 on FreeBSD 10.0. The process will not be very different if different versions of Drupal or FreeBSD are used.
# pkg search drupal
drupal6-6.31
[...snip...]
drupal7-7.31
[...snip...]
Unless there is a compelling reason not to do so, install the latest one:
# pkg install drupal7
To successfully run Drupal, you need:
The Drupal port, however, does not enforce these dependencies, so that you have to satisfy them manually.
# pkg install apache24
Once the port is installed, enable the corresponding service adding the following line to /etc/rc.conf:
apache24_enable="YES"
Since the Drupal port by default defines the MYSQL option, when you install the binary package using pkg you'll also get a MySQL client port, such as what I got at the time of writing:
mysql55-client-5.5.40
As a consequence, you have to install the matching mysqlXX-server port:
# pkg install mysql55-server-5.5.40
If you try to install a different version (at the time of writing mysql56 is available), you may be requested to remove Drupal itself because of the inter-dependencies between the client and server MySQL packages.
Once MySQL is installed, enable the corresponding service adding the following line to /etc/rc.conf:
mysql_enable="YES"
# pkg search mod_php
mod_php5-5.4.33_1,1
mod_php55-5.5.17_1
mod_php56-5.6.1
Since the port depends on php5, then mod_php5-5.4.33_1,1 should be installed:
# pkg install mod_php5-5.4.33_1,1
The port takes care of modifying the Apache HTTP Server configuration file so that the PHP module is loaded. If you did not install the packages in order suggested by this post, then you may have lost that piece of configuration. In any case, make sure a line similar to the following is present in /usr/local/etc/apache24/httpd.conf:
LoadModule php5_module libexec/apache24/libphp5.so
# pkg install drush
# mysql -u root
Welcome to the MySQL monitor. Commands end with ; or \g.
[...snip...]
mysql> set password for root@localhost=PASSWORD('your-password')
mysql> exit
Bye
Once the password is set, you can try to reconnect (in italic bold the variables whose name should be changed with your values of choice):
# mysql -u root -p
Enter password:
Welcome to the MySQL monitor. Commands end with ; or \g.
[...snip...]
mysql> create database drupal_database_name;
mysql> create user 'drupal_user'@'localhost' identified by 'password';
mysql> grant all privileges on drupal_database_name.* to 'drupal_user'@'localhost' with grant option;
mysql> flush privileges;
The modules required to run Drupal are mod_rewrite and the PHP module. The latter was configured automatically by the PHP module port, and the latter can be configured uncommenting the following line from /usr/local/etc/apache24/httpd.conf:
LoadModule rewrite_module libexec/apache24/mod_rewrite.so
The cleanest way to segregate the Drupal configuration is creating a virtual host for it. An additional advantage of this approach is that Drupal will be served from the root path (/) and you won't need to use any rewrite rule to achieve the same result. Assuming the host name and the port where Drupal will be published is drupal.host.name:80, then create a file in /usr/local/etc/apache24/Includes named drupal.conf and define the skeleton of the virtual host:
<VirtualHost *:80>
ServerName drupal.host.name
# Drupal directory configuration placeholder
ErrorLog ${APACHE_LOG_DIR}/drupal-error.log
LogLevel warn
CustomLog ${APACHE_LOG_DIR}/drupal-access.log combined
</VirtualHost>
In the default configuration of Apache in FreeBSD, any .conf file in this directory is included automatically, so that no additional code is required to add the virtual host to the web server configuration. In this fragment I've used an environment variable (${APACHE_LOG_DIR}) to separate some server configuration variables that could be reused in external scripts. To define environment variables, a .env file must be created in /usr/local/etc/apache24/envvars.d such as:
The Drupal directory fragment defines the DocumentRoot of the virtual host and some of the required options:
DocumentRoot /usr/local/www/drupal7
<Directory "/usr/local/www/drupal7">
Options Indexes FollowSymLinks
AllowOverride All
Require all granted
</Directory>
The option AllowOverride set to All is required so that .htaccess files shipped with Drupal are taken into account by the Apache HTTP Server. In this fragment, the path of the Drupal installation directory of the FreeBSD port is used. If you installed Drupal using alternative methods (such as drush), update the path accordingly.
The complete virtual host configuration file is:
Finally, the Apache HTTP Server must be instructed to execute the PHP code contained in PHP pages and to do so we need to add a MIME/type for them adding the following line in httpd.conf:
<IfModule mime_module>
# Content has been trimmed
# Add MIME type for PHP
AddType application/x-httpd-php .php
</IfModule>
Once all the settings are in place, Apache can be restarted and you can point your browser to http://drupal.host.name/ where the Drupal installation wizard will welcome you and will require you to input the database configuration and other Drupal website settings.
To restart the Apache HTTP Server, the following command can be used:
# service apache24 restart
Depending on your proxy settings, different values may be used.
Beware that although Drupal itself (Core) supports a proxy, many third-party modules still do not. One notable exception at the time of writing is the reCaptcha module which will not work without a direct Internet connection.
Installing Drupal
Drupal ports are available on FreeBSD and, in fact, multiple versions are available:# pkg search drupal
drupal6-6.31
[...snip...]
drupal7-7.31
[...snip...]
Unless there is a compelling reason not to do so, install the latest one:
# pkg install drupal7
To successfully run Drupal, you need:
- The Apache HTTP Server.
- PHP.
- A supported database server (PostgreSQL or MySQL).
The Drupal port, however, does not enforce these dependencies, so that you have to satisfy them manually.
Installing the Apache HTTP Server
Unless there is a compelling reason not to do so, install the latest available Apache port (apache24 at the time of writing):# pkg install apache24
Once the port is installed, enable the corresponding service adding the following line to /etc/rc.conf:
apache24_enable="YES"
Installing the Database
Drupal supports both PostgreSQL and MySQL but the Drupal port does not install any, by default, although it installs the MySQL client utilities. In this post MySQL will be used but if you prefer using PostgreSQL instead, just skip this section and read this article instead.Since the Drupal port by default defines the MYSQL option, when you install the binary package using pkg you'll also get a MySQL client port, such as what I got at the time of writing:
mysql55-client-5.5.40
As a consequence, you have to install the matching mysqlXX-server port:
# pkg install mysql55-server-5.5.40
If you try to install a different version (at the time of writing mysql56 is available), you may be requested to remove Drupal itself because of the inter-dependencies between the client and server MySQL packages.
Once MySQL is installed, enable the corresponding service adding the following line to /etc/rc.conf:
mysql_enable="YES"
Installing PHP
The installation of PHP is taken care of by the Drupal port. However, the PHP module for the Apache HTTP Server is not installed and must be installed manually. Make sure you install the PHP module that corresponds with the PHP version installed by the Drupal port. At the time of writing, the following modules are available:# pkg search mod_php
mod_php5-5.4.33_1,1
mod_php55-5.5.17_1
mod_php56-5.6.1
Since the port depends on php5, then mod_php5-5.4.33_1,1 should be installed:
# pkg install mod_php5-5.4.33_1,1
The port takes care of modifying the Apache HTTP Server configuration file so that the PHP module is loaded. If you did not install the packages in order suggested by this post, then you may have lost that piece of configuration. In any case, make sure a line similar to the following is present in /usr/local/etc/apache24/httpd.conf:
LoadModule php5_module libexec/apache24/libphp5.so
Installing drush
drush is an optional package offering an amazingly good command line interface to perform many Drupal-related management tasks: drush could even be used to install Drupal, but this topic is not covered by this post, since I prefer relying on a port tested specifically on FreeBSD. However, once you have tested that a specific release works correctly, you may find drush very useful to streamline your installations. If you are interested in using drush, you will find plenty of good information on the Internet. To install drush, the following command may be used:# pkg install drush
Creating a Database for Drupal
A database for Drupal must be created in the DB server installed in the previous section. The MySQL port sets no password for the root user connecting from localhost; for this reason, setting its password is recommended (in bold the text input by the user):# mysql -u root
Welcome to the MySQL monitor. Commands end with ; or \g.
[...snip...]
mysql> set password for root@localhost=PASSWORD('your-password')
mysql> exit
Bye
Once the password is set, you can try to reconnect (in italic bold the variables whose name should be changed with your values of choice):
# mysql -u root -p
Enter password:
Welcome to the MySQL monitor. Commands end with ; or \g.
[...snip...]
mysql> create database drupal_database_name;
mysql> create user 'drupal_user'@'localhost' identified by 'password';
mysql> grant all privileges on drupal_database_name.* to 'drupal_user'@'localhost' with grant option;
mysql> flush privileges;
Configuring the Apache HTTP Server
Now that everything is in place, we can configure the web server so that it starts serving the Drupal web application. The tasks to perform are the following- Configuring the required modules.
- Configuring a virtual host to serve Drupal.
- Configuring a MIME/type for PHP.
The modules required to run Drupal are mod_rewrite and the PHP module. The latter was configured automatically by the PHP module port, and the latter can be configured uncommenting the following line from /usr/local/etc/apache24/httpd.conf:
LoadModule rewrite_module libexec/apache24/mod_rewrite.so
The cleanest way to segregate the Drupal configuration is creating a virtual host for it. An additional advantage of this approach is that Drupal will be served from the root path (/) and you won't need to use any rewrite rule to achieve the same result. Assuming the host name and the port where Drupal will be published is drupal.host.name:80, then create a file in /usr/local/etc/apache24/Includes named drupal.conf and define the skeleton of the virtual host:
<VirtualHost *:80>
ServerName drupal.host.name
# Drupal directory configuration placeholder
ErrorLog ${APACHE_LOG_DIR}/drupal-error.log
LogLevel warn
CustomLog ${APACHE_LOG_DIR}/drupal-access.log combined
</VirtualHost>
In the default configuration of Apache in FreeBSD, any .conf file in this directory is included automatically, so that no additional code is required to add the virtual host to the web server configuration. In this fragment I've used an environment variable (${APACHE_LOG_DIR}) to separate some server configuration variables that could be reused in external scripts. To define environment variables, a .env file must be created in /usr/local/etc/apache24/envvars.d such as:
The Drupal directory fragment defines the DocumentRoot of the virtual host and some of the required options:
DocumentRoot /usr/local/www/drupal7
<Directory "/usr/local/www/drupal7">
Options Indexes FollowSymLinks
AllowOverride All
Require all granted
</Directory>
The option AllowOverride set to All is required so that .htaccess files shipped with Drupal are taken into account by the Apache HTTP Server. In this fragment, the path of the Drupal installation directory of the FreeBSD port is used. If you installed Drupal using alternative methods (such as drush), update the path accordingly.
The complete virtual host configuration file is:
Finally, the Apache HTTP Server must be instructed to execute the PHP code contained in PHP pages and to do so we need to add a MIME/type for them adding the following line in httpd.conf:
<IfModule mime_module>
# Content has been trimmed
# Add MIME type for PHP
AddType application/x-httpd-php .php
</IfModule>
Once all the settings are in place, Apache can be restarted and you can point your browser to http://drupal.host.name/ where the Drupal installation wizard will welcome you and will require you to input the database configuration and other Drupal website settings.
To restart the Apache HTTP Server, the following command can be used:
# service apache24 restart
Configuring Drupal behind a Proxy Server
Machines connecting to enterprise network often are not connected directly to the Internet but require the use of a web proxy server instead. Drupal can be configured to use a web proxy server by setting the following variables in ${DRUPAL_HOME}/sites/default/settings.php. If this file does not exist, copy the file default.settings.php (shipped with Drupal) into settings.php. The configuration variable that enable proxy support are the following:Depending on your proxy settings, different values may be used.
Beware that although Drupal itself (Core) supports a proxy, many third-party modules still do not. One notable exception at the time of writing is the reCaptcha module which will not work without a direct Internet connection.
Setting Up Clean URLs
Last but not least, clean URLs support may be enabled. Drupal performs a sanity check and will not allow you to enable the Clean URLs feature if the test does not pass. However, I have found plenty of false negatives when running Drupal 7 on FreeBSD: if the Clean URL test fails in your installation, try checking if clean URLs are working and use the workaround described in the official Drupal documentation and forcibly enable Clean URLs.Saturday, September 27, 2014
fswatch 1.4.5 - Release Notes
fswatch 1.4.5 has been released.
New features and bug fixes added since v. 1.4.0 are:
New features and bug fixes added since v. 1.4.0 are:
- Add custom record formats.
- Localize fswatch and libfswatch using GNU gettext.
- Add Italian (it) localization.
- Add Spanish (es) localization.
- Fix Makefile.am because of broken link when DESTDIR installs are performed.
- Fix bug in fswatch-run wrapper script for ZSH which caused last argument not to be split when passed to xargs.
- Add batch marker feature to delimit the boundaries of a batch of events.
- Add Texinfo documentation.
- libfswatch API is now versioned.
- Improved Autoconf checks.
- The inotify monitor now waits for events and honours the latency settings.
- Automaticaly generate the ChangeLog using Git.
- Update autogen.sh to honour some commonly used environment variables.
- The inotify monitor now provides the same functionality provided by all the other monitors.
- Recursive directory monitoring is now implemented.
- Version and revision is now determined dynamically from Git by ancillary scripts invoked by the GNU Build System.
- fswatch does not compile on OS X < 10.9 because some required C++11 classes are not supported by the C++ runtime.
- fswatch does not compile on OS X < 10.9 because some required C++11 classes are not supported by the C++ runtime.
- The libfswatch library has been added with bindings for C and C++.
- fswatch let users specify the monitor to use by name.
Thursday, August 21, 2014
fswatch 1.4.0 - Release Notes
fswatch 1.4.0 has been released bringing few but important updates:
I hope you enjoy using fswatch as much as I enjoy writing it.
- Monitor implementations are found at runtime so no more hardcoded options to choose a specific monitor (the plugging mechanism still needs improvements).
- The fswatch engine has been moved to a separate library called libfswatch with bindings for C and C++. If you need to use the functionality of fswatch from your program, now it's very easy to do. The library and its headers are distributed in the same fswatch bundle.
- On OS X fswatch can now be installed from either MacPorts and Homebrew (see README for more information).
I hope you enjoy using fswatch as much as I enjoy writing it.
Tuesday, August 19, 2014
Writing a MacPorts Portfile (and Testing It on a Local Repository)
As a MacPorts user, it is maybe funny that fswatch is available on Homebrew and not on MacPorts. Today I put an end to this idiosyncrasy of mine and submitted my first MacPorts port file.
I was pleasantly surprised to discover that, although a deceiving initial impression, setting up my first port file was way easier than I first believed. Furthermore, the MacPorts guys have been very supportive and provided many insights that helped me improve the port file and my understanding of the MacPorts port system (beyond what is described in the nice MacPorts Guide).
$ ./configure
$ make
$ make install
is typically very simple, since these two operations are performed out of the box by the Configure, Build and Destroot phases of a port installation life cycle.
In this case, the basic Portfile includes:
In this example you can see how the download URL is split in two pieces: the master_sites and the distfiles (or distnames). The rationale behind this choice is the fact that a package may typically be hosted by multiple master sites (such as mirrors).
In this example, distfiles is specified. This variable contains the full distribution file name, including the suffix (the file extension). By default this value is set to ${distname}${extract.suffix}. You may as well define the distname (which defaults to ${name}-${version}) and the extract.suffix separately. These parameters, in the example above, are redundant, since they simply set the corresponding default value (and use_zip is used as a shortcut to set extract.suffix and other variables related to processing zip files).
Many of the aforementioned configuration variables are inferred by a much simpler GitHub configuration such as:
github.setup emcrisostomo fswatch 1.3.9
github.tarball_from releases
This expands to:
$ port lint --nitpick fswatch
---> Verifying Portfile for fswatch
---> 0 errors and 0 warnings found.
In the example above the fswatch Portfile passes verification with no errors nor warnings. Be sure to check your Portfile before submitting it to the MacPorts repository.
Adding a Portfile to a local repository is very simple:
If you have not done it yet, you have to configure MacPorts to use your local repository, adding a line in $MACPORTS_HOME/etc/macports/sources.conf:
file:///ports
right above any other repository so that ports in the local one take precedence over ports in the public repository.
If everything is setup correctly, you will be able to query and install ports from your local repository.
I was pleasantly surprised to discover that, although a deceiving initial impression, setting up my first port file was way easier than I first believed. Furthermore, the MacPorts guys have been very supportive and provided many insights that helped me improve the port file and my understanding of the MacPorts port system (beyond what is described in the nice MacPorts Guide).
The Basic Portfile
The basic Portfile for a source tarball generated by the GNU Build System, that is a package which is built and installed with the now classic:$ ./configure
$ make
$ make install
is typically very simple, since these two operations are performed out of the box by the Configure, Build and Destroot phases of a port installation life cycle.
In this case, the basic Portfile includes:
- The modeline (optional).
- The Subversion ID tag: placeholder string automatically expanded by the MacPorts infrastructure.
- The PortSystem line: required by all ports.
- The port name and version: many other port variables (including the source tarball name) depend on these values.
- The category line: one or more port categories.
- The platform: darwin most of the times.
- The maintainers.
- The short and long description.
- The homepage.
- The download URLs.
- The checksums (used to verify the integrity of the downloaded files).
- The dependencies (optional).
- The configure arguments (optional).
A fully working, basic port is the following:
In this example you can see how the download URL is split in two pieces: the master_sites and the distfiles (or distnames). The rationale behind this choice is the fact that a package may typically be hosted by multiple master sites (such as mirrors).
In this example, distfiles is specified. This variable contains the full distribution file name, including the suffix (the file extension). By default this value is set to ${distname}${extract.suffix}. You may as well define the distname (which defaults to ${name}-${version}) and the extract.suffix separately. These parameters, in the example above, are redundant, since they simply set the corresponding default value (and use_zip is used as a shortcut to set extract.suffix and other variables related to processing zip files).
A Portfile for a GitHub-Hosted Project
fswatch, such as many other projects nowadays, is hosted at GitHub. Although not yet documented on the MacPorts Guide, a recently added PortGroup called github greatly simplifies the Portfile for such projects. The only existing documentation, at the moment, is this port group source code.Many of the aforementioned configuration variables are inferred by a much simpler GitHub configuration such as:
github.setup emcrisostomo fswatch 1.3.9
github.tarball_from releases
This expands to:
- name is set as the GitHub project name (fswatch in this case).
- version is set as the GitHub version tag (1.3.9 in this case).
- The download URL and the distribution file name is inferred from the repository configuration and the corresponding release URL. If the distribution file name is different than the default (${name}-${version}) then you still have to configure it as described in the previous section.
Checking Your Portfile
The port utility can check whether a Portfile conforms to the MacPorts guidelines using the lint command:$ port lint --nitpick fswatch
---> Verifying Portfile for fswatch
---> 0 errors and 0 warnings found.
In the example above the fswatch Portfile passes verification with no errors nor warnings. Be sure to check your Portfile before submitting it to the MacPorts repository.
Testing Your Portfile With a Local Repository
You can test and store your Portfiles in a local repository before submitting them to a public repository in a private repository. Furthermore, you can take advantage of the MacPorts package management features to maintain your own local packages.Adding a Portfile to a local repository is very simple:
- Create the local repository directory somewhere (if it does not exist).
- Create a subdirectory (if it does not exist) named after the primary category of the port you are adding.
- Create a subdirectory named after the port.
- Move the Portfile into this directory.
- Make sure the user macports has sufficient privileges to read the repository (I usually give him ownership of the port directory).
- Update the port repository indexes running portindex from the repository root.
If you have not done it yet, you have to configure MacPorts to use your local repository, adding a line in $MACPORTS_HOME/etc/macports/sources.conf:
file:///ports
right above any other repository so that ports in the local one take precedence over ports in the public repository.
If everything is setup correctly, you will be able to query and install ports from your local repository.
Further Readings
A basic Portfile such as what I described in this blog post is just the beginning: we only scratched the surface of what MacPorts can offer you. If you want to get further information about MacPorts and the facilities it provides (either from an user or a developer standpoint), start from the MacPorts Guide.Public Domain Flags Archive (in Vector Image Format)
Some time ago, when I was implementing the EMCCountryPickerController component I described in some earlier posts (such as this one), I soon realised I needed high quality images of the flags of all the countries listed in the ISO 3166-1 standard. And since the EMCCountryPickerController library is GPL-licensed, I needed images whose license was compatible with it in order to distribute them together with the component.
I found decent collections of flags in the internet but at the end I decided to build my own, especially in order to overcome problems that arose from the limited resolution of many image collections.
I picked the flags from Wikimedia Commons since they're available in SVG format (a widely used vector image format). This way, if I need to, I can render a flag at any resolution.
I then assembled a GitHub repository where you can find:
The following is a shell script that can be used to render the flags archive at the desired widths.
The script requires librsvg to be installed.
I found decent collections of flags in the internet but at the end I decided to build my own, especially in order to overcome problems that arose from the limited resolution of many image collections.
I picked the flags from Wikimedia Commons since they're available in SVG format (a widely used vector image format). This way, if I need to, I can render a flag at any resolution.
I then assembled a GitHub repository where you can find:
- All the flags in SVG format.
- All the flags in PNG format scaled to a width of 256 pixels.
- All the flags in PNG format, scaled to a width of 512 pixels.
The following is a shell script that can be used to render the flags archive at the desired widths.
The script requires librsvg to be installed.
Friday, June 20, 2014
Installing Logstash v 1.4 (and Greater) on FreeBSD
In a previous post I described how to install Logstash (v. 1.3 and previous) on FreeBSD and in this post I will describe how to install Logstash v. 1.4 and greater.
Until version 1.3 included, Logstash was distributed as a single JAR file, and when version 1.4 was released a new packaging style was introduced. As a consequence, new instructions are required to properly setup Logstash in FreeBSD and registering it as a service. Further information about the new distribution layout can be found in the Logstash release notes.
As seen in the previous post, a Logstash FreeBSD port exists, but it is currently outdated since it bundles Logstash v. 1.2. But while this could be used as a starting point for JAR-based Logstash installations (as we have seen, the update process only required updating the Logstash JAR), this is not possible with the new Logstash distribution because the included rc script will fail to work.
Edit: I've managed to patch the broken Logstash dependency and I'm waiting for the pull request to be merged upstream. In the meantime you can use an updated FreeBSD port I've created to install Logstash on FreeBSD 10.
Edit: The Logstash port has been updated and I'm the new maintainer. Also, the pull request solving a JRuby bug on FreeBSD has been merged to upstream and will hopefully hit a Logstash release soon.
Skimming through the original post is recommended because it provides general information about Logstash and FreeBSD which is required to properly plan and execute a Logstash setup.
# pkg install openjdk
Currently, this command will install an instance of OpenJDK v. 7 in both FreeBSD 9 and 10. If you'd rather install a different version, you can search the available packages and pick the one you prefer (command output has been filtered for brevity):
# pkg search openjdk
openjdk-7.60.19,1
openjdk6-b31_3,1
openjdk8-8.5.13_7
# pkg install openjdk8-8.5.13_7
Although simpler from the standpoint of the configuration, Logstash installations using separate ElasticSearch instances are out of the scope of this post.
: ${logstash14_enable="NO"}
If everything works, you can enable the Logstash service just adding the following line to /etc/rc.conf:
logstash14_enable="YES"
Until version 1.3 included, Logstash was distributed as a single JAR file, and when version 1.4 was released a new packaging style was introduced. As a consequence, new instructions are required to properly setup Logstash in FreeBSD and registering it as a service. Further information about the new distribution layout can be found in the Logstash release notes.
As seen in the previous post, a Logstash FreeBSD port exists, but it is currently outdated since it bundles Logstash v. 1.2. But while this could be used as a starting point for JAR-based Logstash installations (as we have seen, the update process only required updating the Logstash JAR), this is not possible with the new Logstash distribution because the included rc script will fail to work.
Edit: I've managed to patch the broken Logstash dependency and I'm waiting for the pull request to be merged upstream. In the meantime you can use an updated FreeBSD port I've created to install Logstash on FreeBSD 10.
Edit: The Logstash port has been updated and I'm the new maintainer. Also, the pull request solving a JRuby bug on FreeBSD has been merged to upstream and will hopefully hit a Logstash release soon.
Skimming through the original post is recommended because it provides general information about Logstash and FreeBSD which is required to properly plan and execute a Logstash setup.
Prerequisites
The essential prerequisites required to execute Logstash are:- A working Java runtime environment.
- An ElasticSearch instance.
Installing Java
To install OpenJDK on FreeBSD you can use pkg to install a ready-to-use binary package:# pkg install openjdk
Currently, this command will install an instance of OpenJDK v. 7 in both FreeBSD 9 and 10. If you'd rather install a different version, you can search the available packages and pick the one you prefer (command output has been filtered for brevity):
# pkg search openjdk
openjdk-7.60.19,1
openjdk6-b31_3,1
openjdk8-8.5.13_7
# pkg install openjdk8-8.5.13_7
Installing ElasticSearch
Logstash includes an embedded ElasticSearch instance you can use for standalone installations (see my previous post for an introductory view on Logstash operation modes). The required configuration to bootstrap the embedded ElasticSearch instance and to have Logstash use it as its outputs is described in the following sections.Although simpler from the standpoint of the configuration, Logstash installations using separate ElasticSearch instances are out of the scope of this post.
Installing Logstash
Logstash installation procedure is fairly simple since it is distributed as a tarball:- Download Logstash from the official website.
- Extract the tarball in the designated installation directory (my personal suggestion is to avoid /usr/local because it is used by ports and to use /opt instead).
Creating an rc.d Script
An rc.d script is required in a BSD system to register a service, define its configuration and have the rc framework manage its lifetime. The following script can be used as is or as a starting point to customise your own. If used as is, be aware that the script uses the following default values:- Installation directory: ${logstash14_home="/opt/logstash-1.4.1"}
- Configuration file path: ${logstash14_config="/usr/local/etc/${name}/${name}.conf"}
- ElasticSearch data directory: ${logstash14_elastic_datadir="/var/db/logstash14"}
- Java home: ${logstash14_java_home="/usr/local/openjdk6"}
You can override any of the supported configuration values in the /etc/rc.conf file. If, for example, you want to use an alternate Java home path, just add the following line to /etc/rc.conf setting the desired value:
logstash14_java_home="/usr/local/openjdk7"
# service logstash14 onestart
To stop it, use:
# service logstash14 onestop
To help troubleshooting any problem you might find you can enable the Logstash log, setting the logstash14_log variable to YES in the /etc/rc.conf file:
logstash14_log="YES"
The log file location is specified by the logstash14_log_file variable, whose default value is set by the service rc file (only the relevant lines are shown):
name=logstash14
logdir="/var/log"
: ${logstash14_log_file="${logdir}/${name}.log"}
The log file location can be overridden setting the logstash14_log_file variable in the /etc/rc.conf file.
Note that the rc script described above does not enable the Logstash service:logstash14_java_home="/usr/local/openjdk7"
Testing the Service
To test the Logstash service, the following command can be used:# service logstash14 onestart
To stop it, use:
# service logstash14 onestop
To help troubleshooting any problem you might find you can enable the Logstash log, setting the logstash14_log variable to YES in the /etc/rc.conf file:
logstash14_log="YES"
The log file location is specified by the logstash14_log_file variable, whose default value is set by the service rc file (only the relevant lines are shown):
name=logstash14
logdir="/var/log"
: ${logstash14_log_file="${logdir}/${name}.log"}
The log file location can be overridden setting the logstash14_log_file variable in the /etc/rc.conf file.
Enabling the Service
: ${logstash14_enable="NO"}
If everything works, you can enable the Logstash service just adding the following line to /etc/rc.conf:
logstash14_enable="YES"
Wednesday, June 18, 2014
Pkg Update Fails in FreeBSD 9.2 Because of a Python Setuptools Conflict
Today I launched pkg to upgrade some binary packages installed in a FreeBSD 9.2 instance but suddenly pkg failed complaining about a locally installed python package (py27-setuptools-2.0.1) conflicting with the version required by it. The error began with the following statement, followed by a long list of repetitions of the same warning message:
WARNING: locally installed py27-setuptools-2.0.1 conflicts on /usr/local/bin/easy_install with:
- py27-setuptools27-2.0.1
All the software in this box was installed using pkg binary packages, so that at first this error sounded really strange to me.
Even though you use pkg to simplify package installations instead of compiling software from the ports collection, there is a file you should be aware of, especially if you are experiencing installation problems:
/usr/ports/UPDATING
This file contains important information about the update procedure and since binary packages are built from the port tree, the information applies even when installing with pkg.
A quick search starting from approximately the date of the last update of the affected machine pointed me in the right direction:
20140307:
AFFECTS: users of devel/py-setuptools dependent ports
AUTHOR: sunpoet@FreeBSD.org
devel/py-setuptools is being used for every python ports (if USE_PYDISTUTILS
defined) since r336553. Due to PKGORIGIN limitation, we cannot build one
python port with python27 and the other with python33 since they require
different setuptools versions which have same PKGORIGIN. With the addition
of py-setuptools{27,32,33}, we could now have py27-foo and py33-bar coexist
in one system.
[...]
The suggested solution for pkg users is:
# pkg set -o devel/py-setuptools:devel/py-setuptoolsXX
where XX is the affected Python version. After running
# pkg set -o devel/py-setuptools:devel/py-setuptools27
pkg upgrade went fine and the problem was solved.
WARNING: locally installed py27-setuptools-2.0.1 conflicts on /usr/local/bin/easy_install with:
- py27-setuptools27-2.0.1
All the software in this box was installed using pkg binary packages, so that at first this error sounded really strange to me.
Even though you use pkg to simplify package installations instead of compiling software from the ports collection, there is a file you should be aware of, especially if you are experiencing installation problems:
/usr/ports/UPDATING
This file contains important information about the update procedure and since binary packages are built from the port tree, the information applies even when installing with pkg.
A quick search starting from approximately the date of the last update of the affected machine pointed me in the right direction:
20140307:
AFFECTS: users of devel/py-setuptools dependent ports
AUTHOR: sunpoet@FreeBSD.org
devel/py-setuptools is being used for every python ports (if USE_PYDISTUTILS
defined) since r336553. Due to PKGORIGIN limitation, we cannot build one
python port with python27 and the other with python33 since they require
different setuptools versions which have same PKGORIGIN. With the addition
of py-setuptools{27,32,33}, we could now have py27-foo and py33-bar coexist
in one system.
[...]
The suggested solution for pkg users is:
# pkg set -o devel/py-setuptools:devel/py-setuptoolsXX
where XX is the affected Python version. After running
# pkg set -o devel/py-setuptools:devel/py-setuptools27
pkg upgrade went fine and the problem was solved.
Monday, June 16, 2014
NSControlTextEditingDelegate Methods Are Not Called on a the Delegate of a View-Based NSTableView
I was developing a OS X Cocoa application and the time came to validate the text input by the user while editing cells of an NSTableView. My Cocoa-fu immediately suggested me to take advantage of the NSControlTextEditingDelegate protocol that specifies the following two methods to hook exactly where I need to:
These two protocol methods are invoked on the delegate object. Everyday's Interface Builder outlet connection stuff, I thought, unaware I'd lose the rest of the day trying to have those method called. I then selected the text field in the editable column whose editing I wanted to be notified of:

Then I selected the Connection Inspector and connected the delegate outlet to the target object:

Finally, I implemented the two aforementioned methods on the delegate object, ran the application and... nothing happened!
I revised the documentation, outlets and the code over and over again, but I could not detect the problem. Then I noticed that I was not the only one struggling with this issue, although no solution was provided.
To make a long story short, the documentation I checked seemed confirmed the it should have worked, until I found especially after reading an official Apple Technical Q&A, number QA1551, titled Detecting the start and end edit sessions of a cell in NSTableView, stating the following:
So, you should not set the editable field delegate but the table one! Fortunately, that was easy to change. I removed the connection to the delegate outlet in the text field and set the table one instead. I started the application and... nothing happened again!
At this point I felt at a loss and started to wonder whether some code in my application was interfering with the editing notification path. I created a new Cocoa application and quickly replicated the solution suggested in the Apple documentation but the result was the same: the delegate methods were not being called.
In fact, after some of tests I reached the following conclusions:
I suspected that the aforementioned Apple Technical Q&A QA1551 document only considers the case of cell-based tables despite its date of publication: view-based tables were introduced in OS X 10.6, shipped two months before this document was issued. To dispel my doubts I decided to experiment with both kinds of table and found the behaviour described above, one for each different kind of table.
Nevertheless, and even though I dedicated a lot of time to skimming through the documentation, I was unable to find a mention of this issue in any other guide, API documentation or technical article from Apple. Even the very good Table View Programming Guide for Mac makes no mention of this "peculiarity" despite being a fairly common use case.
I hope this post helps anybody falling into the same trap to quickly solve his issues with getting NSControlTextEditingDelegate notifications to his table delegate.
- control:textShouldBeginEditing:
- control:textShouldEndEditing:
These two protocol methods are invoked on the delegate object. Everyday's Interface Builder outlet connection stuff, I thought, unaware I'd lose the rest of the day trying to have those method called. I then selected the text field in the editable column whose editing I wanted to be notified of:
Then I selected the Connection Inspector and connected the delegate outlet to the target object:
Finally, I implemented the two aforementioned methods on the delegate object, ran the application and... nothing happened!
The Official Documentation
I'll won't tell about the frustration I felt trying to do one of the simplest and most paradigmatic tasks in Cocoa programming: setting a delegate and implementing the corresponding protocol. Suffice it to say, I felt like I had some evident bug in front my eyes but could not notice it. Not immediately, not after a cup of tea or two, not after a hour diving into the documentation I could find.I revised the documentation, outlets and the code over and over again, but I could not detect the problem. Then I noticed that I was not the only one struggling with this issue, although no solution was provided.
To make a long story short, the documentation I checked seemed confirmed the it should have worked, until I found especially after reading an official Apple Technical Q&A, number QA1551, titled Detecting the start and end edit sessions of a cell in NSTableView, stating the following:
A: How do I detect start and end edit sessions of a cell in NSTableView?
In order to detect when a user is about to start and end an edit session of a cell in NSTableView, you need to be set as the delegate of that table and implement the following NSControl delegate methods:- (BOOL)control:(NSControl *)control textShouldBeginEditing:(NSText *)fieldEditor;
- (BOOL)control:(NSControl *)control textShouldEndEditing:(NSText *)fieldEditor;The table forwards the delegate message it is getting from the text view on to your delegate object using the control:textShouldEndEditing: method. This way your delegate can be informed of which control the text view field editor is acting on its behalf.
So, you should not set the editable field delegate but the table one! Fortunately, that was easy to change. I removed the connection to the delegate outlet in the text field and set the table one instead. I started the application and... nothing happened again!
At this point I felt at a loss and started to wonder whether some code in my application was interfering with the editing notification path. I created a new Cocoa application and quickly replicated the solution suggested in the Apple documentation but the result was the same: the delegate methods were not being called.
The Solution
The solution was simple, and fortunately not very different from what a Cocoa programmer expects: setting a delegate and implementing a protocol. But while the protocol was the correct one (NSControlTextEditingDelegate), the delegate was not. Better yet: they were not.In fact, after some of tests I reached the following conclusions:
- A cell-based NSTableView instance works as expected: setting the table delegate causes the NSControlTextEditingDelegate protocol methods to be invoked on it.
- A view-based NSTableView instance (such as mine and almost surely most of the new NSTableView instances out there) required both the table and the field delegates to be set for the NSControlTextEditingDelegate protocol methods to be invoked.
I suspected that the aforementioned Apple Technical Q&A QA1551 document only considers the case of cell-based tables despite its date of publication: view-based tables were introduced in OS X 10.6, shipped two months before this document was issued. To dispel my doubts I decided to experiment with both kinds of table and found the behaviour described above, one for each different kind of table.
Nevertheless, and even though I dedicated a lot of time to skimming through the documentation, I was unable to find a mention of this issue in any other guide, API documentation or technical article from Apple. Even the very good Table View Programming Guide for Mac makes no mention of this "peculiarity" despite being a fairly common use case.
I hope this post helps anybody falling into the same trap to quickly solve his issues with getting NSControlTextEditingDelegate notifications to his table delegate.
Thursday, June 5, 2014
EMCCountryPickerController v. 1.3.0 Has Been Released
EMCCountryPickerController v. 1.3.0 has been released bringing the possibility of resizing the flags shown in the table cells automatically resizing the cell height.
Here is a screenshot showing flags resized to fit in a square of size 20:
 |
| Custom Flag Size - Sized to Fit into 20x20 |
and here is a screenshot showing flags resized to fit in a square of size 80:
 |
| Custom Flag Size - Sized to Fit into 80x80 |
To set the desired flag size, just use the controller's flagSize property:
countryPicker.flagSize = 80;
You can get the latest version using CocoaPods, by adding a dependency to your Podfile:
pod 'EMCCountryPickerController' ~> '1.0'
If you are already using EMCCountryPickerController, then you just need to update your pod repository index:
$ pod repo update
and then and update your outdated project dependencies running this command in the project root directory:
$ pod update
Enjoy.
pod 'EMCCountryPickerController' ~> '1.0'
If you are already using EMCCountryPickerController, then you just need to update your pod repository index:
$ pod repo update
and then and update your outdated project dependencies running this command in the project root directory:
$ pod update
Enjoy.
Monday, June 2, 2014
OS X: Creating Packages from the Command Line - Tutorial and a Makefile - Part II
In the previous part of this tutorial we examined how pkgbuild and productbuild are used to build component packages and product archives. We also saw how hdiutil can be used to create a DMG image file to nicely package and distribute your product archive.
Although simple, the procedure is somewhat tedious: lot of typing, three different commands (four or more if we include building), lots of different paths and a many options. All of which, in a precise order, in order to satisfy the dependencies of each commands and to make sure the archives are updated whenever some component file changes.
Exactly what a Makefile is for!
$ xcodebuild install
If this is not the case, just update the relevant action to run the build from the correct directory.
Let's start writing the Makefile in a top-down fashion. Let's add a default all target depending on anything else:
.PHONY : all
all : $(DISTDIR) $(DEPSDIR) $(PRODUCT) $(DMGFILE)
$(DISTDIR) and $(DEPSDIR) are created by the Makefile since we assume it is the Makefile that populates them:
$(DISTDIR) :
mkdir $(DISTDIR)
$(DEPSDIR) :
mkdir $(DEPSDIR)
$(PRODUCT), the product archive, depends on:
$(PRODUCT) : $(BINARIES) $(REQUIREMENTS) \
$(DEPENDENCY) $(COMPONENT_PFILE) \
$(COMPONENT) $(DISTRIBUTION_FILE)
productbuild --distribution $(DISTRIBUTION_FILE) \
--resources . \
--package-path $(DEPSDIR) \
--package-path $(DEPENDENCYDIR) \
$(PRODUCT)
The $(BINARIES) are usually compiled and installed with xcodebuild:
$(BINARIES) :
xcodebuild install
The component package property list file, $(COMPONENT_PFILE), must be created beforehand as seen in the previous post. Let's emit a meaningful error if it is missing referring to a target we will examine later on.
$(COMPONENT_PFILE) :
@echo "Error: Missing component pfile."
@echo "Create a component pfile with make compfiles."
@exit 1
The main component package $(COMPONENT) depends on the binaries $(BINARIES) and the component property list file $(COMPONENT_PFILE) and it must be created with pkgbuild, as seen in the previous part of this tutorial:
$(COMPONENT) : $(BINARIES) $(COMPONENT_PFILE)
pkgbuild --root $(BINARIES) \
--component-plist $(COMPONENT_PFILE) \
$(COMPONENT)
The distribution file $(DISTRIBUTION_FILE), as in the case of $(COMPONENT_PFILE), must be created beforehand. We will emit a meaningful error if it missing referring to a target we will examine later on:
$(DISTRIBUTION_FILE) :
@echo "Error: Missing distribution file."
@echo "Create a distribution file with make distfiles."
@exit 1
Now the Makefile is functional except for one detail: who is going to create the two required property list files $(COMPONENT_PFILE) and $(DISTRIBUTION_FILE)? We have seen in the previous part of this tutorial that both pkgbuild and productbuild can be run in an analysis mode which analyses their input and creates an initial descriptor. We will add two targets to the Makefile that will provide the user a quick way to get initial versions of the required descriptors:
.PHONY : distfiles
distfiles : $(COMPONENT)
productbuild --synthesize \
--product $(REQUIREMENTS) \
--package $(DEPENDENCY) \
--package $(COMPONENT) \
$(DISTRIBUTION_FILE).new
@echo "Edit the $(DISTRIBUTION_FILE).new template to create a suitable $(DISTRIBUTION_FILE) file."
.PHONY : compfiles
compfiles : $(BINARIES)
pkgbuild --analyze \
--root $(BINARIES) \
$(COMPONENT_PFILE).new
@echo "Edit the $(COMPONENT_PFILE).new template to create a suitable $(COMPONENT_PFILE) file."
Note that in the distfiles target the $(DEPENDENCY) variable is used as argument of the --package option. As explained earlier, you have to either add as many "dependency variables" as required by your product archive, or remove it altogether if the product archive only contains one component package, $(COMPONENT).
The files created by both the distfiles and the compfiles targets must be manually edited by the user and moved to their expected name by removing the .new extension.
Finally, let's add some targets to perform some housekeeping:
.PHONY : clean
clean :
-rm -f $(DMGFILE) $(PRODUCT) $(COMPONENT)
-rm -rf $(BINARIES)
.PHONY : distclean
distclean :
-rm -f $(DISTRIBUTION_FILE) $(DISTRIBUTION_FILE).new
.PHONY : compclean
compclean :
-rm -f $(COMPONENT_PFILE) $(COMPONENT_PFILE).new
This is the typical variable definition block I use at the top of this kind of Makefiles:
PROGRAM = Name
DISTDIR = ./dist
DEPSDIR = ./deps
BINARIES = /tmp/Name.dst
DMGFILE = $(PROGRAM).dmg
PRODUCT = $(DISTDIR)/$(PROGRAM).pkg
COMPONENT = $(DEPSDIR)/$(PROGRAM)Component.pkg
COMPONENT_PFILE = $(PROGRAM).plist
DISTRIBUTION_FILE = distribution.dist
REQUIREMENTS = requirements.plist
PROGRAM is a shared fragment which is typically set to the XCode project name. The DMG file name DMGFILE, the product archive name PRODUCT and the binary installation directory BINARIES are all initialised using this prefix. If want to customise any of these names or adjust any path to your needs, just modify accordingly the corresponding variable.
$ make
If everything works correctly, you will find a DMG file image in your execution directory containing your product archive.
Although simple, the procedure is somewhat tedious: lot of typing, three different commands (four or more if we include building), lots of different paths and a many options. All of which, in a precise order, in order to satisfy the dependencies of each commands and to make sure the archives are updated whenever some component file changes.
Exactly what a Makefile is for!
A Makefile to build a Product Archive
All the steps described in the previous part of this tutorial can be automated with a proper Makefile. The Makefile we are going to create is basic, but can be used as a starting point to provide your project a set of ready to go and easy to use make targets to package it into a product archive and distribute it into a DMG file. This Makefile assumes that it is located into your XCode project root directory so that project binaries can be built and installed using$ xcodebuild install
If this is not the case, just update the relevant action to run the build from the correct directory.
Let's start writing the Makefile in a top-down fashion. Let's add a default all target depending on anything else:
- $(DISTDIR) is the source folder for the DMG file, where the product archive will be stored.
- $(DEPSDIR) is an ancillary folder used to store directory. You can add more than one if component packages are stored in multiple folders, or remove it altogether if your product archive will be made up of a single component package.
- $(PRODUCT) is the product archive.
- $(DMGFILE) is the DMG image file creating from the source folder $(DISTDIR).
.PHONY : all
all : $(DISTDIR) $(DEPSDIR) $(PRODUCT) $(DMGFILE)
$(DISTDIR) and $(DEPSDIR) are created by the Makefile since we assume it is the Makefile that populates them:
$(DISTDIR) :
mkdir $(DISTDIR)
$(DEPSDIR) :
mkdir $(DEPSDIR)
$(PRODUCT), the product archive, depends on:
- $(BINARIES), the main component binaries.
- $(DEPENDENCY), a placeholder for the dependencies, a set of component packages to add to the product archive. If you have multiple dependencies, you will create multiple entries of this kind. You could omit this entry altogether, since productbuild would fail if a required component package is missing, but I think it is preferable to have make fail because of a missing target dependency.
- $(COMPONENT_PFILE), the component package property list file.
- $(COMPONENT), the component package.
- $(DISTRIBUTION_FILE), the distribution file.
- $(REQUIREMENTS), the requirements file.
$(PRODUCT) : $(BINARIES) $(REQUIREMENTS) \
$(DEPENDENCY) $(COMPONENT_PFILE) \
$(COMPONENT) $(DISTRIBUTION_FILE)
productbuild --distribution $(DISTRIBUTION_FILE) \
--resources . \
--package-path $(DEPSDIR) \
--package-path $(DEPENDENCYDIR) \
$(PRODUCT)
The $(BINARIES) are usually compiled and installed with xcodebuild:
$(BINARIES) :
xcodebuild install
The component package property list file, $(COMPONENT_PFILE), must be created beforehand as seen in the previous post. Let's emit a meaningful error if it is missing referring to a target we will examine later on.
$(COMPONENT_PFILE) :
@echo "Error: Missing component pfile."
@echo "Create a component pfile with make compfiles."
@exit 1
The main component package $(COMPONENT) depends on the binaries $(BINARIES) and the component property list file $(COMPONENT_PFILE) and it must be created with pkgbuild, as seen in the previous part of this tutorial:
$(COMPONENT) : $(BINARIES) $(COMPONENT_PFILE)
pkgbuild --root $(BINARIES) \
--component-plist $(COMPONENT_PFILE) \
$(COMPONENT)
The distribution file $(DISTRIBUTION_FILE), as in the case of $(COMPONENT_PFILE), must be created beforehand. We will emit a meaningful error if it missing referring to a target we will examine later on:
$(DISTRIBUTION_FILE) :
@echo "Error: Missing distribution file."
@echo "Create a distribution file with make distfiles."
@exit 1
Now the Makefile is functional except for one detail: who is going to create the two required property list files $(COMPONENT_PFILE) and $(DISTRIBUTION_FILE)? We have seen in the previous part of this tutorial that both pkgbuild and productbuild can be run in an analysis mode which analyses their input and creates an initial descriptor. We will add two targets to the Makefile that will provide the user a quick way to get initial versions of the required descriptors:
.PHONY : distfiles
distfiles : $(COMPONENT)
productbuild --synthesize \
--product $(REQUIREMENTS) \
--package $(DEPENDENCY) \
--package $(COMPONENT) \
$(DISTRIBUTION_FILE).new
@echo "Edit the $(DISTRIBUTION_FILE).new template to create a suitable $(DISTRIBUTION_FILE) file."
.PHONY : compfiles
compfiles : $(BINARIES)
pkgbuild --analyze \
--root $(BINARIES) \
$(COMPONENT_PFILE).new
@echo "Edit the $(COMPONENT_PFILE).new template to create a suitable $(COMPONENT_PFILE) file."
Note that in the distfiles target the $(DEPENDENCY) variable is used as argument of the --package option. As explained earlier, you have to either add as many "dependency variables" as required by your product archive, or remove it altogether if the product archive only contains one component package, $(COMPONENT).
The files created by both the distfiles and the compfiles targets must be manually edited by the user and moved to their expected name by removing the .new extension.
Finally, let's add some targets to perform some housekeeping:
- clean, to remove the DMG file and all the packages.
- distclean, to remove the distribution files.
- compclean, to remove the component file.
.PHONY : clean
clean :
-rm -f $(DMGFILE) $(PRODUCT) $(COMPONENT)
-rm -rf $(BINARIES)
.PHONY : distclean
distclean :
-rm -f $(DISTRIBUTION_FILE) $(DISTRIBUTION_FILE).new
.PHONY : compclean
compclean :
-rm -f $(COMPONENT_PFILE) $(COMPONENT_PFILE).new
Populate the Variables
So far, we have used Makefile variables in our targets and actions in order to decouple the basic Makefile structure from the details of a specific project. Now, variables must be populated for the Makefile to work in every specific project.This is the typical variable definition block I use at the top of this kind of Makefiles:
PROGRAM = Name
DISTDIR = ./dist
DEPSDIR = ./deps
BINARIES = /tmp/Name.dst
DMGFILE = $(PROGRAM).dmg
PRODUCT = $(DISTDIR)/$(PROGRAM).pkg
COMPONENT = $(DEPSDIR)/$(PROGRAM)Component.pkg
COMPONENT_PFILE = $(PROGRAM).plist
DISTRIBUTION_FILE = distribution.dist
REQUIREMENTS = requirements.plist
PROGRAM is a shared fragment which is typically set to the XCode project name. The DMG file name DMGFILE, the product archive name PRODUCT and the binary installation directory BINARIES are all initialised using this prefix. If want to customise any of these names or adjust any path to your needs, just modify accordingly the corresponding variable.
Use It
The default Makefile target, all, can be executed by simply invoking$ make
If everything works correctly, you will find a DMG file image in your execution directory containing your product archive.
Conclusion
In this tutorial we have covered the basic tasks every OS X developer should master in order to build product packages for his own projects. Furthermore, the skeleton of a Makefile performing all the required operations has been provided. This is only the beginning of the work of creating an installer, since most of an installer properties and requirements must be manually set by the developer. However, the tedious part of building component packages and creating product packages can be automated in a relatively simple Makefile that I hope it will be useful to many of you.
Subscribe to:
Posts (Atom)